Pihole
You first need to free port 53 on the Pi :
sudo nano /etc/systemd/resolved.conf[Resolve]
DNS=1.1.1.1
FallbackDNS=1.0.0.1
#Domains=
#DNSSEC=no
#DNSOverTLS=no
#MulticastDNS=yes
#LLMNR=yes
#Cache=yes
#DNSStubListener=yes
#DNSStubListenerExtra=
#ReadEtcHosts=yes
#ResolveUnicastSingleLabel=no
DNSStubListener=nosudo ln -sf /run/systemd/resolve/resolv.conf /etc/resolv.confsudo reboot nowThen create ./Pihole/etc-pihole/ and ./Pihole/etc-dnsmasq.d/
Now you can Install Pi-hole
---
version: '3.3'
services:
  pihole:
    container_name: pihole
    hostname: piholehostname # the name you want in the GUI.
    image: pihole/pihole:latest
    ports:
      - 53:53/tcp #DNS Port
      - 53:53/udp #DNS Port
      #- 67:67/udp #DHCP Port
      - 83:80/tcp #Dashboard Port
      #- 443:443/tcp #Port 443 is to provide a sinkhole for ads that use SSL.
    environment:
      TZ: Europe/Paris
      WEBPASSWORD: xxxxxx
      DNS1: "192.168.1.1.1.185#5335" # this is my unbound, but you can put any other DNS you want
      DNS2: 1.0.0.1
      DNSSEC: 'true'
    volumes:
      - /srv/path/Files/Pihole/etc-pihole/:/etc/pihole/
      - /srv/path/Files/Pihole/etc-dnsmasq.d/:/etc/dnsmasq.d/
    cap_add:
      - NET_ADMIN
    restart: always
Enter your modem settings and set your DNS to your pihole's host address.
You might want to restart your modem / router.
To undo the changes :
Edit /etc/systemd/resolved.conf
sudo nano /etc/systemd/resolved.confComment out DNS=, FallbackDNS= and DNSStubListener=no
Remove the /etc/resolv.conf symbolic link:
sudo rm /etc/resolv.confReboot.
HOW TO UPDATE
Optional if previously installed with portainer.
Create a docker-compose file with the configuration above.
Starting your pihole is then just a matter of running the following in the directory of your docker-compose.yml...
docker-compose up -dTo update to a newer version, (when a new update/container is available):
docker pull pihole/pihole

docker-compose down

docker-compose up -d
Blocklists:
- https://firebog.net
- https://beaconsandwich.co.uk/2020/05/03/shut-your-pi-hole/
- https://oisd.nl
- https://avoidthehack.com/best-pihole-blocklists
- https://github.com/topics/pihole-ads-list
See also : unbound + pihole
Make Pi-hole your primary DHCP Server
This step is optional if you can configure your router to use another device as the DNS server. In my case, my router did not allow me to change the DNS server, therefore I had to take the high road and use Pi-hole as the DHCP server in my network.
What is DHCP?
Dynamic Host Configuration Protocol (DHCP) is the communication protocol that allows every device in a network to have a dynamic local IP address so that the device can be addressed within that local network, and the software that manages this assignment process is called DHCP server. Simply, it is the thing that gives your computer the local 192.168.x.y IP address.
One thing you need to know before you move forward, especially if you don’t know what DHCP is or how it works: there needs to be a single DHCP server in a simple home network, otherwise you’ll set for trouble.
Before you go on
It is important to enable Pi-hole DHCP server and disable your router’s DHCP server subsequently to not to have two DHCP servers running in the same network, which would confuse the connected clients. Therefore, before you move on, make sure to find out how to disable your router’s DHCP server. This will highly depend on your router model, therefore you’ll need to google it.
Enabling Pi-hole DHCP server
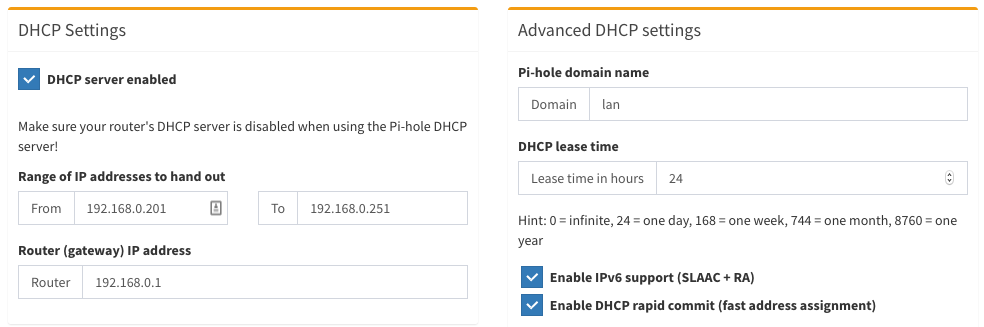
Pi-hole comes with a built-in DHCP server that can be used to replace your default DHCP server. To do that, go to Settings > DHCP and check the DHCP Server Enabled checkbox. Be careful about the range and IP address values there:
- Range of IP addresses to hand out: This one is the IP range your devices will get locally. Give this a range between 50–250 as the last part of your IP address to have a safe range. In my case, I limited it to 192.168.0.201 to 192.168.0.251, meaning that any new device that joins my network will get an IP within this range. In my case, I can only connect 50 clients safely, which is enough for my use-case, but you might want to change this for your own setup.
- Router (gateway) IP address: This is the IP address of your router which we have found previously.
- DHCP lease time: This is the time that a single local IP address will be allocated for a given client. It makes sense to give a low value to this limit during your setup so that you can test expired lease scenarios easily. Once you are done, you can increase this value to a week or so, which would be beneficial if you have stationary devices in your home network.
- Enable IPv6 support (SLAAC + RA): This one is for distributing IPv6 addresses in your home network. I want this to be taken care of by Pi-hole as well, so go ahead and check this too.
- Enable DHCP rapid commit (fast address assignment): This is an option to use DHCP rapid commit. It basically allows faster address assignment on trusted networks like your home. In my case, my router didn’t allow me to disable the IPv6 DHCP server, therefore I enabled this feature so that the clients can get an IP address from the Pi instead of my router, allowing using no-ads surfing on all my devices.
Settings example
Once you are done, hit the “Save” button at the bottom of the page and move onto the next step.
Disabling router’s DHCP server
This highly depends on your router configuration, but you should have figured out how to disable your router’s DHCP server at this point anyway. So, go ahead and disable it.