Containered Apps
See tags here.
- *arr Mega Stack
- Actual Budget
- Akaunting
- Akaunting 2024
- Alexandrite
- Ampache
- Araa
- Archivebox
- Baikal
- Bazarr
- Beszel Draft
- Bibliogram
- BigCapital
- Bloben
- Bludit
- Bookstack
- Changedetection.io
- Cherry
- ClipBucket
- Clipface
- Cloudberry
- Cloudreve
- CommaFeed
- Cryptpad
- Dashy
- Deemix
- Diun
- Docker-webui
- Dockge
- Docmost
- Docuseal
- Dolibarr
- Dolibarr (old)
- Duplicacy
- Duplicati
- Emulatorjs
- epicgames-freegames-node
- EspoCRM
- Filebrowser
- Firefly III
- Firefox
- Fireshare
- Flame
- Flaresolverr
- Flatnotes
- Fluid Calendar
- FreeAskInternet
- FreshRSS
- Funkwhale
- Gerbera
- Ghost
- Gitea
- Gluetun
- Goaccess for NginxProxyManager
- Gotify
- Headphones
- Heimdall
- Homechart
- Homepage
- HRConvert2
- Huginn
- Humhub
- I Hate Money
- Imagor
- Immich
- Invidious
- InvoiceNinja
- InvoiceShelf
- Jackett
- Jekyll
- Jellyfin (linuxserver)
- Jellyfin (official)
- Joal
- Joplin
- Joplin Webview
- Kimai (ARM64)
- KitchenOwl
- Koel
- Komga
- Kopia
- Kutt
- Ladder
- Lemmy Voyager
- LemmySchedule
- Libreoffice
- Librephotos
- LibreX
- Lidarr / LidarrOnSteroids (Lidarr+Deemix)
- Linkace
- Linkding
- Linkstack
- Linx Server
- LMS
- Logseq
- Luna Calendar
- Lychee 4
- Lychee 6
- Manage my damn life
- MediaCMS
- Memos
- MeTube
- MIND reminders
- MinMon
- MKVToolNix
- Moodle
- Morphos
- Movie Roulette
- Musicbrainz Picard
- My Spotify
- N8n
- Nautical-backup
- Navidrome
- NeonLink
- Netdata
- New Speedtest Tracker
- Nextcloud
- Nextcloud (ARM64)
- Nextcloud All-In-One
- Nginx Proxy Manager
- Noisedash
- Nomie
- Note-mark
- Notesnook sync server (local storage)
- Ntfy
- Obisdian Sync
- Obsidian
- Odoo
- Ollama + Open WebUI
- OmniPoly: Languagetool, Libretranslate.
- Onlyoffice
- Our Shopping List
- Ouroboros
- Overseerr / Jellyseerr
- ownCloud
- ownCloud Infinity Scale
- Pairdrop
- Paisa
- Paperless-ngx
- Photoprism
- Photoview
- Picoshare
- Pigallery2
- Piglet
- Pihole
- Pinchflat
- Pinedocs
- Piped
- Piwigo
- Plant-it
- Portall
- Prestashop
- Prestashop with Bind Mounts = Don't do this
- Privatebin
- ProjectSend
- Prowlarr
- qBittorentVPN (hotio) [most UTD notes]
- qBittorentVPN (trigus42)
- qBittorrent
- QBittorrentVPN (binhex)
- QDirStat
- Radarr
- Radicale
- RClone + GUI
- Reactive Resume
- Reader
- Reiverr
- Rpi-Monitor
- Scrutiny
- Seafile
- SearXNG
- Serge-chat
- Servas
- Shlink
- Shotshare
- Silverbullet
- SiYuan
- Slink
- Smokeping
- Solidinvoice
- Sonarr
- Soulseek
- Speedtest Tracker
- Stash
- Stirling-PDF
- SuiteCRM
- Tailscale (in a container, host wide)
- Teddit
- Thumbor
- Titra
- Traggo
- Transmission-OpenVPN
- Trilium
- Tube Archivist
- Tubesync
- Twenty
- Ubooquity
- Umami
- Unbound
- Unpackerr
- UpSnap
- Uptime-Kuma
- UrBackup
- Viewtube
- Vikunja (with mail notifications)
- Wallos
- Watch your LAN
- Watchtower
- Websurfx
- WeddingShare
- What's up Docker
- Whoogle
- Wireguard Easy
- Wordpress
- Workout-tracker
- XBackbone
- Xyphyn/photon for Lemmy
- Yacy
- Yourls
- Youtransfer
- YouTubeDL-Material
- YTPTube
- Whisper-WebUI
*arr Mega Stack
version: "3.7"

services:
  radarr:
    container_name: radarr
    hostname: Radarr
    image: ghcr.io/hotio/radarr
    ports:
      - "7878:7878"
    environment:
      - PUID=998
      - PGID=100
      - UMASK=002
      - TZ=Europe/Paris
    volumes:
      - /srv/path/Files/Radarr/config:/config
      - /mnt/OrbiterVideo/movies:/movies
      - /mnt/OrbiterVideo/EnfantsFilms:/moviesKids
      - /srv/path/Files/QBittorrentVPN/downloads:/downloads
    restart: unless-stopped
    networks:
      - arr

  sonarr:
    container_name: sonarr
    hostname: Sonarr
    image: ghcr.io/hotio/sonarr
    ports:
      - "8989:8989"
    environment:
      - PUID=998
      - PGID=100
      - UMASK=002
      - TZ=Europe/Paris
    volumes:
      - /srv/path/Files/Sonarr/config:/config
      - /mnt/OrbiterVideo/tvshows/:/tvshows
      - /mnt/OrbiterVideo/EnfantsSeries:/tvshowsKids
      - /srv/path/Files/QBittorrentVPN/downloads:/downloads
    restart: unless-stopped
    networks:
      - arr

  qbittorrent:
    container_name: qbittorrentvpn
    image: ghcr.io/hotio/qbittorrent
    ports:
      - 8992:8992
      - 8118:8118
    environment:
      - WEBUI_PORTS=8992/tcp,8992/udp
      - PUID=998
      - PGID=100
      - UMASK=0022
      - TZ=Europe/Paris
      - VPN_ENABLED=true
      - VPN_LAN_NETWORK=192.168.1.0/24
      - VPN_CONF=wg0
      - VPN_IP_CHECK_DELAY=5
      - PRIVOXY_ENABLED=false
      - DEBUG=yes
    volumes:
      - /srv/path/Files/QBittorrentVPN:/config
      - /srv/path/Files/QBittorrentVPN/downloads:/downloads
      - /srv/path/Files/QBittorrentVPN/skins:/skins
    cap_add:
      - NET_ADMIN
    sysctls:
      - net.ipv4.conf.all.src_valid_mark=1
      - net.ipv6.conf.all.disable_ipv6=1
    restart: unless-stopped
    networks:
      - arr

  bazarr:
    container_name: bazarr
    hostname: Bazarr
    image: ghcr.io/hotio/bazarr
    ports:
      - "6767:6767"
    environment:
      - PUID=998
      - PGID=100
      - UMASK=002
      - TZ=Europe/Paris
    volumes:
      - /srv/path/Files/Bazarr/config:/config
      - /mnt/OrbiterVideo/tvshows/:/tvshows
      - /mnt/OrbiterVideo/movies:/movies
      - /mnt/OrbiterVideo/EnfantsSeries/:/tvshowsKids
      - /mnt/OrbiterVideo/EnfantsFilms/:/moviesKids
    restart: unless-stopped
    networks:
      - arr

  jackett:
    image: lscr.io/linuxserver/jackett
    container_name: jackett
    environment:
      - PUID=998
      - PGID=100
      - TZ=Europe/Paris
      - AUTO_UPDATE=true
    volumes:
      - /srv/path/Files/Jackett/config:/config
      - /srv/path/Files/Jackett/downloads:/downloads
    ports:
      - 9117:9117
    restart: unless-stopped
    networks:
      - arr

  prowlarr:
    image: lscr.io/linuxserver/prowlarr:develop
    container_name: prowlarr
    environment:
      - PUID=998
      - PGID=100
      - TZ=Europe/Paris
    volumes:
      - /srv/path/Files/Prowlarr/config:/config
    ports:
      - 9696:9696
    restart: unless-stopped
    networks:
      - arr

  jellyseerr:
    image: fallenbagel/jellyseerr:latest
    container_name: jellyseerr
    environment:
      - LOG_LEVEL=debug
      - TZ=Europe/Paris
    ports:
      - 5055:5055
    volumes:
      - /srv/path/Files/Jellyseerr/config:/app/config
    restart: unless-stopped
    networks:
      - arr

  reiverr:
    image: ghcr.io/aleksilassila/reiverr:latest
    container_name: reiverr
    ports:
      - 9494:9494
    volumes:
      - /srv/path/Files/Reiverr/config:/config
    restart: unless-stopped
    networks:
      - arr

  flaresolverr:
    # DockerHub mirror flaresolverr/flaresolverr:latest
    image: ghcr.io/flaresolverr/flaresolverr:latest
    container_name: flaresolverr
    environment:
      - LOG_LEVEL=debug
      - LOG_HTML=false
      - CAPTCHA_SOLVER=none
      - LANG=en_US #important for yggtorrent for example. Don't change
      - TZ=Europe/Paris
      - LANG=en_EN
    ports:
      - "8191:8191"
    restart: unless-stopped
    networks:
      - arr

  unpackerr:
    image: golift/unpackerr
    container_name: unpackerr
    volumes:
      - /srvpath/Files/QBittorrentVPN/downloads:/downloads
    restart: always
    user: "998:100"
    environment:
      - TZ=Europe/Paris
      - UN_DEBUG=true
      - UN_LOG_FILE=/downloads/unpackerr.log #do not change. Or check dedicated page for unpackerr in this wiki
      - UN_INTERVAL=10m
      - UN_START_DELAY=1m
      - UN_RETRY_DELAY=5m
      - UN_MAX_RETRIES=3
      - UN_PARALLEL=1
      # Sonarr Config
      - UN_SONARR_0_URL=http://
      - UN_SONARR_0_API_KEY=
      - UN_SONARR_0_PROTOCOLS=torrent
      # Radarr Config
      - UN_RADARR_0_URL=http://
      - UN_RADARR_0_API_KEY=
      - UN_RADARR_0_PROTOCOLS=torrent
    networks:
      - arr

networks:
  arr:
    driver: bridge
Actual Budget
version: '3.7'
services:
  actual-server:
    image: tbleiker/actual-server:latest
    container_name: actual-server
    volumes:
      - srv/path/Files/ActualBudget/data:/data
    ports:
      - 5006:5006
    restart: unless-stopped
Akaunting
version: '3.3'
services:
    docker-akaunting:
        container_name: akaunting
        restart: unless-stopped
        ports:
            - '4587:8080'
        volumes:
            - '/srv/path/Files/Akaunting/mysql:/var/lib/mysql'
            - '/srv/path/Files/Akaunting/logs:/var/log'
            - '/srv/path/Files/Akaunting/config:/var/www/akaunting/config'
        environment:
            - 'MYSQL_ROOT_PASSWORD=xxxxxx'   # Must be at least 8 char + 1cap + 1num + 1 special
        image: 'kuralabs/docker-akaunting:latest'
Go to container logs and wait for the installation to finish. Then finish database setup with given credentials.
Akaunting 2024
https://github.com/akaunting/docker
Usage
git clone https://github.com/akaunting/docker
cd docker
cp env/db.env.example env/db.env
vi env/db.env # and set things
cp env/run.env.example env/run.env
vi env/run.env # and set things

AKAUNTING_SETUP=true docker-compose up -d
Then head to HTTP at port 8080 on the docker-compose host and finish configuring your Akaunting company through the interactive wizard.
After setup is complete, bring the containers down before bringing them back up without the setup variable.
docker-compose down
docker-compose up -d
Please never use
AKAUNTING_SETUP=trueenvironment variable again after the first time use.
I set up a docker-compose with no need to use .env files
version: '3.7'

services:

  akaunting:
    container_name: akaunting
    image: docker.io/akaunting/akaunting:latest
    ports:
      - 1621:80
    volumes:
      - akaunting-data:/var/www/html
    restart: unless-stopped
    environment:
      APP_URL: http://192.168.1.104:1621
      LOCALE: fr-FR
      DB_HOST: akaunting-db
      DB_PORT: 3306
      DB_NAME: akaunting
      DB_USERNAME: admin
      DB_PASSWORD: PASSWORD
      DB_PREFIX: asd_
      COMPANY_NAME: name
      COMPANY_EMAIL: mail@mail.mail
      ADMIN_EMAIL: admin@mail.mail
      ADMIN_PASSWORD: PASSWORD
      AKAUNTING_SETUP: 'true'
    depends_on:
      - akaunting-db

  akaunting-db:
    container_name: akaunting-db
    image: mariadb
    volumes:
      - akaunting-db:/var/lib/mysql
    restart: unless-stopped
    environment:
      MYSQL_DATABASE: akaunting
      MYSQL_USER: admin
      MYSQL_PASSWORD: PASSWORD
      MYSQL_RANDOM_ROOT_PASSWORD: 'yes'

volumes:
  akaunting-data:
  akaunting-db:
Run the setup, then edit the stack AKAUNTING_SETUP: 'false' and deploy again
OR
remove AKAUNTING_SETUP line and complete the setup yourself
Alexandrite
version: '3.7'
services:
  # ...
  alexandrite:
    image: ghcr.io/sheodox/alexandrite:latest
    ports:
      - 3002:3000
    environment:
      # example config only allowing logins to example.com
      # with no links to Lemmy docs, or an instance list
      ALEXANDRITE_DEFAULT_INSTANCE: lemmy.ml
      ALEXANDRITE_WELCOME_LEMMY_HELP: false
      ALEXANDRITE_WELCOME_INSTANCE_HELP: false
      ALEXANDRITE_FORCE_INSTANCE: lemmy.ml
Ampache
version: '3.3'
services:
    ampache:
        container_name: ampache
        volumes:
            - '/srv/path/Files/Ampache/music:/media:ro'
        ports:
            - '8012:80'
        image: ampache/ampache
Araa
Github | Compose example | Clarification
services:
  araa-search:
    container_name: Araa
    image: docker.io/temthelem/araa-search:latest
    environment:
      - DOMAIN=araa.domain.click
    ports:
      - "6413:8000"
Configuring (Environmental Variables)
You can configure the following environmental variables;
| Variable name | Required/Optional | Default | Description |
|---|---|---|---|
DOMAIN |
required | N/A | The domain of your instance. An example domain would look like; DOMAIN=tailsx.domain.com. This is required as the /opensearch.xml will be generated using it. |
PORT |
optional | 8000 | The port the Python web server will run on. |
WORKERS |
optional | 8 | The number of workers the web server will use. |
THREADS |
optional | 2 | The number of threads the web server will use. |
SHEBANG |
optional | ! | The 'shebang' to use for all of the shebang macros. Shebangs allow people to switch to another search engine through Araa Search. Something like !ddg cats will redirect the user to DuckDuckGo with their results for cats. |
DONATE_URL |
optional | https://github.com/sponsors/Extravi |
Archivebox
version: '3.3'

services:
    archivebox:
        image: archivebox/archivebox:latest
        command: server --quick-init 0.0.0.0:8102
        ports:
            - 8102:8102
        environment:
            - ALLOWED_HOSTS=*                   # add any config options you want as env vars
            - MEDIA_MAX_SIZE=750m
        volumes:
            - /srv/path/Files/Archivebox/data:/data
        restart: unless-stopped
To create an admin user : create a docker-compose.yml, cd to its folder, and run docker-compose run archivebox manage createsuperuser.
Erase newly and nonfunctional created container.
Baikal
version: "3.3"
services:
  baikal:
    image: ckulka/baikal
    restart: unless-stopped
    ports:
      - "6158:80"
    volumes:
      - /srv/path/Files/Baikal/config:/var/www/baikal/config
      - /srv/path/Files/Baikal/Specific:/var/www/baikal/Specific
Bazarr
version: "3.7"

services:
  sonarr:
    container_name: bazarr
    image: ghcr.io/hotio/bazarr
    ports:
      - "6767:6767"
    environment:
      - PUID=998
      - PGID=100
      - UMASK=002
      - TZ=Europe/Paris
    volumes:
      - /srv/path/Files/Bazarr/config:/config
      - /srv/path/Video/tvshows:/tvshows
      - /srv/path/Video/movies:/movies
#     - /srv/path/Files/QBittorrentVPN/downloads:/downloads
    restart: unless-stopped
Beszel Draft
https://github.com/henrygd/beszel?tab=readme-ov-file#docker
services:
  beszel:
    image: 'henrygd/beszel'
    container_name: 'beszel-hub'
    restart: unless-stopped
    ports:
      - '8090:8090'
    volumes:
      - /srv/docker/beszel/data:/beszel_data
services:
  beszel-agent:
    image: 'henrygd/beszel-agent'
    container_name: 'beszel-agent'
    restart: unless-stopped
    network_mode: host
    volumes:
      - /var/run/docker.sock:/var/run/docker.sock:ro
    environment:
      PORT: 45876
      KEY: 'reallylongstringofcharacters
      # FILESYSTEM: /dev/sda1 # set to the correct filesystem for disk I/O stats
Bibliogram
version: '3.3'
volumes:
    db:
services:
    bibliogram:
        build: .
        image: schklom/bibliogram
        volumes:
            - /srv/path/Files/Bibliogram/db:/app/db
        ports:
            - 10407:10407
        restart: unless-stopped
BigCapital
Steps to deploy Bigcapital using docker-compose
- Download the required files.
In a directory of your choosing, clone the Bigcapital repository and navigate into the ./bigcapital directory by entering the following commands:
git clone --depth 1 -b main https://github.com/bigcapitalhq/bigcapital.git && cd ./bigcapital
The most important files in the docker deployment the docker-compose.prod.yml, .env.example and docker folder, we're not going to build docker images of the application from scratch, but docker-compose already imports built images from Github Registry where our continuous-deployment push the new built images when we release new versions.
- Configure the
.envfile.
Change all mail variables to configure it with your mail server and the password of databases.
cp .env.example .env && nano .envFor example, you can change :
BASE_URL=http://192.168.1.103:2465
PUBLIC_PROXY_PORT=2465
PUBLIC_PROXY_SSL_PORT=1443
2b. Configure docker-compose.prod.yml
Reflect your changes in .env
    ports:
      - '${PUBLIC_PROXY_PORT:-2465}:80'
      - '${PUBLIC_PROXY_SSL_PORT:-1443}:443'
You can use bind mounts for data persistency.
docker-compose --file docker-compose.prod.yml up -dChanging .env values after running Docker containers
Once the Docker containers are built and running, the application inside the container has already read the values from the .env file and is using them. If you need to change the environment variable values, you will have to stop and re-start the Bigcapital containers.
If you were on production, use the following command.
docker-compose --file docker-compose.prod.yml restart
Or if you were on development mode.
docker-compose restartThe .env.example file contains all the necessary environment variable values, allowing you to begin using the application directly with these pre-configured settings. You also have the option to modify the values as needed.
- Get the services up and running.
docker-compose --file docker-compose.prod.yml up -dBloben
1. Files
Clone this repository https://github.com/nibdo/bloben-app
git clone https://github.com/nibdo/bloben-app.git2. Secrets
Copy .env.example file to .env file. You will need to change secrets for database, session, two-factor authentication and initial admin password. Setup also app domain env APP_DOMAIN to your domain.
INITIAL_ADMIN_PASSWORD=yourInitialLoginPasswordForAdmin
DB_PASSWORD=someDbPassword
POSTGRES_PASSWORD=someDbPassword
SESSION_SECRET=xxxx
OTP_SECRET=xxxx
APP_DOMAIN=yourDomain
ENCRYPTION_PASSWORD=optionalPasswordForEncryptingEmailConfigs
3. Edit docker-compose-pg14.yml
There is already a docker-compose.yml in the folder, so rename it or get rid of it. Then:
cp docker-compose-pg14.yml docker-compose.yml
nano docker-compose.yml
4. Start server
Run file docker-compose.yml
docker-compose -f docker-compose.yml up -daccess admin panel at https://your.bloben.tld/admin
acess calendar at https://your.bloben.tld/calendar
Bludit
version: '3.7'
services:
  bludit:
    image: laugmanuel/bludit:latest
    restart: unless-stopped
    ports:
      - 7980:8080
    volumes:
      - .bl-plugins:/usr/share/nginx/html/bl-plugins
      - .bl-themes:/usr/share/nginx/html/bl-themes
      - .bl-content:/usr/share/nginx/html/bl-content
Bookstack
---
version: "3.3"
services:
  bookstack:
    image: lscr.io/linuxserver/bookstack
    container_name: bookstack
    environment:
      - PUID=998
      - PGID=100
      - APP_URL=https://your.domain.com
      - DB_HOST=bookstack_db
      - DB_USER=bookstack
      - DB_PASS=xxxxxx
      - DB_DATABASE=bookstackapp
    volumes:
      - /srv/path/Files/Bookstack/config:/config
    ports:
      - 6875:80
    restart: unless-stopped
    depends_on:
      - bookstack_db
  bookstack_db:
    image: lscr.io/linuxserver/mariadb
    container_name: bookstack_db
    environment:
      - PUID=998
      - PGID=100
      - MYSQL_ROOT_PASSWORD=xxxxxx
      - TZ=Europe/Paris
      - MYSQL_DATABASE=bookstackapp
      - MYSQL_USER=bookstack
      - MYSQL_PASSWORD=xxxxxx
    volumes:
      - /srv/path/Files/Bookstack/db:/config
    restart: unless-stopped
Export All Books
This script will export all books in your preferred format (PDF, HTML or TXT).
Requirements
You will need php (~7.1+) installed on the machine you want to run this script on.
apt install phpYou will also need BookStack API credentials (TOKEN_ID & TOKEN_SECRET) at the ready.
Edit profile > create token > copy tokens
Running
# Downloading the script
curl https://raw.githubusercontent.com/BookStackApp/api-scripts/main/php-export-all-books/export-books.php > export-books.php

# Setup
# ALTERNATIVELY: Open the script and edit the variables at the top.
$apiUrl = getenv('BS_URL') ?: 'http://192.168.1.103:6875'; // http://bookstack.local/
$clientId = getenv('BS_TOKEN_ID') ?: 'token';
$clientSecret = getenv('BS_TOKEN_SECRET') ?: 'token';

# Running the script
php export-books.php <format> <output_dir>
Raw script
#!/usr/bin/env php
<?php

// API Credentials
// You can either provide them as environment variables
// or hard-code them in the empty strings below.
$apiUrl = getenv('BS_URL') ?: ''; // http://bookstack.local/
$clientId = getenv('BS_TOKEN_ID') ?: '';
$clientSecret = getenv('BS_TOKEN_SECRET') ?: '';

// Export Format & Location
// Can be provided as a arguments when calling the script
// or be hard-coded as strings below.
$exportFormat = $argv[1] ?? 'pdf';
$exportLocation = $argv[2] ?? './';

// Script logic
////////////////

$books = getAllBooks();
$outDir = realpath($exportLocation);

$extensionByFormat = [
    'pdf' => 'pdf',
    'html' => 'html',
    'plaintext' => 'txt',
];

foreach ($books as $book) {
    $id = $book['id'];
    $extension = $extensionByFormat[$exportFormat] ?? $exportFormat;
    $content = apiGet("api/books/{$id}/export/{$exportFormat}");
    $outPath = $outDir  . "/{$book['slug']}.{$extension}";
    file_put_contents($outPath, $content);
}

/**
 * Get all books from the system API.
 */
function getAllBooks() {
    $count = 100;
    $offset = 0;
    $total = 0;
    $allBooks = [];

    do {
        $endpoint = 'api/books?' . http_build_query(['count' => $count, 'offset' => $offset]);
        $resp = apiGetJson($endpoint);

        // Only set total on first request, due to API bug:
        // https://github.com/BookStackApp/BookStack/issues/2043
        if ($offset == 0) {
            $total = $resp['total'] ?? 0;
        }

        $newBooks = $resp['data'] ?? [];
        array_push($allBooks, ...$newBooks);
        $offset += $count;
    } while ($offset < $total);

    return $allBooks;
}

/**
 * Make a simple GET HTTP request to the API.
 */
function apiGet(string $endpoint): string {
    global $apiUrl, $clientId, $clientSecret;
    $url = rtrim($apiUrl, '/') . '/' . ltrim($endpoint, '/');
    $opts = ['http' => ['header' => "Authorization: Token {$clientId}:{$clientSecret}"]];
    $context = stream_context_create($opts);
    return file_get_contents($url, false, $context);
}

/**
 * Make a simple GET HTTP request to the API &
 * decode the JSON response to an array.
 */
function apiGetJson(string $endpoint): array {
    $data = apiGet($endpoint);
    return json_decode($data, true);
}

/**
 * DEBUG: Dump out the given variables and exit.
 */
function dd(...$args) {
    foreach ($args as $arg) {
        var_dump($arg);
    }
    exit(1);
}
Examples
# Export as plaintext to an existing "out" directory
php export-books.php plaintext ./out

# Export as pdf to the current directory
php export-books.php pdf ./

# Export as HTML to an existing "html" directory
php export-books.php html ./html

# Export as HTML to an existing "bookstackPDFexport" directory
php /home/scripts/bookstack/export-books.php html /home/bookstackPDFexport/
You can schedule using cron
crontab -e

30 5 * * * rm -rf /home/bookstackexport/* #clear folder at 5:30
0 6 * * * php /home/scripts/bookstack/export-books.php html /home/bookstackexport/ #export to folder at 6:00
Changedetection.io
version: '3.3'
services:
    changedetection.io:
        restart: unless-stopped
        ports:
            - '5001:5000' #5000:5000
        volumes:
            - '/srv/path/Files/ChangeDetection/datastore:/datastore'
        container_name: changedetection.io
        image: dgtlmoon/changedetection.io
Cherry
version: '3.3'
services:
    cherry:
        container_name: cherry
        volumes:
            - /srv/path/Files/Cherry/data:/data
        ports:
            - '8000:8000'
        environment:
            - JWT_SECRET=LoNgAnDcOmPlIcAtEd
            - ENABLE_PUBLIC_REGISTRATION=0
            - PAGE_BOOKMARK_LIMIT=1000
            - LOG_LEVEL='debug'
            - USE_INSECURE_COOKIE=1
        image: haishanh/cherry
Environment variables : https://cherry.haishan.me/docs/deploy#environment-variables
ClipBucket
ClipBucket is an Open Source and freely downloadable PHP script that will let you start your own Video Sharing website (YouTube/Netflix Clone) in a matter of minutes. ClipBucket is the fastest growing video script with the most advanced video sharing and social features.
Optionnal:
mkdir -vp Clipbucket/{db,files} \
&& chmod -R 777 Clipbucket/ \
&& chown -R 998:100 Clipbucket/
Docker-compose:
services:
  clipbucket:
    restart: unless-stopped
    pull_policy: always
    environment:
      - DOMAIN_NAME=192.168.1.104:6598
      - MYSQL_PASSWORD=
      - PUID=998
      - GUID=100
    volumes:
      - /srv/dev-disk-by-uuid-7fe66601-5ca0-4c09-bc13-a015025fe53a/Files/Clipbucket/db:/var/lib/mysql
      - /srv/dev-disk-by-uuid-7fe66601-5ca0-4c09-bc13-a015025fe53a/Files/Clipbucket/files:/srv/http/clipbucket
    ports:
      - 6598:80
    container_name: clipbucket
    image: oxygenz/clipbucket-v5
networks: {}
Clipface
version: '3.3'
services:
    clipface:
        container_name: clipface
        volumes:
            - '/srv/path/Files/Clipface/clips:/clips'
        ports:
            - '1314:80'
        environment:
            - CLIPFACE_USER_PASSWORD=xxxxxxxxxx
            - 'CLIPFACE_CLIPS_PAGE_TITLE=Taytay'
         #   - CLIPFACE_SECURE_COOKIES=false
        image: 'tomsan/clipface:latest'
restart: unless-stoppedCloudberry
version: '3'
services:
  cloudberry-backup:
    image: jlesage/cloudberry-backup
    environment:
      - USER_ID=0
      - GROUP_ID=0
      - TZ=Europe/Paris
      - CBB_WEB_INTERFACE_USER=admin
      - CBB_WEB_INTERFACE_PASSWORD=01664892ganjah12
    ports:
      - "5800:5800"
    volumes:
	  - "/srv/path/Files/Cloudberry-Backup/config:/config:rw"
	  - "/srv/path/Files/folder:/storage:ro" # What to backup
Full list of variables
Cloudreve
Create the necessary directory structure:
mkdir -vp cloudreve/{uploads,avatar} \
&& touch cloudreve/conf.ini \
&& touch cloudreve/cloudreve.db \
&& mkdir -p aria2/config \
&& mkdir -p data/aria2 \
&& chmod -R 777 data/aria2
Save the following content as docker-compose.yml in the current directory (same level as the Cloudreve folder). Make sure to modify the RPC_SECRET in the file
version: "3.8"
services:
  cloudreve:
    container_name: cloudreve
    image: cloudreve/cloudreve:latest
    restart: unless-stopped
    ports:
      - "5212:5212"
    volumes:
      - temp_data:/data
      - ./cloudreve/uploads:/cloudreve/uploads
      - ./cloudreve/conf.ini:/cloudreve/conf.ini
      - ./cloudreve/cloudreve.db:/cloudreve/cloudreve.db
      - ./cloudreve/avatar:/cloudreve/avatar
    depends_on:
      - aria2
  aria2:
    container_name: aria2
    image: p3terx/aria2-pro
    restart: unless-stopped
    environment:
      - RPC_SECRET=your_aria_rpc_token
      - RPC_PORT=6800
    volumes:
      - ./aria2/config:/config
      - temp_data:/data
volumes:
  temp_data:
    driver: local
    driver_opts:
      type: none
      device: $PWD/data
      o: bind
Run the Docker images:
docker-compose up -dLogin and password are in the logs
Configure the control panel with the following settings:
- RPC Server Address: http://aria2:6800
- RPC Authorization Token: your_aria_rpc_token
- Aria2 Temporary Download Path: /data (do not modify)
For updates, first, stop the running containers without removing configurations:
docker-compose downIf Docker images were previously pulled, update them with:
docker pull cloudreve/cloudreveRepeat the steps to rerun the containers.
-------------------------------------------------
Example with an OMV path
mkdir -vp /srv/dev-disk-by-uuid-7fe66601-5ca0-4c09-bc13-a015025fe53a/Files/Cloudreve/{uploads,avatar} \
&& touch /srv/dev-disk-by-uuid-7fe66601-5ca0-4c09-bc13-a015025fe53a/Files/Cloudreve/conf.ini \
&& touch /srv/dev-disk-by-uuid-7fe66601-5ca0-4c09-bc13-a015025fe53a/Files/Cloudreve/cloudreve.db \
&& mkdir -p /srv/dev-disk-by-uuid-7fe66601-5ca0-4c09-bc13-a015025fe53a/Files/Cloudreve/aria2/config \
&& mkdir -p /srv/dev-disk-by-uuid-7fe66601-5ca0-4c09-bc13-a015025fe53a/Files/Cloudreve/data/aria2 \
&& chmod -R 777 /srv/dev-disk-by-uuid-7fe66601-5ca0-4c09-bc13-a015025fe53a/Files/Cloudreve/data/aria2
version: "3.8"
services:
cloudreve:
container_name: cloudreve
image: cloudreve/cloudreve:latest
restart: unless-stopped
ports:
- "5212:5212"
volumes:
- /srv/dev-disk-by-uuid-7fe66601-5ca0-4c09-bc13-a015025fe53a/Files/Cloudreve/temp_data:/data
- /srv/dev-disk-by-uuid-7fe66601-5ca0-4c09-bc13-a015025fe53a/Files/Cloudreve/uploads:/cloudreve/uploads
- /srv/dev-disk-by-uuid-7fe66601-5ca0-4c09-bc13-a015025fe53a/Files/Cloudreve/conf.ini:/cloudreve/conf.ini
- /srv/dev-disk-by-uuid-7fe66601-5ca0-4c09-bc13-a015025fe53a/Files/Cloudreve/cloudreve.db:/cloudreve/cloudreve.db
- /srv/dev-disk-by-uuid-7fe66601-5ca0-4c09-bc13-a015025fe53a/Files/Cloudreve/avatar:/cloudreve/avatar
depends_on:
- aria2
aria2:
container_name: aria2
image: p3terx/aria2-pro
restart: unless-stopped
environment:
- RPC_SECRET=longstringkey
- RPC_PORT=6800
volumes:
- /srv/dev-disk-by-uuid-7fe66601-5ca0-4c09-bc13-a015025fe53a/Files/Cloudreve/data/aria2/config:/config
- /srv/dev-disk-by-uuid-7fe66601-5ca0-4c09-bc13-a015025fe53a/Files/Cloudreve/temp_data:/data
volumes:
temp_data:
driver: local
driver_opts:
type: none
device: /srv/dev-disk-by-uuid-7fe66601-5ca0-4c09-bc13-a015025fe53a/Files/Cloudreve//data
o: bindCommaFeed
Google Reader inspired self-hosted RSS reader, based on Quarkus and React/TypeScript.
services:
  commafeed:
    image: athou/commafeed:latest-h2
    restart: unless-stopped
    volumes:
      - /srv/Files/Commafeed/db:/commafeed/data
    deploy:
      resources:
        limits:
          memory: 256M
    ports:
      - 8082:8082
Default credentials are admin admin
Password requires 1 upper case character and 1 special character
Cryptpad
version: '3.3'
services:
    cryptpad:
        environment:
            - CPAD_MAIN_DOMAIN=example.com
            - CPAD_SANDBOX_DOMAIN=sandbox.example.com
        volumes:
            - '${PWD}/data/blob:/cryptpad/blob'
            - '${PWD}/data/block:/cryptpad/block'
            - '${PWD}/customize:/cryptpad/customize'
            - '${PWD}/data/data:/cryptpad/data'
            - '${PWD}/data/files:/cryptpad/datastore'
            - '${PWD}/config.js:/cryptpad/config/config.js'
        ports:
            - '3000:3000'
            - '3001:3001'
        image: promasu/cryptpad
Dashy
Link | Video | Base .conf
version: '3.3'
services:
    dashy:
        ports:
            - '4000:80'
        volumes:
            - '/srv/path/Files/Dashy/conf/conf.yml:/app/public/conf.yml'
            - '/srv/path/Files/Dashy/icons:/app/public/item-icons/icons'
        container_name: dashy
        restart: unless-stopped
        image: 'lissy93/dashy:latest'
Icons pack :/srv/path/Files/Dashy/iconsgit clone https://github.com/walkxcode/dashboard-icons.git
Deemix
version: '3.3'
services:
    deemix:
        image: registry.gitlab.com/bockiii/deemix-docker
        container_name: Deemix
        volumes:
            - /srv/path/Files/Deemix/Downloads:/downloads
            - /srv/path/Files/Deemix/Config:/config
        environment:
            - PUID=998
            - PGID=100
            - ARL=xxxxxx #Put your ARL cookie code here : https://en.deezercommunity.com/your-account-and-subscription-5/how-do-find-my-personal-arl-number-on-deezer-68040?postid=200029#post200029
            - UMASK_SET=022
        ports:
            - 6595:6595
        restart: unless-stopped
Diun
version: "3.3"

services:
  diun:
    image: crazymax/diun:latest
    container_name: diun
    hostname: diun_dockerhost1
    volumes:
      - /srv/path/Files/Diun/data:/data
      - /var/run/docker.sock:/var/run/docker.sock:ro
    environment:
      - TZ=Europe/Paris
      - LOG_LEVEL=info
      - DIUN_DB_PATH=/data/diun.db
      - DIUN_WATCH_WORKERS=10
      - DIUN_WATCH_SCHEDULE=0 0 10 ? * SAT
      - DIUN_WATCH_FIRSTCHECKNOTIF=true
      - DIUN_PROVIDERS_DOCKER_WATCHBYDEFAULT=true
      - DIUN_NOTIF_DISCORD_WEBHOOKURL=https://discord.com/api/webhooks/0000000/XXXXXXXXXXXXXXXXXX
      - DIUN_NOTIF_DISCORD_TEMPLATEBODY=Docker tag {{ .Entry.Image }} which you subscribed to through {{ .Entry.Provider }} provider has been released.
    restart: unless-stopped
    labels:
     - diun.enable=true
Docker-webui
version: '3.3'

services:

    docker-webui:
        image: macgyverbass/docker-webui
        container_name: docker-webui
        restart: unless-stopped
        ports:
            - "8900:9000"
        stdin_open: true
        tty: true
        volumes:
            - /var/run/docker.sock:/var/run/docker.sock
Dockge
version: "3.8"
services:
  dockge:
    image: louislam/dockge:latest
    restart: unless-stopped
    ports:
      # Host Port:Container Port
      - 5001:5001
    volumes:
      - /var/run/docker.sock:/var/run/docker.sock
      - /srv/Dockge/data:/app/data

      # If you want to use private registries, you need to share the auth file with Dockge:
      # - /root/.docker/:/root/.docker

      # Your stacks directory in the host (The paths inside container must be the same as the host)
      # ⚠️⚠️ If you did it wrong, your data could end up be written into a wrong path.
      # ✔️✔️✔️✔️ CORRECT EXAMPLE: - /my-stacks:/my-stacks (Both paths match)
      # ❌❌❌❌ WRONG EXAMPLE: - /docker:/my-stacks (Both paths do not match)
      - /srv/Dockge/stacks:/srv/Dockge/stacks
    environment:
      # Tell Dockge where is your stacks directory
      - DOCKGE_STACKS_DIR=/srv/Dockge/stacks
Docmost
Open-source collaborative wiki and documentation software.
version: '3'

services:
  docmost:
    image: docmost/docmost:latest
    depends_on:
      - db
      - redis
    environment:
      APP_URL: 'http://localhost:3000'
      APP_SECRET: 'REPLACE_WITH_LONG_SECRET'
      DATABASE_URL: 'postgresql://docmost:STRONG_DB_PASSWORD@db:5432/docmost?schema=public'
      REDIS_URL: 'redis://redis:6379'
    ports:
      - "3000:3000"
    restart: unless-stopped
    volumes:
      - docmost:/app/data/storage

  db:
    image: postgres:16-alpine
    environment:
      POSTGRES_DB: docmost
      POSTGRES_USER: docmost
      POSTGRES_PASSWORD: STRONG_DB_PASSWORD
    restart: unless-stopped
    volumes:
      - db_data:/var/lib/postgresql/data

  redis:
    image: redis:7.2-alpine
    restart: unless-stopped
    volumes:
      - redis_data:/data

volumes:
  docmost:
  db_data:
  redis_data:
Docuseal
DocuSeal is an open source platform that provides secure and efficient digital document signing and processing. Create PDF forms to have them filled and signed online on any device with an easy-to-use, mobile-optimized web tool.
version: '3'

services:
  app:
    depends_on:
      postgres:
        condition: service_healthy
    image: docuseal/docuseal:latest
    ports:
      - 3000:3000
    volumes:
      - /srv/path/Docuseal/data:/data
    environment:
      - FORCE_SSL=false
      - DATABASE_URL=postgresql://postgres:postgres@postgres:5432/docuseal
    restart: unless-stopped

  postgres:
    image: postgres:15
    volumes:
      - '/srv/path/Docuseal/pg_data:/var/lib/postgresql/data'
    environment:
      POSTGRES_USER: postgres
      POSTGRES_PASSWORD: postgres
      POSTGRES_DB: docuseal
    healthcheck:
      test: ["CMD-SHELL", "pg_isready -U postgres"]
      interval: 5s
      timeout: 5s
      retries: 5
    restart: unless-stopped
In Nginx Proxy Manager, in Advanced > Custom Nginx Configuration, add:
location / {
    proxy_pass http://yourdocuseal.internal.hostname:port/;
    proxy_set_header X-Forwarded-For $proxy_add_x_forwarded_for;
    proxy_set_header X-Forwarded-Proto $scheme;
    proxy_set_header X-Forwarded-Host $host;
}
Dolibarr
services:
  db:
    image: mariadb:latest
    environment:
      MYSQL_ROOT_PASSWORD:
      MYSQL_DATABASE: dolibarr
      MYSQL_USER: dolibarr
      MYSQL_PASSWORD:
    volumes:
      - /srv/Files/Dolibarr/db:/var/lib/mysql

  web:
    image: dolibarr/dolibarr:latest
    environment:
      WWW_USER_ID: 998
      WWW_GROUP_ID: 100
      DOLI_DB_HOST: db
      DOLI_DB_NAME: dolibarr
      DOLI_DB_USER: dolibarr
      DOLI_DB_PASSWORD:
      DOLI_URL_ROOT: http://192.168.1.103
      DOLI_ADMIN_LOGIN: admin
      DOLI_ADMIN_PASSWORD:
      DOLI_CRON: ${DOLI_CRON:-0}
      DOLI_INIT_DEMO: ${DOLI_INIT_DEMO:-0}
      DOLI_COMPANY_NAME:
      DOLI_COMPANY_COUNTRYCODE: FR
      DOLI_ENABLE_MODULES: societe,facture,banque,Accounting,service
    ports:
      - "8231:80"
    links:
      - db
    volumes:
      - /srv/Files/Dolibarr/documents:/var/www/documents
      - /srv/Files/Dolibarr/custom:/var/www/html/custom
chown -R 998:100 /srv/Files/Dolibarr/chmod -R 775 /srv/Files/Dolibarr/
DOLI_ENABLE_MODULES: Accounting,Adherent,Agenda,Api,banque,barcodecommande,cron,eventorganization,expensereport,export,facture,gravatar,import,notification,product,projet,propal,service,socialnetworks,societe,stock,stripe,paypal,syslog,takepos,tax,user,variants,webhook
The expected name is the name of the description file of the module.
Before anything else, be sure to have set the company name and company country with DOLI\_COMPANY\_NAME and DOLI\_COMPANY\_COUNTRYCODE. Enabling modules without that can break installation.
The files are like modName.class.php, as modUser.class.php, modDoliCalc.class.php or modFacture.class.php. Remove the “mod” and the “.class.php” parts and you have the name.
These files are located at DOL_ROOT/core/modules/modName.class.php for core modules and DOL_ROOT/some_name/core/modules/modName.class.php for custom modules.
You can find all your modules descriptor files with : find DOL_ROOT/ -name 'mod*.class.php'
Plugins: https://www.dolistore.com/en/modules/1019-KanProspects--Prospects-Kanban-view-.html
Free Invoice Templates:
https://www.dolistore.com/en/index.php?controller=attachment&id_attachment=942
https://www.dolistore.com/en/index.php?controller=attachment&id_attachment=1301
Sauvegarde de vos données Dolibarr :
Le plus simple est de passer par l'interface graphique de Dolibarr. Les fichiers seront stockés sur le serveur mais il est plus sur de les télécharger et de les stocker soi-même ailleurs.
Sinon:
-
Identifiez les éléments à sauvegarder :
- Base de données : Dolibarr utilise généralement une base de données MySQL ou MariaDB pour stocker ses informations.
- Répertoire des documents : C'est l'endroit où Dolibarr stocke les fichiers que vous téléchargez, comme les factures, les devis, etc.
-
Sauvegarde de la base de données :
- Si votre base de données est dans un conteneur Docker, vous pouvez utiliser la commande suivante pour créer une sauvegarde :
docker exec NOM_DU_CONTENEUR_MYSQL mysqldump -u UTILISATEUR -pMOT_DE_PASSE NOM_DE_LA_BASE > /chemin/vers/votre/dossier/nom_de_sauvegarde.sql- Remplacez
NOM_DU_CONTENEUR_MYSQLpar le nom de votre conteneur MySQL/MariaDB. - Remplacez
UTILISATEURetMOT_DE_PASSEpar vos identifiants de base de données. - Remplacez
NOM_DE_LA_BASEpar le nom de votre base de données Dolibarr. - Cette commande crée un fichier
sauvegarde.sqlcontenant toutes les données de votre base.
- Remplacez
- Si votre base de données est dans un conteneur Docker, vous pouvez utiliser la commande suivante pour créer une sauvegarde :
-
Sauvegarde du répertoire des documents :
- Si vous avez mappé le répertoire des documents de Dolibarr sur votre système hôte lors de la configuration Docker, il vous suffit de copier ce dossier vers un emplacement sûr.
- Si le répertoire des documents est à l'intérieur du conteneur, vous pouvez l'exporter en utilisant la commande suivante :
docker cp NOM_DU_CONTENEUR_DOLIBARR:/chemin/vers/documents /chemin/de/sauvegarde_sur_hote- Remplacez
NOM_DU_CONTENEUR_DOLIBARRpar le nom de votre conteneur Dolibarr. - Remplacez
/chemin/vers/documentspar le chemin du répertoire des documents dans le conteneur. - Remplacez
/chemin/de/sauvegarde_sur_hotepar le chemin où vous souhaitez sauvegarder les documents sur votre machine hôte.
- Remplacez
Restauration de vos données Dolibarr :
Le plus simple:
🔹 1. Sauvegarde des données
Avant toute manipulation, assurez-vous d’avoir une sauvegarde complète :
- Effectuez une sauvegarde de la base de données depuis Dolibarr ou via mysqldump.
- Sauvegardez le dossier "documents" de votre installation actuelle, depuis Dolibarr.
- Téléchargez les zip et le .sql
🔹 2. Restauration des fichiers
- Copiez le fichier de sauvegarde sur votre machine et extraites-en le contenu.
- Remplacez le dossier "documents" de la nouvelle installation par celui de la sauvegarde.
🔹 3. Restauration de la base de données
a. Ouvrez phpMyAdmin.
- Utilisez les identifiants définis dans vos variables d’environnement :
- Nom d’utilisateur : MYSQL_USER (par défaut dolibarr)
- Mot de passe : MYSQL_PASSWORD
b. Sélectionnez la base de données cible, puis cliquez sur "Importer" et chargez le fichier .sql.
c. ✅ Si l’import fonctionne, la migration est terminée !
d. ❌ Si une erreur survient (encodage, conflit, etc.) :
- Sélectionnez la base de données concernée.
- Descendez en bas de la page, cliquez sur "Check all", puis "Drop" (supprimer).
- Confirmez avec "Yes".
- Importez à nouveau l’ancienne base de données.
🔹 4. Mise à jour de Dolibarr
Si vous avez changé de version :
- Accédez à votre instance Dolibarr.
- Suivez les instructions de mise à jour.
- Suivez les instructions. Supprimez le fichier install.lock situé dans documents/ puis rechargez la page.
- Finalisez la procédure et recréez manuellement un fichier install.lock pour sécuriser l’installation.
Sinon:
-
Restauration de la base de données :
- Copiez le fichier
sauvegarde.sqlsur votre machine hôte si ce n'est pas déjà fait. - Utilisez la commande suivante pour restaurer la base de données :
docker exec -i NOM_DU_CONTENEUR_MYSQL mysql -u UTILISATEUR -pMOT_DE_PASSE NOM_DE_LA_BASE < sauvegarde.sql- Cette commande importe les données du fichier
sauvegarde.sqldans votre base de données.
- Cette commande importe les données du fichier
- Copiez le fichier
-
Restauration du répertoire des documents :
- Si vous avez sauvegardé le répertoire des documents sur votre machine hôte, copiez-le de nouveau à l'endroit approprié.
- Si le répertoire des documents doit être à l'intérieur du conteneur, utilisez la commande suivante pour le copier :
docker cp /chemin/de/sauvegarde_sur_hote NOM_DU_CONTENEUR_DOLIBARR:/chemin/vers/documents
En suivant ces étapes, vous devriez pouvoir sauvegarder et restaurer vos données Dolibarr sans problème. Si vous préférez une explication visuelle, voici une vidéo qui montre comment restaurer Dolibarr en local :
Dolibarr (old)
Link 1 | Link 2 | Official Docker image
version: '3'

services:

  mariadb:
    image: mariadb:10.6
    container_name: mariadb
    restart: unless-stopped
    command: --character_set_client=utf8 --character-set-server=utf8mb4 --collation-server=utf8mb4_unicode_ci
    volumes:
      - /srv/Files/Dolibarr/db:/var/lib/mysql
    environment:
      - MYSQL_DATABASE=dolibarr
      - MYSQL_USER=dolibarr
      - MYSQL_PASSWORD=CHANGEME #change
      - MYSQL_RANDOM_ROOT_PASSWORD=yes

  dolibarr:
    image: upshift/dolibarr:14.0
    container_name: dolibarr
    restart: unless-stopped
    depends_on:
        - mariadb
    ports:
        - "8230:80"
    environment:
      - DOLI_ADMIN_LOGIN=CHANGEME #change
      - DOLI_ADMIN_PASSWORD=CHANGEME #change
      - DOLI_DB_HOST=mariadb
      - DOLI_DB_NAME=dolibarr
      - DOLI_DB_USER=dolibarr
      - DOLI_DB_PASSWORD=CHANGEME #change
      - TZ=Europe/Paris
      - LANG=fr_FR
    volumes:
      - /srv/Files/Dolibarr/html:/var/www/html
      - /srv/Files/Dolibarr/docs:/var/www/documents
Plugins: https://www.dolistore.com/en/modules/1019-KanProspects--Prospects-Kanban-view-.html
Free Invoice Templates:
https://www.dolistore.com/en/index.php?controller=attachment&id_attachment=942
https://www.dolistore.com/en/index.php?controller=attachment&id_attachment=1301
Sauvegarde de vos données Dolibarr :
-
Identifiez les éléments à sauvegarder :
- Base de données : Dolibarr utilise généralement une base de données MySQL ou MariaDB pour stocker ses informations.
- Répertoire des documents : C'est l'endroit où Dolibarr stocke les fichiers que vous téléchargez, comme les factures, les devis, etc.
-
Sauvegarde de la base de données :
- Si votre base de données est dans un conteneur Docker, vous pouvez utiliser la commande suivante pour créer une sauvegarde :
docker exec NOM_DU_CONTENEUR_MYSQL mysqldump -u UTILISATEUR -pMOT_DE_PASSE NOM_DE_LA_BASE > /chemin/vers/votre/dossier/nom_de_sauvegarde.sql- Remplacez
NOM_DU_CONTENEUR_MYSQLpar le nom de votre conteneur MySQL/MariaDB. - Remplacez
UTILISATEURetMOT_DE_PASSEpar vos identifiants de base de données. - Remplacez
NOM_DE_LA_BASEpar le nom de votre base de données Dolibarr. - Cette commande crée un fichier
sauvegarde.sqlcontenant toutes les données de votre base.
- Remplacez
- Si votre base de données est dans un conteneur Docker, vous pouvez utiliser la commande suivante pour créer une sauvegarde :
-
Sauvegarde du répertoire des documents :
- Si vous avez mappé le répertoire des documents de Dolibarr sur votre système hôte lors de la configuration Docker, il vous suffit de copier ce dossier vers un emplacement sûr.
- Si le répertoire des documents est à l'intérieur du conteneur, vous pouvez l'exporter en utilisant la commande suivante :
docker cp NOM_DU_CONTENEUR_DOLIBARR:/chemin/vers/documents /chemin/de/sauvegarde_sur_hote- Remplacez
NOM_DU_CONTENEUR_DOLIBARRpar le nom de votre conteneur Dolibarr. - Remplacez
/chemin/vers/documentspar le chemin du répertoire des documents dans le conteneur. - Remplacez
/chemin/de/sauvegarde_sur_hotepar le chemin où vous souhaitez sauvegarder les documents sur votre machine hôte.
- Remplacez
Restauration de vos données Dolibarr :
-
Restauration de la base de données :
- Copiez le fichier
sauvegarde.sqlsur votre machine hôte si ce n'est pas déjà fait. - Utilisez la commande suivante pour restaurer la base de données :
docker exec -i NOM_DU_CONTENEUR_MYSQL mysql -u UTILISATEUR -pMOT_DE_PASSE NOM_DE_LA_BASE < sauvegarde.sql- Cette commande importe les données du fichier
sauvegarde.sqldans votre base de données.
- Cette commande importe les données du fichier
- Copiez le fichier
-
Restauration du répertoire des documents :
- Si vous avez sauvegardé le répertoire des documents sur votre machine hôte, copiez-le de nouveau à l'endroit approprié.
- Si le répertoire des documents doit être à l'intérieur du conteneur, utilisez la commande suivante pour le copier :
docker cp /chemin/de/sauvegarde_sur_hote NOM_DU_CONTENEUR_DOLIBARR:/chemin/vers/documents
En suivant ces étapes, vous devriez pouvoir sauvegarder et restaurer vos données Dolibarr sans problème. Si vous préférez une explication visuelle, voici une vidéo qui montre comment restaurer Dolibarr en local :
Duplicacy
version: '3.3'
services:
    duplicacy-web:
        container_name: duplicacy
        ports:
            - '3875:3875/tcp'
        environment:
            - USR_ID=998
            - GRP_ID=100
            - TZ=Europe/Paris
        volumes:
            - '/srv/Files/Duplicacy/config:/config'
            - '/srv/Files/Duplicacy/logs:/logs'
            - '/srv/Files/Duplicacy/cache:/cache'
            - '/srv/Files/:/FilesBackup:ro'
        image: saspus/duplicacy-web
Needs a licence.
Duplicati
---
version: "3.3"
services:
  duplicati:
    image: lscr.io/linuxserver/duplicati
    container_name: duplicati
    environment:
      - PUID=0  # That means it runs as root
      - PGID=0  # That means it runs as root
      - TZ=Europe/Paris
     #- CLI_ARGS= #optional
    volumes:
      - /srv/path/Files/Duplicati/config:/config #Config Files
     #- /srv/path/Backups:/BackupStorage #Local Backup Storage
      - /srv/path/Files:/FilesBackup #What to Backup
      - /srv/path/Music:/MusicBackup #What to Backup
      - /srv/path/NextCloud:/NextCloudBackup #What to Backup
      - /srv/path/_XChange:/XChangeBackup #What to Backup
    ports:
      - 8200:8200
    restart: unless-stopped
Discord notifications: http://duplicati-notifications.lloyd.ws
Emulatorjs
---
version: "3.3"
services:
  emulatorjs:
    image: lscr.io/linuxserver/emulatorjs
    container_name: emulatorjs
    environment:
      - PUID=998
      - PGID=100
      - TZ=Europe/Paris
      - SUBFOLDER=/ #optional
    volumes:
      - /srv/path/Files/Emulatorjs/config:/config
      - /srv/path/Files/Emulatorjs/data:/data
    ports:
      - 3000:3000
      - 3001:80 #originally 80:80
      - 4001:4001 #optional
    restart: unless-stopped
epicgames-freegames-node
version: '3.3'
services:
    claabs:
        volumes:
            - '/srv/path/EpicGames/:/usr/app/config:rw'
        ports:
            - '3901:3000'  #originally 3000:3000
        image: 'ghcr.io/claabs/epicgames-freegames-node:latest'
        restart: unless-stopped
Put config.json in /srv/path/EpicGames/
Original config
{
"runOnStartup": true,
"cronSchedule": "0 0/6 * * *",
"logLevel": "info",
"webPortalConfig": {
"baseUrl": "https://epic.example.com",
},
"accounts": [
{
"email": "example@gmail.com",
},
],
"notifiers": [
// You may configure as many of any notifier as needed
// Here are some examples of each type
{
"type": "email",
"smtpHost": "smtp.gmail.com",
"smtpPort": 587,
"emailSenderAddress": "hello@gmail.com",
"emailSenderName": "Epic Games Captchas",
"emailRecipientAddress": "hello@gmail.com",
"secure": false,
"auth": {
"user": "hello@gmail.com",
"pass": "abc123",
},
},
{
"type": "discord",
"webhookUrl": "https://discord.com/api/webhooks/123456789123456789/A-abcdefghijklmn-abcdefghijklmnopqrst12345678-abcdefghijklmnop123456",
// Optional list of users or roles to mention
"mentionedUsers": ["914360712086843432"],
"mentionedRoles": ["734548250895319070"],
},
{
"type": "telegram",
// Optional Custom TELEGRAM server URL
"apiUrl": "https://api.telegram.org",
"token": "644739147:AAGMPo-Jz3mKRnHRTnrPEDi7jUF1vqNOD5k",
"chatId": "-987654321",
},
{
"type": "apprise",
"apiUrl": "http://192.168.1.2:8000",
"urls": "mailto://user:pass@gmail.com",
},
{
"type": "pushover",
"token": "a172fyyl9gw99p2xi16tq8hnib48p2",
"userKey": "uvgidym7l5ggpwu2r8i1oy6diaapll",
},
{
"type": "gotify",
"apiUrl": "https://gotify.net",
"token": "SnL-wAvmfo_QT",
},
{
"type": "homeassistant",
"instance": "https://homeassistant.example.com",
"token": "eyJhbGciOiJIUzI1NiIsInR5cCI6IkpXVCJ9.eyJzdWIiOiIxMjM0NTY3ODkwIiwibmFtZSI6IkpvaG4gRG9lIiwiaWF0IjoxNTE2MjM5MDIyfQ.SflKxwRJSMeKKF2QT4fwpMeJf36POk6yJV_adQssw5c",
"notifyservice": "mobile_app_smartphone_name",
},
{
"type": "bark",
// your bark key
"key": "xxxxxxxxxxxxxxxxxxxxxx",
// bark title, optional, default: 'epicgames-freegames'
"title": "epicgames-freegames",
// bark group, optional, default: 'epicgames-freegames'
"group": "epicgames-freegames",
// bark private service address, optional, default: 'https://api.day.app'
"apiUrl": "https://api.day.app"
},
{
"type": "ntfy",
"webhookUrl": "https://ntfy.example.com/mytopic",
"priority": "urgent",
"token": "tk_mytoken"
},
],
}
Example config
{
"runOnStartup": true,
"cronSchedule": "5 16 * * *",
"logLevel": "info",
"webPortalConfig": {
"baseUrl": "http://serverIP:3901",
},
"accounts": [
{
"email": "account@email.fr",
"password": "password",
},
],
"notifiers": [
{
"type": "discord",
"webhookUrl": "https://discord.com/api/webhooks/XXXXXXXX/xxxxxxxxxxxxxxxxxxxxxxxxxxxxxxxxx",
},
],
}
Then restart the container
EspoCRM
version: '3.8'

services:

  espocrm-db:
    image: mariadb:latest
    container_name: espocrm-db
    environment:
      MARIADB_ROOT_PASSWORD: CHANGEME #change
      MARIADB_DATABASE: espocrm
      MARIADB_USER: espocrm
      MARIADB_PASSWORD: CHANGEME #change
    volumes:
      - /srv/Files/EspoCRM/db:/var/lib/mysql
    restart: always

  espocrm:
    image: espocrm/espocrm
    container_name: espocrm
    environment:
      ESPOCRM_DATABASE_PLATFORM: Mysql
      ESPOCRM_DATABASE_HOST: espocrm-db
      ESPOCRM_DATABASE_USER: espocrm
      ESPOCRM_DATABASE_PASSWORD: CHANGEME #change
      ESPOCRM_ADMIN_USERNAME: admin
      ESPOCRM_ADMIN_PASSWORD: CHANGEME #change
      ESPOCRM_SITE_URL: "http://localhost:8080" #eg http://localhost:4862
    volumes:
      - /srv/Files/EspoCRM/html:/var/www/html
    restart: always
    depends_on:
      - espocrm-db
    ports:
      - 8080:80 #eg 4862:80

  espocrm-daemon:
    image: espocrm/espocrm
    container_name: espocrm-daemon
    volumes:
      - /srv/Files/EspoCRM/html:/var/www/html
    restart: always
    depends_on:
      - espocrm
    entrypoint: docker-daemon.sh

  espocrm-websocket:
    image: espocrm/espocrm
    container_name: espocrm-websocket
    environment:
      ESPOCRM_CONFIG_USE_WEB_SOCKET: "true"
      ESPOCRM_CONFIG_WEB_SOCKET_URL: "ws://localhost:8081" #eg ws://localhost:4863
      ESPOCRM_CONFIG_WEB_SOCKET_ZERO_M_Q_SUBSCRIBER_DSN: "tcp://*:7777"
      ESPOCRM_CONFIG_WEB_SOCKET_ZERO_M_Q_SUBMISSION_DSN: "tcp://espocrm-websocket:7777"
    volumes:
      - /srv/Files/EspoCRM/html:/var/www/html
    restart: always
    depends_on:
      - espocrm
    entrypoint: docker-websocket.sh
    ports:
      - 8081:8080 #eg 4863:80
Filebrowser
version: '3.3'
services:
  filebrowser:
    container_name: filebrowser
    image: filebrowser/filebrowser:latest
    volumes:
      - /srv/path/:/srv  # Arborescence qui sera visible de l'utilisateur par défaut
      - /srv/path/conf/filebrowser.json:/filebrowser.json  # Fichier de configuration pour personnaliser certaines options
      - /srv/path/Files/Filebrowser/db/filebrowser.db:/database.db # mandatory
    ports:
      - 8084:80  # WebUI
    restart: unless-stopped
Default credentials:
admin
admin
By default, we already have a configuration file with some defaults so you can just mount the root and the database. Although you can overwrite by mounting a directory with a new config file. If you don't already have a database file, make sure to create a new empty file under the path you specified. Otherwise, Docker will create an empty folder instead of an empty file, resulting in an error when mounting the database into the container.
NEWS:
The password is printed in the logs. For the correct volumes and entrypoints, check the docs on https://github.com/filebrowser/filebrowser/blob/master/docs/installation.md#docker.
Note that the password will only be shown once, when generating the database file for the first time.
Firefly III
wget https://raw.githubusercontent.com/firefly-iii/docker/main/docker-compose.ymlwget https://raw.githubusercontent.com/firefly-iii/firefly-iii/main/.env.exampleRename .env.example to .env
Nano into docker-compose.yml and .env and edit
docker-compose up -dFirefox
version: '3.3'
services:
    firefox:
        container_name: firefox
        ports:
            - '5800:5800'
        volumes:
            - '/srv/path/Files/Firefox:/config:rw'
        image: jlesage/firefox
        restart: unless-stopped
Fireshare
version: "3"
services:
  fireshare:
    container_name: fireshare
    image: shaneisrael/fireshare:latest
    ports:
      - "8080:80"
    volumes:
      - /srv/path/Fireshare/data:/data
      - /srv/path/Fireshare/processed:/processed
      - /srv/path/Files/Fireshare/videos:/videos
    environment:
      - ADMIN_USERNAME=
      - ADMIN_PASSWORD=
      - SECRET_KEY=long_random_string
      - MINUTES_BETWEEN_VIDEO_SCANS=5
      - PUID=998
      - PGID=100
Flame
version: '3.3'
services:
  flame:
    image: pawelmalak/flame:multiarch2.1.0  # Had to specify the tag
    container_name: flamedashboard
    volumes:
      - /srv/path/Files/FlameDashboard:/app/data
      - /var/run/docker.sock:/var/run/docker.sock # optional but required for Docker integration feature
    ports:
      - 5005:5005
    environment:
      - PASSWORD=xxxxxx
    restart: unless-stopped
My favorite theme : Tron
CSS :
@media (min-width: 0px) {
  .WeatherWidget {
    visibility: visible;
  }
  body {
      background: url(uploads/MilkyWaySmall.jpg);
      background-size: cover;
      background-repeat: no-repeat;
      background-attachment: fixed;
  }
  .BookmarkCard_BookmarkCard__1GmHc, .AppGrid_AppGrid__33iLW {
      margin: 20px;
      background-color: rgba(0,0,0,.5);
      padding: 20px;
  }
  .AppCard_AppCard__1V2_0 {
      padding: 4px !important;
      border-radius: 4px;
      transition: all .1s;
  }
  .AppCard_AppCard__1V2_0:hover {
      background: rgba(0,0,0,1) !important;
  }
    a div>span {                                        	 # remove if want underline (uncomment!)
      display:none !important                 				 # remove if want underline (uncomment!)
  }                                                          # remove if want underline (uncomment!)
}
Personnal : Check vault for weatherapi.com API key and coordinates
Flaresolverr
version: "3.3"
services:
  flaresolverr:
    # DockerHub mirror flaresolverr/flaresolverr:latest
    image: ghcr.io/flaresolverr/flaresolverr:latest
    container_name: flaresolverr
    environment:
      - LOG_LEVEL=debug
      - LOG_HTML=false
      - CAPTCHA_SOLVER=none
      - TZ=Europe/Paris
      - LANG=en_US #important for yggtorrent for example. Don't change
    ports:
      - "8191:8191"
    restart: unless-stopped
---------------------------------------------------------------------------------------------------------------------
version: '3.3'
services:
    flaresolverr:
        container_name: flaresolverr
        ports:
            - '8191:8191'
        environment:
            - LOG_LEVEL=info
        restart: unless-stopped
        image: 'ghcr.io/flaresolverr/flaresolverr:latest'
Flatnotes
version: "3"

services:
  flatnotes:
    container_name: flatnotes
    image: dullage/flatnotes:latest
    environment:
      PUID: 998
      PGID: 100
      FLATNOTES_AUTH_TYPE: "password"
      FLATNOTES_USERNAME: "user"
      FLATNOTES_PASSWORD: "password"
      FLATNOTES_SECRET_KEY: "32keysmegasecret"
    volumes:
      - "/srv/path/Flatnotes/data:/data"
      # Optional. Allows you to save the search index in a different location:
      - "/srv/path/Flatnotes/index:/data/.flatnotes"
    ports:
      - "4568:8080"  #og 8080:8080
    restart: unless-stopped
Fluid Calendar
🛠 Prerequisites
Before starting, ensure you have:
- Docker installed on your machine
- Portainer set up and running
- An available port for the app (default is
3000, but we will use3087in this guide) - An available port for PostgreSQL (default is
5432, but we will use5433for external access)
📂 Step 1: Prepare Your Environment
1️⃣ Create a Directory for Fluid Calendar
Since we need to persist the PostgreSQL database, create a directory:
mkdir -p /srv/Files/Fluidcalendar/postgres_dev_dataThis will be used to store PostgreSQL data outside of the container.
📜 Step 2: Create the docker-compose.yml File
1️⃣ Open Portainer and Create a New Stack
- Go to your Portainer dashboard
- Click on Stacks → Add a new stack
- Name it: fluid-calendar
- Copy and paste the following
docker-compose.ymlconfiguration:
services:
  app:
    image: eibrahim/fluid-calendar:latest
    ports:
      - "3087:3000"  # External 3087 → Internal 3000
    env_file:
      - stack.env
    depends_on:
      db:
        condition: service_healthy
    restart: unless-stopped

  db:
    image: postgres:16-alpine
    environment:
      - POSTGRES_USER=fluid
      - POSTGRES_PASSWORD=fluid
      - POSTGRES_DB=fluid_calendar
    ports:
      - "5433:5432"  # External 5433 → Internal 5432
    volumes:
      - /srv/Files/Fluidcalendar/postgres_dev_data:/var/lib/postgresql/data
    healthcheck:
      test: ["CMD-SHELL", "pg_isready -U fluid -d fluid_calendar"]
      interval: 5s
      timeout: 5s
      retries: 5
    restart: unless-stopped
📄 Step 3: Create the .env File
1️⃣ Add an Environment File in Portainer
- Still in Portainer, scroll down to Environment Variables
- Click Add an Environment File
- Name it:
stack.env - Paste the following content:
# Database Configuration
DATABASE_URL="postgresql://fluid:fluid@db:5432/fluid_calendar"  # Internal Docker communication uses port 5432

# NextAuth Configuration
# Use domain in production, localhost for development
NEXTAUTH_URL="http://localhost:3087"
NEXT_PUBLIC_APP_URL="http://localhost:3087"
NEXTAUTH_SECRET="32charcomplicatedkey"
NEXT_PUBLIC_SITE_URL="http://localhost:3087"

NEXT_PUBLIC_ENABLE_SAAS_FEATURES=false

RESEND_API_KEY=
RESEND_FROM_EMAIL=
🚀 Step 4: Deploy the Stack
- Click "Deploy the stack" in Portainer
- Wait for the services to start
- Open your browser and go to http://localhost:3087
✅ Step 5: Verify Everything is Running
1️⃣ Check Running Containers
In your terminal, run:
docker ps
You should see two running containers:
fluidcalendar_app_1fluidcalendar_db_1
2️⃣ Check Logs for Errors
If something is wrong, check logs:
docker logs -f fluidcalendar-app-1
docker logs -f fluidcalendar-db-1
3️⃣ Test the Database Connection
If the app doesn’t connect, manually check the database:
docker exec -it fluidcalendar-db-1 psql -U fluid -d fluid_calendar
If it works, the database is running fine.
🔗 Step 6: Connect Fluid Calendar to Nextcloud
To sync your Nextcloud calendar with Fluid Calendar, use the following details:
- Username: Your Nextcloud username
- Password: An app-specific password (Generate one in Nextcloud under Settings → Security)
- Server URL:
https://cloud.example.com(Replace with your Nextcloud instance) - Path:
/remote.php/dav
🐛 Troubleshooting
❌ App stuck at "Waiting for database to be ready..."
- Check that the database container is running:
docker ps | grep fluidcalendar-db - Ensure you are using port
5432inside Docker:
Run this inside the app container:
If this works, updatedocker exec -it fluidcalendar-app-1 sh psql "postgresql://fluid:fluid@db:5432/fluid_calendar".envto use5432, not5433.
❌ Database Not Persisting
Make sure the volume is mounted correctly:
ls -la /srv/Files/Fluidcalendar/postgres_dev_dataIf the folder is empty, check that Docker has write permissions.
🎉 Conclusion
That's it! You have successfully deployed Fluid Calendar on Portainer with Docker. 🚀
If you run into any issues, check the logs and verify the database connection. Hope this helps! 😊
FreeAskInternet
FreeAskInternet is a completely free, private and locally running search aggregator & answer generate using LLM, Without GPU needed. The user can ask a question and the system will use searxng to make a multi engine search and combine the search result to the ChatGPT3.5 LLM and generate the answer based on search results. All process running locally and No GPU or OpenAI or Google API keys are needed.
git clone https://github.com/nashsu/FreeAskInternet.git
cd ./FreeAskInternet
docker-compose up -d
Feeling spicy ? Try this shit out:
networks:
  freeaskinternet_default:
    external: true
    name: "freeaskinternet_default"

services:

  freeaskinternet-backend-1:
    command:
      - "server.py"
    container_name: "freeaskinternet-backend-1"
    entrypoint:
      - "python3"
    environment:
      - "PATH=/usr/local/bin:/usr/local/sbin:/usr/local/bin:/usr/sbin:/usr/bin:/sbin:/bin"
      - "LANG=C.UTF-8"
      - "GPG_KEY=E3FF2839C048B25C084DEBE9B26995E310250568"
      - "PYTHON_VERSION=3.9.15"
      - "PYTHON_PIP_VERSION=22.0.4"
      - "PYTHON_SETUPTOOLS_VERSION=58.1.0"
      - "PYTHON_GET_PIP_URL=https://github.com/pypa/get-pip/raw/66030fa03382b4914d4c4d0896961a0bdeeeb274/public/get-pip.py"
      - "PYTHON_GET_PIP_SHA256=1e501cf004eac1b7eb1f97266d28f995ae835d30250bec7f8850562703067dc6"
    expose:
      - "8000/tcp"
    hostname: "55226ab67b8a"
    image: "docker.io/nashsu/free_ask_internet:latest"
    ipc: "private"
    labels:
      com.docker.compose.config-hash: "f5f70b9ca8856bc79cbc29ef1d8b507e48287735f54d6f1faba0ab4f39e2fd2c"
      com.docker.compose.container-number: "1"
      com.docker.compose.depends_on: "llm-freegpt35:service_started:false"
      com.docker.compose.image: "sha256:98fe4e92e1c51ddf4963400c19edc998ecab4d928ecf56cad59c519881572d7f"
      com.docker.compose.oneoff: "False"
      com.docker.compose.project: "freeaskinternet"
      com.docker.compose.project.config_files: "/srv/Files/FreeAskInternet/docker-compose.yaml"
      com.docker.compose.project.working_dir: "/srv/Files/FreeAskInternet"
      com.docker.compose.service: "backend"
      com.docker.compose.version: "2.27.0"
    logging:
      driver: "json-file"
      options: {}
    networks:
      - "freeaskinternet_default"
    restart: "on-failure"
    working_dir: "/app"

  freeaskinternet-chatgpt-next-web-1:

    command:
      - "/bin/sh"
      - "-c"
      - "if [ -n \"$PROXY_URL\" ]; then     export HOSTNAME=\"127.0.0.1\";     protocol=$(echo $PROXY_URL\
        \ | cut -d: -f1);     host=$(echo $PROXY_URL | cut -d/ -f3 | cut -d: -f1);     port=$(echo $PROXY_URL\
        \ | cut -d: -f3);     conf=/etc/proxychains.conf;     echo \"strict_chain\" > $conf;     echo\
        \ \"proxy_dns\" >> $conf;     echo \"remote_dns_subnet 224\" >> $conf;     echo \"tcp_read_time_out\
        \ 15000\" >> $conf;     echo \"tcp_connect_time_out 8000\" >> $conf;     echo \"localnet 127.0.0.0/255.0.0.0\"\
        \ >> $conf;     echo \"localnet ::1/128\" >> $conf;     echo \"[ProxyList]\" >> $conf;     echo\
        \ \"$protocol $host $port\" >> $conf;     cat /etc/proxychains.conf;     proxychains -f $conf\
        \ node server.js;     else     node server.js;     fi"

    container_name: "freeaskinternet-chatgpt-next-web-1"

    entrypoint:
      - "docker-entrypoint.sh"

    environment:
      - "CUSTOM_MODELS=-all,+gpt-3.5-turbo"
      - "OPENAI_API_KEY=FreeAskInternet"
      - "BASE_URL=http://backend:8000"
      - "PATH=/usr/local/sbin:/usr/local/bin:/usr/sbin:/usr/bin:/sbin:/bin"
      - "NODE_VERSION=18.20.2"
      - "YARN_VERSION=1.22.19"
      - "PROXY_URL="
      - "GOOGLE_API_KEY="
      - "CODE="

    hostname: "d91bd72f9ceb"

    image: "yidadaa/chatgpt-next-web"

    ipc: "private"

    labels:
      com.docker.compose.config-hash: "995ddb15df366e72330778bffbf3b3ff94fb96314af4399cf0e9da8daa43cac3"
      com.docker.compose.container-number: "1"
      com.docker.compose.depends_on: "llm-freegpt35:service_started:false"
      com.docker.compose.image: "sha256:f4666e8c59d9e864d55aad3700f0de304bded7fb3d0acd6008938959627a2c66"
      com.docker.compose.oneoff: "False"
      com.docker.compose.project: "freeaskinternet"
      com.docker.compose.project.config_files: "/srv/Files/FreeAskInternet/docker-compose.yaml"
      com.docker.compose.project.working_dir: "/srv/Files/FreeAskInternet"
      com.docker.compose.service: "chatgpt-next-web"
      com.docker.compose.version: "2.27.0"
      org.opencontainers.image.created: "2024-05-14T09:37:52.274Z"
      org.opencontainers.image.description: "A cross-platform ChatGPT/Gemini UI (Web / PWA / Linux / Win\
        \ / MacOS). 一键拥有你自己的跨平台 ChatGPT/Gemini 应用。"
      org.opencontainers.image.licenses: "MIT"
      org.opencontainers.image.revision: "cf635a5e6fe21b5ae4cfc4f17ec7f7f2f8aa053e"
      org.opencontainers.image.source: "https://github.com/ChatGPTNextWeb/ChatGPT-Next-Web"
      org.opencontainers.image.title: "ChatGPT-Next-Web"
      org.opencontainers.image.url: "https://github.com/ChatGPTNextWeb/ChatGPT-Next-Web"
      org.opencontainers.image.version: "v2.12.3"

    logging:
      driver: "json-file"
      options: {}

    networks:
      - "freeaskinternet_default"

    ports:
      - "3030:3000/tcp"

    restart: "always"

    working_dir: "/app"

  freeaskinternet-freeaskinternet-ui-1:
    container_name: "freeaskinternet-freeaskinternet-ui-1"
    entrypoint:
      - "/bin/sh"
      - "/data/generate-config.sh"
    environment:
      - "BACKEND_HOST=backend:8000"
      - "PATH=/usr/local/sbin:/usr/local/bin:/usr/sbin:/usr/bin:/sbin:/bin"
      - "NGINX_VERSION=1.25.4"
      - "PKG_RELEASE=1"
      - "NJS_VERSION=0.8.3"
    hostname: "9f1f027ddc20"
    image: "docker.io/nashsu/free_ask_internet_ui:latest"
    ipc: "private"
    labels:
      com.docker.compose.config-hash: "65a0a9b2dd098c91d00b45b0faedfdc18643c654a04420912e1f72223dfbf066"
      com.docker.compose.container-number: "1"
      com.docker.compose.depends_on: "backend:service_started:false"
      com.docker.compose.image: "sha256:01d7402232616e6c6ebc5ca7804cc7543616debe6193b1f105ae7fae8e45a5fa"
      com.docker.compose.oneoff: "False"
      com.docker.compose.project: "freeaskinternet"
      com.docker.compose.project.config_files: "/srv/Files/FreeAskInternet/docker-compose.yaml"
      com.docker.compose.project.working_dir: "/srv/Files/FreeAskInternet"
      com.docker.compose.service: "freeaskinternet-ui"
      com.docker.compose.version: "2.27.0"
      maintainer: "NGINX Docker Maintainers <docker-maint@nginx.com>"
    logging:
      driver: "json-file"
      options: {}
    networks:
      - "freeaskinternet_default"
    ports:
      - "3000:80/tcp"
    restart: "always"
    working_dir: "/data"

  freeaskinternet-llm-freegpt35-1:

    command:
      - "node"
      - "app.js"

    container_name: "freeaskinternet-llm-freegpt35-1"

    entrypoint:
      - "docker-entrypoint.sh"

    environment:
      - "PATH=/usr/local/sbin:/usr/local/bin:/usr/sbin:/usr/bin:/sbin:/bin"
      - "NODE_VERSION=21.7.3"
      - "YARN_VERSION=1.22.19"

    expose:
      - "3040/tcp"

    hostname: "6c4928cf1b1c"

    image: "missuo/freegpt35:latest"

    ipc: "private"

    labels:
      com.docker.compose.config-hash: "2e9af5a824aefce8a20b83f617ef893932790f93b878e46fae9f4997e63b8b5c"
      com.docker.compose.container-number: "1"
      com.docker.compose.depends_on: ""
      com.docker.compose.image: "sha256:c75d531daf82f0b2b1a9b2e782dfb30465c39c7fe54c6afd616a3e39d2cb7d30"
      com.docker.compose.oneoff: "False"
      com.docker.compose.project: "freeaskinternet"
      com.docker.compose.project.config_files: "/srv/Files/FreeAskInternet/docker-compose.yaml"
      com.docker.compose.project.working_dir: "/srv/Files/FreeAskInternet"
      com.docker.compose.service: "llm-freegpt35"
      com.docker.compose.version: "2.27.0"
      org.opencontainers.image.created: "2024-04-21T05:57:41.050Z"
      org.opencontainers.image.description: "Utilize the unlimited free GPT-3.5-Turbo API service provided\
        \ by the login-free ChatGPT Web."
      org.opencontainers.image.licenses: "AGPL-3.0"
      org.opencontainers.image.revision: "b4c62270753d648aec9b56194f03d04425371b64"
      org.opencontainers.image.source: "https://github.com/missuo/FreeGPT35"
      org.opencontainers.image.title: "FreeGPT35"
      org.opencontainers.image.url: "https://github.com/missuo/FreeGPT35"
      org.opencontainers.image.version: "v1.0.3"

    logging:
      driver: "json-file"
      options: {}

    networks:
      - "freeaskinternet_default"

    restart: "always"

    working_dir: "/usr/src/app"

  freeaskinternet-llm-glm4-1:
    command:
      - "npm"
      - "start"
    container_name: "freeaskinternet-llm-glm4-1"
    entrypoint:
      - "docker-entrypoint.sh"
    environment:
      - "TZ=Asia/Shanghai"
      - "PATH=/usr/local/sbin:/usr/local/bin:/usr/sbin:/usr/bin:/sbin:/bin"
      - "NODE_VERSION=20.12.2"
      - "YARN_VERSION=1.22.19"
    expose:
      - "8000/tcp"
    hostname: "671d6b06305b"
    image: "vinlic/glm-free-api:latest"
    ipc: "private"
    labels:
      com.docker.compose.config-hash: "c7da6e379caf5847357ed8a50ccebfd99520f4ab74da202981bf805eb601aaa6"
      com.docker.compose.container-number: "1"
      com.docker.compose.depends_on: ""
      com.docker.compose.image: "sha256:25297b723d80f324fe5fe2f575ac77dc99b554f19e1e99aac04e04f331cf3152"
      com.docker.compose.oneoff: "False"
      com.docker.compose.project: "freeaskinternet"
      com.docker.compose.project.config_files: "/srv/Files/FreeAskInternet/docker-compose.yaml"
      com.docker.compose.project.working_dir: "/srv/Files/FreeAskInternet"
      com.docker.compose.service: "llm-glm4"
      com.docker.compose.version: "2.27.0"
    logging:
      driver: "json-file"
      options: {}
    networks:
      - "freeaskinternet_default"
    restart: "always"
    working_dir: "/app"

  freeaskinternet-llm-kimi-1:
    command:
      - "npm"
      - "start"
    container_name: "freeaskinternet-llm-kimi-1"
    entrypoint:
      - "docker-entrypoint.sh"
    environment:
      - "TZ=Asia/Shanghai"
      - "PATH=/usr/local/sbin:/usr/local/bin:/usr/sbin:/usr/bin:/sbin:/bin"
      - "NODE_VERSION=20.12.2"
      - "YARN_VERSION=1.22.19"
    expose:
      - "8000/tcp"
    hostname: "c2b7a29ac31b"
    image: "vinlic/kimi-free-api:latest"
    ipc: "private"
    labels:
      com.docker.compose.config-hash: "a323333684f35efaab9c9a2d890c77dd6b94bdfde91a7ba4f21712eba2b93d2d"
      com.docker.compose.container-number: "1"
      com.docker.compose.depends_on: ""
      com.docker.compose.image: "sha256:98ff6a7e693d2d864c46435394a1c259403f0a35d7de1ad4e7d3f01257a93575"
      com.docker.compose.oneoff: "False"
      com.docker.compose.project: "freeaskinternet"
      com.docker.compose.project.config_files: "/srv/Files/FreeAskInternet/docker-compose.yaml"
      com.docker.compose.project.working_dir: "/srv/Files/FreeAskInternet"
      com.docker.compose.service: "llm-kimi"
      com.docker.compose.version: "2.27.0"
    logging:
      driver: "json-file"
      options: {}
    networks:
      - "freeaskinternet_default"
    restart: "always"
    working_dir: "/app"

  freeaskinternet-llm-qwen-1:
    command:
      - "npm"
      - "start"
    container_name: "freeaskinternet-llm-qwen-1"
    entrypoint:
      - "docker-entrypoint.sh"
    environment:
      - "TZ=Asia/Shanghai"
      - "PATH=/usr/local/sbin:/usr/local/bin:/usr/sbin:/usr/bin:/sbin:/bin"
      - "NODE_VERSION=20.13.1"
      - "YARN_VERSION=1.22.19"
    expose:
      - "8000/tcp"
    hostname: "134e3a7697e8"
    image: "vinlic/qwen-free-api:latest"
    ipc: "private"
    labels:
      com.docker.compose.config-hash: "6bf517a5d6f525418f968c76ee2a308ba3dfabb7e3f6ce22a8544848befde6ee"
      com.docker.compose.container-number: "1"
      com.docker.compose.depends_on: ""
      com.docker.compose.image: "sha256:1dc8a3918999b6f37bac7199081e413e89907c741e52c4445b4f837b1988be55"
      com.docker.compose.oneoff: "False"
      com.docker.compose.project: "freeaskinternet"
      com.docker.compose.project.config_files: "/srv/Files/FreeAskInternet/docker-compose.yaml"
      com.docker.compose.project.working_dir: "/srv/Files/FreeAskInternet"
      com.docker.compose.service: "llm-qwen"
      com.docker.compose.version: "2.27.0"
    logging:
      driver: "json-file"
      options: {}
    networks:
      - "freeaskinternet_default"
    restart: "always"
    working_dir: "/app"

  freeaskinternet-searxng-1:

    cap_drop:
      - "ALL"

    container_name: "freeaskinternet-searxng-1"

    entrypoint:
      - "/sbin/tini"
      - "--"
      - "/usr/local/searxng/dockerfiles/docker-entrypoint.sh"

    environment:
      - "SEARXNG_BASE_URL=https://localhost/"
      - "PATH=/usr/local/sbin:/usr/local/bin:/usr/sbin:/usr/bin:/sbin:/bin"
      - "INSTANCE_NAME=searxng"
      - "AUTOCOMPLETE="
      - "BASE_URL="
      - "MORTY_KEY="
      - "MORTY_URL="
      - "SEARXNG_SETTINGS_PATH=/etc/searxng/settings.yml"
      - "UWSGI_SETTINGS_PATH=/etc/searxng/uwsgi.ini"
      - "UWSGI_WORKERS=%k"
      - "UWSGI_THREADS=4"

    expose:
      - "8080/tcp"

    hostname: "57bd913a80a3"

    image: "docker.io/searxng/searxng:latest"

    ipc: "private"

    labels:
      com.docker.compose.config-hash: "0d074aae5f883d0f2b78373c201d847e610d78f3fe27f2d7f4f7da9bc460581b"
      com.docker.compose.container-number: "1"
      com.docker.compose.depends_on: ""
      com.docker.compose.image: "sha256:253fcf66aef5e3654f1fc3ca986853301e91db905eb31d7e9ac658f871b686da"
      com.docker.compose.oneoff: "False"
      com.docker.compose.project: "freeaskinternet"
      com.docker.compose.project.config_files: "/srv/Files/FreeAskInternet/docker-compose.yaml"
      com.docker.compose.project.working_dir: "/srv/Files/FreeAskInternet"
      com.docker.compose.service: "searxng"
      com.docker.compose.version: "2.27.0"
      description: "A privacy-respecting, hackable metasearch engine."
      maintainer: "searxng <https://github.com/searxng/searxng>"
      org.label-schema.build-date: "2024-05-16T05:34:24Z"
      org.label-schema.name: "searxng"
      org.label-schema.schema-version: "1.0"
      org.label-schema.url: "https://github.com/searxng/searxng"
      org.label-schema.usage: "https://github.com/searxng/searxng-docker"
      org.label-schema.vcs-ref: "2f2d93b292a62c0d78187f3cac0cda7599efc066"
      org.label-schema.vcs-url: "https://github.com/searxng/searxng"
      org.label-schema.version: "2024.5.16+2f2d93b29"
      org.opencontainers.image.created: "2024-05-16T05:34:24Z"
      org.opencontainers.image.documentation: "https://github.com/searxng/searxng-docker"
      org.opencontainers.image.revision: "2f2d93b292a62c0d78187f3cac0cda7599efc066"
      org.opencontainers.image.source: "https://github.com/searxng/searxng"
      org.opencontainers.image.title: "searxng"
      org.opencontainers.image.url: "https://github.com/searxng/searxng"
      org.opencontainers.image.version: "2024.5.16-2f2d93b29"
      version: "2024.5.16+2f2d93b29"

    logging:
      driver: "json-file"
      options:
        max-file: "1"
        max-size: "1m"

    networks:
      - "freeaskinternet_default"

    restart: "always"

    volumes:
      - "/srv/Files/FreeAskInternet/searxng:/etc/searxng"

    working_dir: "/usr/local/searxng"

version: "3.6"
FreshRSS
FreshRSS is a self-hosted RSS feed aggregator.
version: "3.3"
services:
  freshrss:
    restart: unless-stopped
    logging:
      options:
        max-size: 10m
    ports:
      - 6327:80
    environment:
      - TZ=Europe/Paris
      - CRON_MIN=1,31
    volumes:
      - /srv/Files/FreshRSS/freshrss_data:/var/www/FreshRSS/data
      - /srv/Files/FreshRSS/freshrss_extensions:/var/www/FreshRSS/extensions
    container_name: freshrss
    image: freshrss/freshrss
#volumes:
#  freshrss_data: {}
#  freshrss_extensions: {}
Funkwhale
version: '3.3'
services:
    funkwhale:
        container_name: funkwhale
        environment:
            - FUNKWHALE_HOSTNAME=<yourdomain.funkwhale>
            - NESTED_PROXY=0
            - PUID=998
            - PGID=100
        volumes:
            - '/srv/path/Files/Funkwhale:/data'
            - '/srv/path/Files/Funkwhale/Music:/music:ro'
        ports:
            - '9136:80'
        image: thetarkus/funkwhale
        restart: unless-stopped
docker exec -it funkwhale manage createsuperuserdocker exec -it funkwhale manage import_files 117f11a4-6f3d-4a9d-8a31-955a3789545a "/music/**/**/*.mp3" --in-place --asyncGerbera
Gerbera is a UPnP media server which allows you to stream your digital media through your home network and consume it on a variety of UPnP compatible devices.
Ports
Port 49494/tcp (HTTP, also set as gerbera port via command line) and 1900/udp (SSDP Multicast) are exposed by default.
Multicast
UPnP relies on having clients and servers able to communicate via IP Multicast. The default docker bridge network setup does not support multicast. The easiest way to achieve this is to use "host networking". Connecting Gerbera to your network via the "macvlan" driver should work, but remember you will not be able to access the container from the docker host with this method by default.
Transcoding Tools
Transcoding tools are made available in a separate image with the -transcoding suffix. e.g. gerbera/gerbera:2.3.0-transcoding. Includes tools such as ffmpeg and vlc.
Examples
Serve some files via a volume
$ docker run \
    --name some-gerbera \
    --network=host \
    -v /some/files:/mnt/content:ro \
     gerbera/gerbera:2.3.0
or for those that prefer docker-compose:
---
version: "2.3"
services:
  gerbera:
    image: gerbera/gerbera
    container_name: gerbera
    network_mode: host
    volumes:
      - ./gerbera-config:/var/run/gerbera
      - /some/files:/mnt/content:ro

volumes:
  gerbera-config:
    external: false
The directory /mnt/content is automatically scanned for content by default. Host networking enables us to bypass issues with broadcast across docker bridges.
You may place custom JavaScript files in the directory /mnt/customization/js. Every time Gerbera creates /var/run/gerbera/config.xml, the shell script /mnt/customization/shell/gerbera_config.sh (if existing) will be executed.
Provide your own config file
$ docker run \
    --name another-gerbera \
    --network=host \
    -v /some/files:/mnt/content:ro \
    -v /some/path/config.xml:/var/run/gerbera/config.xml \
     gerbera/gerbera:2.3.0
Overwrite default ports
In cases (e.g. running multiple gerbera containers with different versions) you can override the exported ports
$ docker run \
    --name another-gerbera \
    --network=host \
    --expose <your-port>:<your-port> \
    -v /some/files:/mnt/content:ro \
     gerbera/gerbera:2.3.0 gerbera --port <your-port> --config /var/run/gerbera/config.xml
Overwrite default user and group id
In cases (e.g. running multiple gerbera containers with different versions) you can override the exported ports
$ docker run \
    --name another-gerbera \
    --network=host \
    --env UID=<newuid> \
    --env GID=<newgid> \
    -v /some/files:/mnt/content:ro \
     gerbera/gerbera:2.3.0 gerbera --config /var/run/gerbera/config.xml
BASE_IMAGE
Use a different base image for container. Changing this may lead to build problems if the required packages are not available.
- Default: alpine:3.20
IMAGE_USER, IMAGE_GROUP
Set a different user/group name in the image to match user/group names on your host
- Default: gerbera
IMAGE_UID, IMAGE_GID
Set a different user/group id in the image to match user/group ids on your host
- Default: 1042
IMAGE_PORT
Change the port of gerbera in the image so you don't have to overwrite the port settings on startup.
- Default: 49494
Ghost
version: '3.3'
services:

  ghost:
    image: ghost:latest
    restart: always
    depends_on:
      - db
    environment:
      url: https://example.com
      database__client: mysql
      database__connection__host: db
      database__connection__user: ghost
      database__connection__password: ghostdbpass
      database__connection__database: ghostdb
    volumes:
      - /home/ghost/content:/var/lib/ghost/content

  db:
    image: mariadb:latest
    restart: always
    environment:
      MYSQL_ROOT_PASSWORD: your_mysql_root_password
      MYSQL_USER: ghost
      MYSQL_PASSWORD: ghostdbpass
      MYSQL_DATABASE: ghostdb
    volumes:
      - /home/ghost/mysql:/var/lib/mysql
  nginx:
    build:
      context: ./nginx
      dockerfile: Dockerfile
    restart: always
    depends_on:
      - ghost
    ports:
      - "80:80"
      - "443:443"
    volumes:
      - /etc/letsencrypt/:/etc/letsencrypt/
      - /usr/share/nginx/html:/usr/share/nginx/html
Gitea
version: "3"

networks:
  gitea:
    external: false

services:
  server:
    image: gitea/gitea:1.15.8
    container_name: gitea
    environment:
      - USER_UID=998
      - USER_GID=100
      - GITEA__database__DB_TYPE=mysql
      - GITEA__database__HOST=db:3306
      - GITEA__database__NAME=gitea
      - GITEA__database__USER=gitea
      - GITEA__database__PASSWD=xxxxxx
    restart: unless-stopped
    networks:
      - gitea
    volumes:
      - ./srv/Files/Gitea/data:/data
      - /etc/timezone:/etc/timezone:ro
      - /etc/localtime:/etc/localtime:ro
    ports:
      - "3000:3000"
      - "222:22"
    depends_on:
      - db

  db:
    image: mysql:8
    restart: unless-stopped
    environment:
      - MYSQL_ROOT_PASSWORD=xxxxxxx
      - MYSQL_USER=gitea
      - MYSQL_PASSWORD=xxxxxx
      - MYSQL_DATABASE=gitea
    networks:
      - gitea
    volumes:
      - ./mysql:/var/lib/mysql
Gluetun
version: "3.3"
services:
  gluetun:
    image: qmcgaw/gluetun
    cap_add:
      - NET_ADMIN
    ports:
      - 8889:8888/tcp # HTTP proxy  #original 8888:8888
      - 8388:8388/tcp # Shadowsocks
      - 8388:8388/udp # Shadowsocks
  #    - 5800:5800 # firefox
  #    - 6080:6080 # soulseek
    volumes:
      - /srv/path/Files/Gluetun:/gluetun/config.conf:ro
    environment:
      - VPNSP=custom  # or supported provider
      - VPN_TYPE=wireguard
     ## For OpenVPN
  #    - OPENVPN_CUSTOM_CONFIG=/gluetun/custom.conf
     ## For Wireguard
      - WIREGUARD_ENDPOINT_IP=
      - WIREGUARD_ENDPOINT_PORT=51820
      - WIREGUARD_PUBLIC_KEY=
      - WIREGUARD_PRIVATE_KEY=
      - WIREGUARD_PRESHARED_KEY=
      - WIREGUARD_ADDRESS=
  #    - SERVER_COUNTRIES=Netherlands # optionnal
  #    - FIREWALL_VPN_INPUT_PORTS= # for port forwarding, multiple comma separated
      - TZ=Europe/Paris
    restart: unless-stopped
With AirVPN : https://github.com/qdm12/gluetun/wiki/AirVPN
Port Forwarding : https://github.com/qdm12/gluetun/wiki/VPN-server-port-forwarding
Goaccess for NginxProxyManager
version: "3"
services:
  goaccess:
    image: justsky/goaccess-for-nginxproxymanager
    container_name: goaccess-for-nginxproxymanager
    restart: unless-stopped
    environment:
        - TZ=Europe/Paris
        - PUID=998
        - PGID=100
    ports:
        - '7880:7880'
    volumes:
        - /srv/dev-disk-by-uuid-53d16a81-1979-44a2-9f39-fd2dff88856a/Files/NginxProxyManager/data/logs/:/opt/log
Gotify
version: "3"

services:
  gotify:
    image: gotify/server
    ports:
      - 8080:80
    environment:
      - GOTIFY_DEFAULTUSER_PASS=custom #change this. for "admin" credential
    volumes:
- "./gotify_data:/app/data"gotify/server-arm7/ghcr.io/gotify/server-arm7: for arm-7 processors (raspberry pi)gotify/server-arm64/ghcr.io/gotify/server-arm64: for arm-64 processors
Headphones
---
version: "3.3"
services:
  headphones:
    image: lscr.io/linuxserver/headphones
    container_name: headphones
    environment:
      - PUID=998
      - PGID=100
      - TZ=Europe/Paris
    volumes:
      - /srv/path/Files/Headphones/config:/config
      - /srv/path/Files/Headphones/downloads:/downloads
      - /srv/path/Music:/music
    ports:
      - 8181:8181
    restart: unless-stopped
Heimdall
---
version: "3.3"
services:
  heimdall:
    image: lscr.io/linuxserver/heimdall
    container_name: heimdall
    environment:
      - PUID=998
      - PGID=100
      - TZ=Europe/Paris
    volumes:
      - /srv/path/Files/Heimdall/config:/config
    ports:
      - 3210:80
      - 4435:443
    restart: unless-stopped
Homechart
version: "3"
volumes:
  postgres: {}

services:
  homechart:
    depends_on:
      - postgres
    environment:
      HOMECHART_POSTGRESQL_HOSTNAME: postgres
      HOMECHART_POSTGRESQL_PASSWORD: xxxxxx
      HOMECHART_POSTGRESQL_USERNAME: postgres
      HOMECHART_APP_ADMINEMAILADDRESSES: t@f.fr
      HOMECHART_SMTP_HOSTNAME: ssl0.ovh.net
      HOMECHART_SMTP_EMAILADDRESS: a@s.com
      HOMECHART_SMTP_REPLYTO: a@s.com
      HOMECHART_SMTP_PORT: 465
      HOMECHART_SMTP_PASSWORD: xxxxxx
      HOMECHART_SMTP_USERNAME: a@s.com
    image: candiddev/homechart:latest
    ports:
      - "3031:3000"
    restart: unless-stopped
  postgres:
    environment:
      POSTGRES_PASSWORD: xxxxxx
    image: postgres:14
    restart: unless-stopped
    volumes:
      - /srv/Path/Homechart/postgres:/var/lib/postgresql/data
Homepage
services:
    homepage:
        image: ghcr.io/gethomepage/homepage:latest
        container_name: homepage
        ports:
            - 5005:3000
        volumes:
            - /srv/path/to/config:/app/config
            - /srv/path1:/data # for widget resources
            - /srv/path2:/backup # for widget resources
            - /var/run/docker.sock:/var/run/docker.sock # (optional) For docker integrations
        environment:
            - LOG_LEVEL=debug
            - HOMEPAGE_ALLOWED_HOSTS=*
        restart: unless-stopped
HOMEPAGE_ALLOWED_HOSTS
As of v1.0 there is one required environment variable to access homepage via a URL other than localhost, HOMEPAGE_ALLOWED_HOSTS. The setting helps prevent certain kinds of attacks when retrieving data from the homepage API proxy.
The value is a comma-separated (no spaces) list of allowed hosts (sometimes with the port) that can host your homepage install. See the docker, kubernetes and source installation pages for more information about where / how to set the variable.
localhost:3000 and 127.0.0.1:3000 are always included, but you can add a domain or IP address to this list to allow that host such as HOMEPAGE_ALLOWED_HOSTS=gethomepage.dev,192.168.1.2:1234, etc.
If you are seeing errors about host validation, check the homepage logs and ensure that the host exactly as output in the logs is in the HOMEPAGE_ALLOWED_HOSTS list.
This can be disabled by setting HOMEPAGE_ALLOWED_HOSTS to * but this is not recommended.
HRConvert2
A self-hosted drag-and-drop file conversion server & file sharing tool that supports 445 file formats with 4 color schemes & 13 end-user selectable languages.
services:
  hrconvert2:
    ports:
      - 8080:80
      - 8443:443
    image: zelon88/hrconvert2:latest
networks: {}
Huginn
Link :
version: '3.3'
services:
    huginn:
        ports:
            - '8013:3000'
        restart: unless-stopped
        volumes:
            - '/srv/Files/Huginn/data:/var/lib/mysql'
        image: huginn/huginn
Humhub
version: '3.1'
services:
  humhub:
    image: mriedmann/humhub:1.6.2
    links:
      - "db:db"
    ports:
      - "4862:80"
    volumes:
      - "/srv/path/Files/Humhub/config:/var/www/localhost/htdocs/protected/config"
      - "/srv/path/Files/Humhub/uploads:/var/www/localhost/htdocs/uploads"
      - "/srv/path/Files/Humhub/modules:/var/www/localhost/htdocs/protected/modules"
    environment:
      HUMHUB_DB_USER: user
      HUMHUB_DB_PASSWORD: pass

  db:
    image: mariadb:10.2
    environment:
      MYSQL_ROOT_PASSWORD: xxxxxx
      MYSQL_DATABASE: humhub
      MYSQL_USER: humhub
      MYSQL_PASSWORD: xxxxxx

volumes:
  config: {}
  uploads: {}
  modules: {}
I Hate Money
I hate money is a web application made to ease shared budget management. It keeps track of who bought what, when, and for whom; and helps to settle the bills.
version: "3.3"
services:
  ihatemoney:
    ports:
      - 8293:8000  # OG 8000:8000
    volumes:
      - /srv/path/Ihatemoney/database:/database
    environment:
      - SESSION_COOKIE_SECURE=False # set to true if running over https
      - ACTIVATE_DEMO_PROJECT=False
      - ALLOW_PUBLIC_PROJECT_CREATION= False
      - BABEL_DEFAULT_TIMEZONE=Europe/Paris
      - ACTIVATE_ADMIN_DASHBOARD=True
      - ADMIN_PASSWORD=pbkdf2:sha256:600000$$xxxxxxx # in the case of a docker-compose like here BE SURE to ADD a $ after '600000$'
    image: ihatemoney/ihatemoney
    restart: unless-stopped
To enable the Admin dashboard, first generate a hashed password with:
docker run -it --rm --entrypoint ihatemoney ihatemoney/ihatemoney generate_password_hashCopy paste the hashed password adding a $ as indicated in the comment in the docker-compose
If you get CSRF Token: The CSRF tokens do not match. you're accessing the plateform through plain HTTP so you need to disable secure cookies: https://ihatemoney.readthedocs.io/en/latest/configuration.html#session-cookie-secure
Or just use a domain with HTTPS.
Imagor
Self-hosted image gallery and live editing web application for creators
- Can edit images.
- Can't share gallery to clients to be downloaded.
version: "3.8"

services:
  imagor-studio:
    image: shumc/imagor-studio:latest
    ports:
      - "8000:8000"
    volumes:
      - /srv/dev-disk-by-uuid-7fe66601-5ca0-4c09-bc13-a015025fe53a/Files/Imagor/data:/app/data
      - /srv/dev-disk-by-uuid-7fe66601-5ca0-4c09-bc13-a015025fe53a/Files/Imagor/Pictures:/app/gallery
    environment:
      - DATABASE_URL=sqlite:///app/data/imagor-studio.db
      - PORT=8000
      # User/Group configuration (optional)
      - PUID=998 # Set to your user ID
      - PGID=100 # Set to your group ID
    restart: unless-stopped
sudo chown -R 998:100 /srv/dev-disk-by-uuid-7fe66601-5ca0-4c09-bc13-a015025fe53a/Files/Imagor/datasudo chmod -R 750 /srv/dev-disk-by-uuid-7fe66601-5ca0-4c09-bc13-a015025fe53a/Files/Imagor/data
Immich
Docker Compose [Recommended]
Docker Compose is the recommended method to run Immich in production. Below are the steps to deploy Immich with Docker Compose.
Step 1 - Download the required files
Create a directory of your choice (e.g. ./immich-app) to hold the docker-compose.yml and .env files.
mkdir ./immich-app
cd ./immich-app
Download docker-compose.yml and example.env, either by running the following commands:
wget https://github.com/immich-app/immich/releases/latest/download/docker-compose.ymlwget -O .env https://github.com/immich-app/immich/releases/latest/download/example.envwget https://github.com/immich-app/immich/releases/latest/download/hwaccel.ymlor by downloading from your browser and moving the files to the directory that you created.
Note: If you downloaded the files from your browser, also ensure that you rename example.env to .env.
Optionally, you can use the hwaccel.yml file to enable hardware acceleration for transcoding. See the Hardware Transcoding guide for info on how to set this up.
Step 2 - Populate the .env and .yml files with custom values
Example .yml content
version: "3.8"

services:
  immich-server:
    container_name: immich_server
    image: ghcr.io/immich-app/immich-server:${IMMICH_VERSION:-release}
    command: [ "start.sh", "immich" ]
    volumes:
      - ${UPLOAD_LOCATION}:/usr/src/app/upload
    env_file:
      - .env
    depends_on:
      - redis
      - database
      - typesense
    restart: always

  immich-microservices:
    container_name: immich_microservices
    image: ghcr.io/immich-app/immich-server:${IMMICH_VERSION:-release}
    # extends:
    #   file: hwaccel.yml
    #   service: hwaccel
    command: [ "start.sh", "microservices" ]
    volumes:
      - ${UPLOAD_LOCATION}:/usr/src/app/upload
    env_file:
      - .env
    depends_on:
      - redis
      - database
      - typesense
    restart: always

  immich-machine-learning:
    container_name: immich_machine_learning
    image: ghcr.io/immich-app/immich-machine-learning:${IMMICH_VERSION:-release}
    volumes:
      - model-cache:/cache
    env_file:
      - .env
    restart: always

  immich-web:
    container_name: immich_web
    image: ghcr.io/immich-app/immich-web:${IMMICH_VERSION:-release}
    env_file:
      - .env
    restart: always

  typesense:
    container_name: immich_typesense
    image: typesense/typesense:0.24.1@sha256:9bcff2b829f12074426ca044b56160ca9d777a0c488303469143dd9f8259d4dd
    environment:
      - TYPESENSE_API_KEY=${TYPESENSE_API_KEY}
      - TYPESENSE_DATA_DIR=/data
      # remove this to get debug messages
      - GLOG_minloglevel=1
    volumes:
      - /srv/path/Files/Immich/tsdata:/data
    restart: always

  redis:
    container_name: immich_redis
    image: redis:6.2-alpine@sha256:70a7a5b641117670beae0d80658430853896b5ef269ccf00d1827427e3263fa3
    restart: always

  database:
    container_name: immich_postgres
    image: postgres:14-alpine@sha256:28407a9961e76f2d285dc6991e8e48893503cc3836a4755bbc2d40bcc272a441
    env_file:
      - .env
    environment:
      POSTGRES_PASSWORD: ${DB_PASSWORD}
      POSTGRES_USER: ${DB_USERNAME}
      POSTGRES_DB: ${DB_DATABASE_NAME}
    volumes:
      - /srv/path/Files/Immich/pgdata:/var/lib/postgresql/data
    restart: always

  immich-proxy:
    container_name: immich_proxy
    image: ghcr.io/immich-app/immich-proxy:${IMMICH_VERSION:-release}
    environment:
      # Make sure these values get passed through from the env file
      - IMMICH_SERVER_URL
      - IMMICH_WEB_URL
    ports:
      - 2283:8080
    depends_on:
      - immich-server
      - immich-web
    restart: always

volumes:
  pgdata:
  model-cache:
  tsdata:
Example .env content
# You can find documentation for all the supported env variables at https://immich.app/docs/install/environment-variables
# The location where your uploaded files are stored
UPLOAD_LOCATION=/srv/path/Files/Immich/Upload
# The Immich version to use. You can pin this to a specific version like "v1.71.0"
IMMICH_VERSION=release
# Connection secrets for postgres and typesense. You should change these to random passwords
TYPESENSE_API_KEY=complicatedrandomkey
DB_PASSWORD=anothercomplicatedrandomkey
## Needed
IMMICH_WEB_URL=http://immich-web:3000
IMMICH_SERVER_URL=http://immich-server:3001
IMMICH_MACHINE_LEARNING_URL=http://immich-machine-learning:3003
# The values below this line do not need to be changed
###################################################################################
DB_HOSTNAME=immich_postgres
DB_USERNAME=postgres
DB_DATABASE_NAME=immich
REDIS_HOSTNAME=immich_redis
- Populate custom database information if necessary.
- Populate
UPLOAD_LOCATIONwith your preferred location for storing backup assets. - Consider changing
DB_PASSWORDto something randomly generated - Consider changing
TYPESENSE_API_KEYto something randomly generated
Step 3 - Start the containers
From the directory you created in Step 1, (which should now contain your customized docker-compose.yml and .env files) run docker-compose up -d.
docker-compose up -d # or `docker compose up -d` based on your docker-compose versionFor more information on how to use the application, please refer to the Post Installation guide.
Note that downloading container images might require you to authenticate to the GitHub Container Registry (steps here).
Step 4 - Upgrading
If IMMICH_VERSION is set, it will need to be updated to the latest or desired version.
When a new version of Immich is released, the application can be upgraded with the following commands, run in the directory with the docker-compose.yml file:
docker-compose pull && docker-compose up -d # Or `docker compose up -d`Automatic Updates
Immich is currently under heavy development, which means you can expect breaking changes and bugs. Therefore, we recommend reading the release notes prior to updating and to take special care when using automated tools like Watchtower.
Portainer
- Go to "Stacks" in the left sidebar.
- Click on "Add stack".
- Give the stack a name (i.e. Immich), and select "Web Editor" as the build method.
- Copy the content of the
docker-compose.ymlfile from the GitHub repository. - Replace
.envwithstack.envfor all containers that need to use environment variables in the web editor.
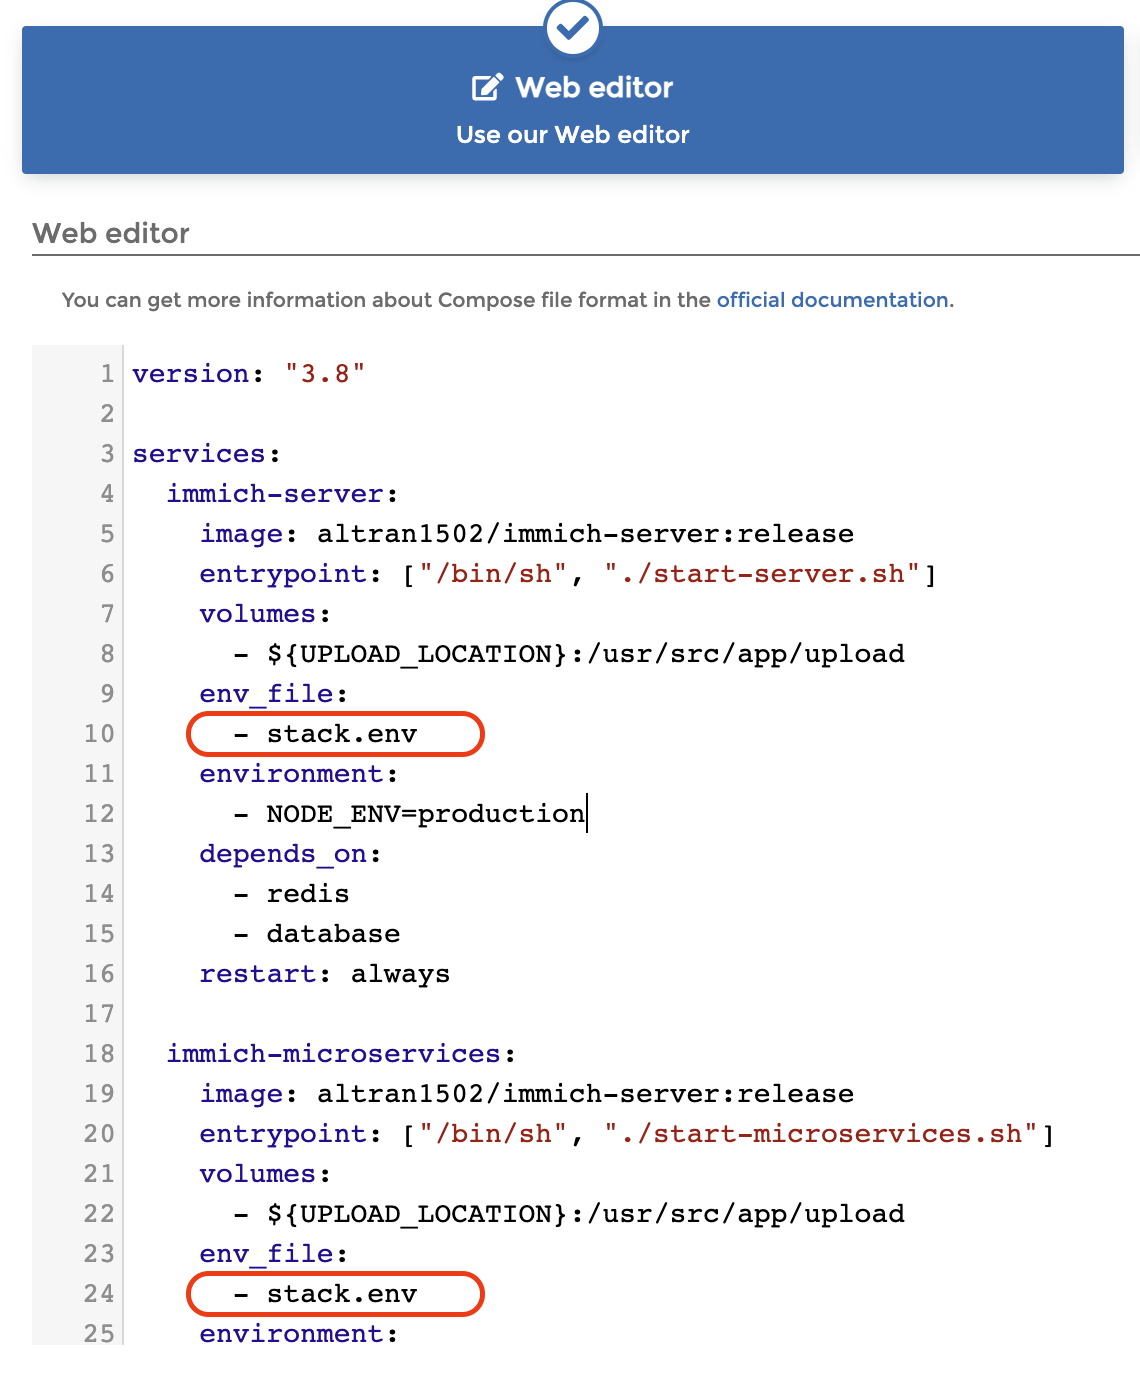
- Click on "Advanced Mode" in the Environment Variables section.
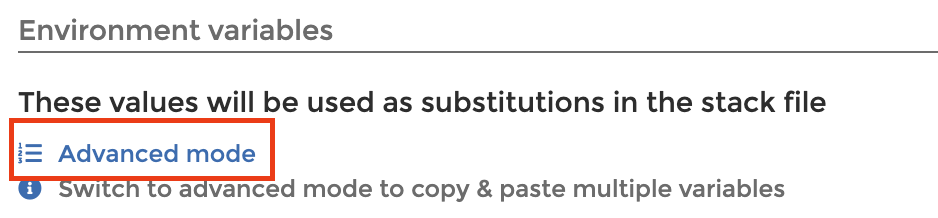
- Copy the content of the
example.envfile from the GitHub repository and paste into the editor. - Switch back to "Simple Mode".
- Populate custom database information if necessary.
- Populate
UPLOAD_LOCATIONwith your preferred location for storing backup assets.
- Click on "Deploy the stack".
For more information on how to use the application, please refer to the Post Installation guide.
Configure Nginx Proxy Manager for large files.
# allow large uploads. Here 50Go
client_max_body_size 50G;

# important to avoid buffering the whole body
proxy_request_buffering off;
proxy_buffering off;

# tune timeouts
proxy_connect_timeout 600s;
proxy_send_timeout 3600s;
proxy_read_timeout 3600s;

# temp file usage
proxy_max_temp_file_size 0;
Invidious
1. Create t-invidious-db.sh
Create /srv/path/Files/Invidious/docker/
cd /srv/path/Files/Invidious/docker/Create / download init-invidious-db.sh
#!/bin/bash
set -eou pipefail

psql --username "$POSTGRES_USER" --dbname "$POSTGRES_DB" < config/sql/channels.sql
psql --username "$POSTGRES_USER" --dbname "$POSTGRES_DB" < config/sql/videos.sql
psql --username "$POSTGRES_USER" --dbname "$POSTGRES_DB" < config/sql/channel_videos.sql
psql --username "$POSTGRES_USER" --dbname "$POSTGRES_DB" < config/sql/users.sql
psql --username "$POSTGRES_USER" --dbname "$POSTGRES_DB" < config/sql/session_ids.sql
psql --username "$POSTGRES_USER" --dbname "$POSTGRES_DB" < config/sql/nonces.sql
psql --username "$POSTGRES_USER" --dbname "$POSTGRES_DB" < config/sql/annotations.sql
psql --username "$POSTGRES_USER" --dbname "$POSTGRES_DB" < config/sql/playlists.sql
psql --username "$POSTGRES_USER" --dbname "$POSTGRES_DB" < config/sql/playlist_videos.sql
2. Generate po_token and visitor_data identities:
Generate po_token and visitor_data identities for passing all verification checks on YouTube side:
docker run quay.io/invidious/youtube-trusted-session-generatorYou have to run this command on the same public IP address as the one blocked by YouTube. Not necessarily the same machine, just the same public IP address.
You will need to copy these two parameters in the third step.
Subsequent usage of this same token will work on the same IP range or even the same ASN. The point is to generate this token on a blocked IP as "unblocked" IP addresses seems to not generate a token valid for passing the checks on a blocked IP.
3. Stack
version: "3"
services:

  invidious:
    image: quay.io/invidious/invidious:latest
    # image: quay.io/invidious/invidious:latest-arm64 # ARM64/AArch64 devices
    restart: unless-stopped
    ports:
      - "3000:3000"
    environment:
      # Please read the following file for a comprehensive list of all available
      # configuration options and their associated syntax:
      # https://github.com/iv-org/invidious/blob/master/config/config.example.yml
      INVIDIOUS_CONFIG: |
        db:
          dbname: invidious
          user: kemal
          password: kemal
          host: invidious-db
          port: 5432
        check_tables: true
        signature_server: inv_sig_helper:12999
        visitor_data: "CHANGE_ME!!"
        po_token: CHANGE_ME!!"
        external_port: 443
        domain: your.domain.com  # Don't put "https://"
        https_only: true
        statistics_enabled: true
        hmac_key: "CHANGE_ME!!" #generate using command "pwgen 20 1" or "openssl rand -hex 20" or just 20 random characters
        admins: ["admin"]
    healthcheck:
      test: wget -nv --tries=1 --spider http://127.0.0.1:3000/api/v1/trending || exit 1
      interval: 30s
      timeout: 5s
      retries: 2
    logging:
      options:
        max-size: "1G"
        max-file: "4"
    depends_on:
      - invidious-db

  inv_sig_helper:
    image: quay.io/invidious/inv-sig-helper:latest
    init: true
    command: ["--tcp", "0.0.0.0:12999"]
    environment:
      - RUST_LOG=info
    restart: unless-stopped
    cap_drop:
      - ALL
    read_only: true
    security_opt:
      - no-new-privileges:true

  invidious-db:
    image: docker.io/library/postgres:14
    restart: unless-stopped
    volumes:
      - /srv/Files/Invidious/postgresdata:/var/lib/postgresql/data
      - /srv/Files/Invidious/config/sql:/config/sql
      - /srv/Files/Invidious/docker/init-invidious-db.sh:/docker-entrypoint-initdb.d/init-invidious-db.sh
    environment:
      POSTGRES_DB: invidious
      POSTGRES_USER: kemal
      POSTGRES_PASSWORD: kemal
    healthcheck:
      test: ["CMD-SHELL", "pg_isready -U $$POSTGRES_USER -d $$POSTGRES_DB"]

volumes:
  postgresdata:
The environment variable POSTGRES_USER cannot be changed. The SQL config files that run the initial database migrations are hard-coded with the username kemal.
Same goes with environment variable port . Stick to 3000:3000 and change other service port if needed.
Detailed post-install configuration available in the configuration guide.
If you use a reverse proxy, you must configure invidious to properly serve request through it:
https_only: true : if your are serving your instance via https, set it to truedomain: domain.ext: if you are serving your instance via a domain name, set it here (no "https://")external_port: 443: if your are serving your instance via https, set it to 443
Env variables must be put after INVIDIOUS_CONFIG: | in the compose file
Open youtube links in Invidious | Link 2
InvoiceNinja
Invoice Ninja is an open-source invoicing, billing, and payment management platform designed for freelancers and small to medium-sized businesses
version: "3.3"
services:
  invoiceninja:
    volumes:
      - /var/invoiceninja/public:/var/app/public
      - /var/invoiceninja/storage:/var/app/storage
    environment:
      - APP_ENV=production
      - APP_DEBUG=0
      - APP_URL=http://ninja.dev
      - APP_KEY=<INSERT THE GENERATED APPLICATION KEY HERE>
      - APP_CIPHER=AES-256-CBC
      - DB_TYPE=mysql
      - DB_STRICT=false
      - DB_HOST=localhost
      - DB_DATABASE=ninja
      - DB_USERNAME=ninja
      - DB_PASSWORD=ninja
    ports:
      - 80:80
image: invoiceninja/invoiceninjagit clone https://github.com/invoiceninja/dockerfiles.git
rename dockerfiles
chmod -R 755
docker run --rm -it invoiceninja/invoiceninja php key:generate --show
InvoiceShelf
InvoiceShelf is an open-source web & mobile app that helps you track expenses, payments & create professional invoices & estimates.
#-------------------------------------------
#  Docker Compose
#  - Darko Gjorgjijoski
# Repo : https://github.com/InvoiceShelf/docker
#-------------------------------------------

version: '3'

services:
  invoiceshelf_db:
    container_name: invoiceshelf_db
    image: mariadb:10
    environment:
      - MYSQL_ROOT_PASSWORD=StROnGpAsSwOrD!
      - MYSQL_DATABASE=invoiceshelf
      - MYSQL_USER=invoiceshelf
      - MYSQL_PASSWORD=StROnGpAsSwOrD
    expose:
      - 3306
    volumes:
      - /srv/Files/Invoiceshelf/mysql:/var/lib/mysql
    networks:
      - invoiceshelf
    restart: unless-stopped

  invoiceshelf:
    image: invoiceshelf/invoiceshelf
    container_name: invoiceshelf
    ports:
      - 90:80
    volumes:
      - /srv/Files/Invoiceshelf/invoiceshelf/data:/data
    networks:
      - invoiceshelf
    environment:
      - PUID=998
      - PGID=100
      # PHP timezone e.g. PHP_TZ=America/New_York
      - PHP_TZ=Europe/Paris
      - TIMEZONE=Europe/Paris
      #- APP_NAME=Laravel
      #- APP_ENV=local
      #- APP_FORCE_HTTPS=false
      #- APP_DEBUG=true
      #- APP_URL=http://localhost
      - DB_CONNECTION=mysql
      - DB_HOST=invoiceshelf_db
      - DB_PORT=3306
      - DB_DATABASE=invoiceshelf
      - DB_USERNAME=invoiceshelf
      - DB_PASSWORD=StROnGpAsSwOrD
      #- DB_PASSWORD_FILE=<filename>
      #- DB_OLD_INVOICESHELF_PREFIX=''
      #- CACHE_DRIVER=file
      #- SESSION_DRIVER=file
      #- SESSION_LIFETIME=120
      #- SECURITY_HEADER_HSTS_ENABLE=false
      #- SANCTUM_STATEFUL_DOMAINS=
      #- SESSION_DOMAIN=
      #- REDIS_HOST=127.0.0.1
      #- REDIS_PASSWORD=null
      #- REDIS_PASSWORD_FILE=<filename>
      #- REDIS_PORT=6379
      #- MAIL_DRIVER=smtp
      #- MAIL_HOST=smtp.mailtrap.io
      #- MAIL_PORT=2525
      #- MAIL_USERNAME=null
      #- MAIL_PASSWORD=null
      #- MAIL_PASSWORD_FILE=<filename>
      #- MAIL_ENCRYPTION=null
      - STARTUP_DELAY=30
      - ADMIN_USER=admin
      - ADMIN_PASSWORD=StROnGpAsSwOrD
      # - ADMIN_PASSWORD_FILE=<filename>
    restart: unless-stopped
    depends_on:
      - invoiceshelf_db

networks:
  invoiceshelf:

#volumes:
#  mysql:
Jackett
---
version: "3.3"
services:
  jackett:
    image: lscr.io/linuxserver/jackett
    container_name: jackett
    environment:
      - PUID=998
      - PGID=100
      - TZ=Europe/Paris
      - AUTO_UPDATE=true #optional
   #  - RUN_OPTS=<run options here> #optional
    volumes:
      - /srv/path/Files/Jacket/config:/config
      - /srv/path/Files/Jacket/downloads:/downloads
    ports:
      - 9117:9117
    restart: unless-stopped
Jekyll
---
version: "2"
services:
  jekyll:
    image: bretfisher/jekyll
    container_name: jekyll
    volumes:
      - /srv/Files/Jekyll:/site
    restart: unless-stopped
  jekyll-serve:
    image: bretfisher/jekyll-serve
    container_name: jekyll-serve
    ports:
      - 4000:4000
    volumes:
      - /srv/Files/Jekyll:/site
    restart: unless-stopped
Jellyfin (linuxserver)
---
version: "3.3"
services:
   jellyfin:
    image: lscr.io/linuxserver/jellyfin
    container_name: jellyfin
    environment:
      - PUID=998
      - PGID=100
      - TZ=Europe/Paris
    # - JELLYFIN_PublishedServerUrl=192.168.x.x #optional
    volumes:
      - /srv/path/Files/Jellyfin/config:/config
      - /srv/path/Files/Jellyfin/tvshows:/data/tvshows
      - /srv/path/Files/Jellyfin/movies:/data/movies
      - /srv/path/Music:/data/music
    # - /opt/vc/lib:/opt/vc/lib #optional
    ports:
      - 8096:8096
    # - 8920:8920 #optional
    # - 7359:7359/udp #optional
    # - 1900:1900/udp #optional
   # devices:
    # - /dev/dri:/dev/dri #optional
    # - /dev/vcsm:/dev/vcsm #optional
    # - /dev/vchiq:/dev/vchiq #optional
    # - /dev/video10:/dev/video10 #optional
    # - /dev/video11:/dev/video11 #optional
    # - /dev/video12:/dev/video12 #optional
     restart: unless-stopped
Full HD h264 is the absolut maximum a Raspberry Pi 4 can handle for transcoding. Everything above must be played directly because the hardware isn't good enough.
https://www.reddit.com/r/jellyfin/comments/rqzecj/how_to_get_jellyfin_to_transcode_on_raspberry_pi_4/
Jellyfin (official)
Create /config and /cache
Give them permission for your user (here 998:100) as well as your media folders :
chown -R 998:100 /config
chown -R 998:100 /cache
etc...
Deploy
version: "3.5"
services:
  jellyfin:
    image: jellyfin/jellyfin
    container_name: jellyfin_off
    user: 998:100
    network_mode: "host"
    volumes:
      - /srv/path/Files/Jellyfin/config:/config
      - /srv/path/Files/Jellyfin/cache:/cache
      - /srv/path/Files/Jellyfin/tvshows:/tvshows
      - /srv/path/Files/Jellyfin/movies:/movies
      - /srv/path/Files/Jellyfin/docus:/docus
      - /srv/path/Music:/music
    restart: "unless-stopped"
    # Optional - alternative address used for autodiscovery
 #  environment:
    #  - JELLYFIN_PublishedServerUrl=http://example.com
Full HD h264 is the absolut maximum a Raspberry Pi 4 can handle for transcoding. Everything above must be played directly because the hardware isn't good enough.
https://www.reddit.com/r/jellyfin/comments/rqzecj/how_to_get_jellyfin_to_transcode_on_raspberry_pi_4/
FFmpeg Installation
Default Transoding options:
Alternative optimized Transcoding settings :
https://youtu.be/HIExT8xq1BQ?t=1249
KODI
Add-on Repository
There are two different Kodi add-ons that serve slightly different use cases.
- Jellyfin for Kodi - This add-on syncs metadata from selected Jellyfin libraries into the local Kodi database. This has the effect of making interacting with it feel very much like vanilla Kodi with local media (shows up under Movies/TV Shows on the home screen by default, virtually no delay, etc). However, it also tends to consume the database and not share well, so if you have local media or something else that interacts with the database directly, you will have conflicts and it will not be happy. The sync process can take some extra time on Kodi startup if you do not leave it running 24/7, but it is mostly in the background while Kodi is running.
- JellyCon - Behaves more like a standard Kodi streaming add-on. Media is accessed primarily by going through the Add-ons -> JellyCon menu, however you can set up menu options to link to it and show info on the home screen. It also allows easier switching between multiple Jellyfin servers or users since it doesn't have to rely on syncing all the metadata down. By not having metadata synced, it has to request info from the server which can take a bit more time when you are browsing (typically only a second or two in my testing), but you don't have to wait for the database to sync or keep it up to date.
Install Add-on Repository
The most convenient install method of our Jellyfin add-ons is to use the official Kodi Jellyfin Repository. Using this repository allows for easy install of our add-ons, as well as automatically keeping the add-ons up to date with the latest version. Any other Jellyfin related add-ons that may be built in the future will also be available here.
The installation method for the repository varies depending on what kind of device you're using, outlined below.
General Use Devices (PCs and Tablets)
- Download the repository installer found here.
- It will be saved as
repository.jellyfin.kodi.zip
- It will be saved as
- Install the Jellyfin repository.
- Open Kodi, go to the settings menu, and navigate to "Add-on Browser"
- Select "Install from Zip File"
- If prompted, enter settings and enable "Unknown Sources", then go back to the Add-on Browser
- Select the newly downloaded file and it will be installed
"Embedded" Devices (Android TV, Firestick, and other TV Boxes)
- Open Kodi, go to the settings menu, and navigate to "File manager"
- Select "Add source"
- In the text box, enter
https://kodi.jellyfin.org - Enter a name for the data source, such as "Jellyfin Repo" and select Ok
- From the settings menu, navigate to "Add-on Browser"
- Select "Install from Zip File"
- If prompted, enter settings and enable "Unknown Sources", then go back to the Add-on Browser
- Select the data source you just added
- Install
repository.jellyfin.kodi.zip
- Select "Install from Zip File"
Jellyfin for Kodi
It is highly recommended to install the Kodi Sync Queue plugin into the Jellyfin server as well. This will keep your media libraries up to date without waiting for a periodic re-sync from Kodi.
Remote Kodi databases, like MySQL, are not supported. A local SQLite database is required (this is the default).
Jellyfin for Kodi Overview
This add-on syncs metadata from selected Jellyfin libraries into the local Kodi database. This has the effect of making interacting with it feel very much like vanilla Kodi with local media (shows up under Movies/TV Shows on the home screen by default, virtually no delay, etc). However, it also tends to consume the database and not share well, so if you have local media or something else that interacts with the database directly, you will have conflicts and it will not be happy. The sync process can take some extra time on Kodi startup if you do not leave it running 24/7, but it is mostly in the background while Kodi is running.
Media in Kodi's database is automatically kept in sync with the server in one of several ways:
- Startup sync - Each time Kodi starts, it will reach out to the Kodi Sync Queue plugin in the server and request all updated media since its last check-in time (when Kodi was last shut down).
- Live sync - This happens while Kodi is running. When the server updates an item, it will send a notification to Kodi over a websocket connection that it has new media that needs to be updated.
Install Jellyfin for Kodi Add-on
- Install Jellyfin for Kodi.
- From within Kodi, navigate to "Add-on Browser"
- Select "Install from Repository"
- Choose "Kodi Jellyfin Add-ons", followed by "Video Add-ons"
- Select the Jellyfin add-on and choose install
- Within a few seconds you should be prompted for your server details.
- If a Jellyfin server is detected on your local network, it will displayed in a dialog
- If a Jellyfin server is not detected on your local network, select "Manually Add Server". Enter your server info into the text field.
- Enter the server name or IP address and the port number (default value is 8096)
- Host:
192.168.1.10:8096
- Host:
- If using SSL and a reverse proxy, enter the full URL in the "Host" field
- Host:
https://jellyfin.example.com
- Host:
- Note that if you have a baseurl set, you should append that value to the end of the host field.
- Host:
192.168.0.10:8096/jellyfin
- Host:
- Enter the server name or IP address and the port number (default value is 8096)
- Select user account and input password, or select "Manual Login" and fill in your user information
- Once you are successfully authenticated with the server, you'll be asked about which mode you'd like to use, Add-on vs Native, which are outlined below.
Add-on Mode
Add-on mode uses the Jellyfin server to translate media files from the filesystem to Kodi. This is the default setting for the add-on, and is sufficient for most use cases. It will work both on the local network and over the Internet through a reverse proxy or VPN connection. Providing network speed is sufficient, Kodi will direct play nearly all files and put little overhead on the Jellyfin server.
To use Add-on mode, simply choose "Add-on" at the dialog and proceed to Library Syncing
Native Mode
Native mode accesses your media files directly from the filesystem, bypassing the Jellyfin server during playback. Native mode needs more setup and configuration, but it can, on rare occasions, lead to better performance where network bandwidth is a limitation. It requires your media to be available to the device Kodi is running on over either NFS or Samba, and therefore should only be used on a LAN or over a VPN connection.
To use Native mode, first set up your libraries in Jellyfin with a remote path.
- In the Jellyfin server, navigate to the Libraries section of the admin dashboard.
- Select an existing library (or create a new one)
- Select the media folder
- Enter the path to your network share in the "Shared network folder" textbox
- Possible formats:
- NFS
nfs://192.168.0.10:/path/to/media
- Samba
- Guest User -
\\192.168.0.10\share_name - Custom User (Not Recommended) -
\\user:password@192.168.0.10\share_name- It's more secure to use the generic Guest mapping here and specify credentials from within Kodi
- Guest User -
- Mounted share
- If you have mounted your network share, you can reference the local mount point. This can be more performant but generally means it only works for one type of operating system, given the difference between the file systems
/mnt/media(Linux)Z:\media(Windows)/Volumes/media(Mac OS)
- If you have mounted your network share, you can reference the local mount point. This can be more performant but generally means it only works for one type of operating system, given the difference between the file systems
- NFS
- Configure libraries in Kodi
- Skip the initial library selection. We need to add file shares to Kodi first
- Within Kodi, navigate to the settings menu and select "File manager"
- Select "Add source"
- Select "Browse" and "Add network location"
- Create either a NFS or SMB location from the selection box and fill in the necessary information about your network share
- If you are using a mounted share, browse to the mount point on your file system rather than the network share
- Select your newly created location and choose "Ok"
- Give your media source a name and choose "Ok"
- Go to Add-ons -> Jellyfin -> Manage Libraries -> Add Libraries
- Proceed to Library Syncing
Library Syncing
This screen allows you to choose which libraries to sync to your Kodi install. This process will copy metadata for your media into the local Kodi database, allowing you to browse through your media libraries as if they were native to your device.
Either choose "All" or select individual libraries you would like synced and select OK. Syncing the metadata will start automatically. The duration of this process varies greatly depending on the size of your library, the power of your local device, and the connection speed to the server.
You can still access any libraries that have not been synced by going through the Jellyfin add-on menu. These unsynced libraries will be labeled as "dynamic."
If an error occurs during syncing, enable debug logging in the Jellyfin add-on in Kodi and if in a Unix-like OS, set the log level of Samba to 2 to see if there are issues authenticating.
KODI PLAYBACK SPEED
An add-on to add variable playback speed in the menu : https://znedw.github.io/kodi.repository/repo/
INTRO SKIPPER
https://github.com/intro-skipper/intro-skipper/wiki/Installation#step-1-install-the-plugin
MERGE VERSIONS
https://github.com/danieladov/jellyfin-plugin-mergeversions
Joal
First, download the latest tar.gz release and extract config.json clients and torrents, to /srv/path/Joal. This folder will be our joal-conf.
Then, deploy stack
version: "2"
services:
  joal:
    image: anthonyraymond/joal
    container_name: joal
    restart: unless-stopped
    volumes:
      - /srv/path/Files/Joal/:/data
    ports:
      - 6512:6512 # can be whatever you want
    command: ["--joal-conf=/data", "--spring.main.web-environment=true", "--server.port=6512", "--joal.ui.path.prefix=joal_", "--joal.ui.secret-token=xxxxxx"]
To access the Web-UI, go to http://192.168.x.xx:6512/joal_/ui/, connect with path prefix and secret token.
Joplin
Github | Website | Forums | See also Joplin Webview and Joplin webapp
Joplin is a free, open source note taking and to-do application, which can handle a large number of notes organised into notebooks. The notes are searchable, can be copied, tagged and modified either from the applications directly or from your own text editor. The notes are in Markdown format.
# This is a sample docker-compose file that can be used to run Joplin Server
# along with a PostgreSQL server.
#
# Update the following fields in the stanza below:
#
# POSTGRES_USER
# POSTGRES_PASSWORD
# APP_BASE_URL
#
# APP_BASE_URL: This is the base public URL where the service will be running.
#	- If Joplin Server needs to be accessible over the internet, configure APP_BASE_URL as follows: https://example.com/joplin.
#	- If Joplin Server does not need to be accessible over the internet, set the APP_BASE_URL to your server's hostname.
#     For Example: http://[hostname]:22300. The base URL can include the port.
# APP_PORT: The local port on which the Docker container will listen.
#	- This would typically be mapped to port to 443 (TLS) with a reverse proxy.
#	- If Joplin Server does not need to be accessible over the internet, the port can be mapped to 22300.

version: '3'

services:
    db:
        image: postgres:16
        volumes:
            - ./Joplin/data/postgres:/var/lib/postgresql/data
        ports:
            - "5432:5432"
        restart: unless-stopped
        environment:
            - POSTGRES_PASSWORD=PASSWORD
            - POSTGRES_USER=joplin
            - POSTGRES_DB=joplindb
    app:
        image: joplin/server:latest
        depends_on:
            - db
        ports:
            - "22300:22300"
        restart: unless-stopped
        environment:
            - APP_PORT=22300
            - APP_BASE_URL=http://192.168.1.103:22300
            - DB_CLIENT=pg
            - POSTGRES_PASSWORD=PASSWORD
            - POSTGRES_DATABASE=joplindb
            - POSTGRES_USER=joplin
            - POSTGRES_PORT=5432
            - POSTGRES_HOST=db
            - MAILER_ENABLED=1
            - MAILER_HOST=ssl0.ovh.net
            - MAILER_PORT=465
            - MAILER_SECURITY=ssl
            - MAILER_AUTH_USER=a@s.com
            - MAILER_AUTH_PASSWORD=mailerpassword
            - MAILER_NOREPLY_NAME=Joplin
            - MAILER_NOREPLY_EMAIL=a@s.com
Some of the .env variables are:MAILER_ENABLED= Enables the mailing system - 1 is ON 0 is OFFMAILER_HOST= SMTP server addressMAILER_PORT= SMTP server portMAILER_SECURITY= SMTP server security method - none or tls or starttls (Server 2.7.4 and above)MAILER_AUTH_USER= Login username for the SMTP serverMAILER_AUTH_PASSWORD= Login password for the SMTP serverMAILER_NOREPLY_NAME= Display name for mail sent by the serverMAILER_NOREPLY_EMAIL= Sender email address for mail sent by the serverSIGNUP_ENABLED= Enables site visitors to sign up from the server login page - 1 is ON 0 is OFF (I have not used this since before Joplin Cloud went "Live")TERMS_ENABLED= Enables the login page terms and conditions link - 1 is ON 0 is OFF (I have not used this as anything other than "OFF" since before Joplin Cloud went "Live")ACCOUNT_TYPES_ENABLED= Enables the admin to set user accounts as Default, Basic or Pro with their associated usage limits / sharing features - 1 is ON 0 is OFF
Joplin Webview
A simple web viewer for Joplin notes.
version: '3.4'

x-common-variables: &common-variables
   ORIGINS: "'http://localhost:22301', 'http://192.168.1.103:22301'"  #match ports
   JOPLIN_LOGIN_REQUIRED: True

services:
  django-joplin-vieweb:
    image: gri38/django-joplin-vieweb:latest
    depends_on:
      - joplin-terminal-xapi
    environment:
       <<: *common-variables
    restart: unless-stopped
    ports:
      - 22301:8000 #match ports
    volumes:
      - /srv/Files/JoplinWeb/joplin:/root/.config/joplin:ro
      - /srv/Files/JoplinWeb/joplin-vieweb:/root/.config/joplin-vieweb
    networks:
      - joplin-net

  joplin-terminal-xapi:
    image: gri38/joplin-terminal-xapi:latest
    restart: unless-stopped
    volumes:
      - /srv/Files/JoplinWeb/joplin:/root/.config/joplin
    networks:
      - joplin-net

#volumes:
#  joplin:
#  joplin-vieweb:

networks:
  joplin-net: {}
Configuration and usage
! Users configuration is done from this url: https://your_domain.com/admin/
! Usage url, to access joplin notes: https://your_domain.com/joplin
Users
First you must change admin password:
- login to https://your_domain.com/admin/ (login: admin / password: admin)

- Change the admin password:

- If you want to login to joplin-vieweb with another login than admin: create a user:

- Now you can logout and visit https://your_domain.com/joplin

- Login with admin or your newly created user:

Synchronisation
You should configure a synchronisation to secure your notes:
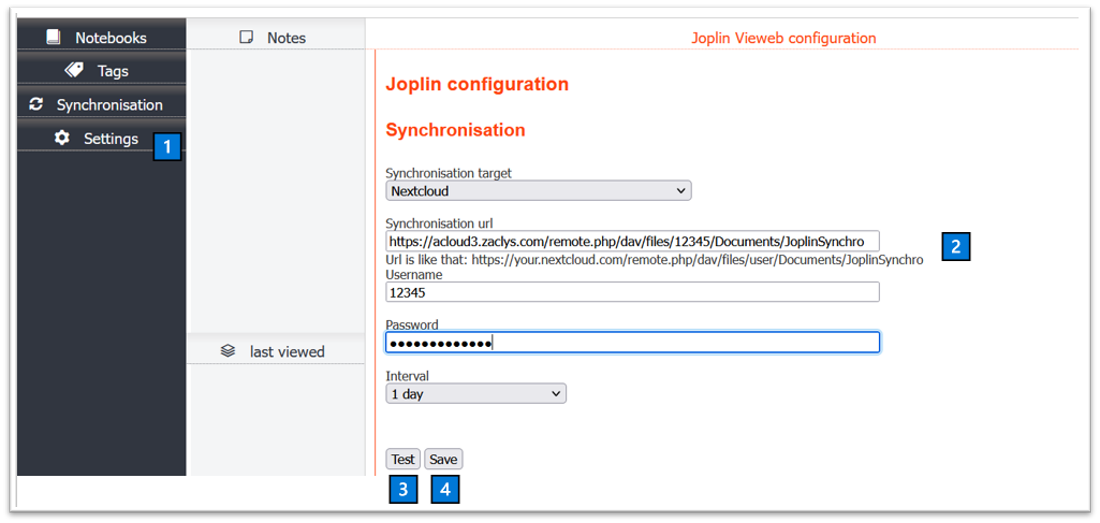
1️⃣ Click the settings tab
2️⃣ Input synchronisation data (only nextcloud, webdav and joplin server are supported for now, if you would like other services, ask in a conversation)
3️⃣ Test
4️⃣ If test result is OK: save
If your cloud already contains joplin content, do a synchronisation:
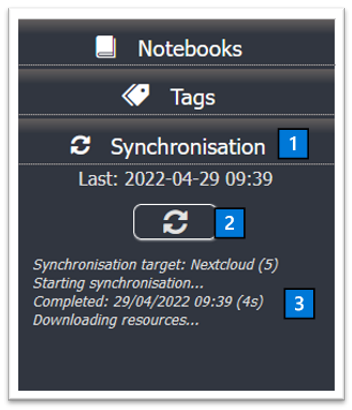
1️⃣ Click the synchronisation tab
2️⃣ click the sync button
3️⃣ Wait for the sync to finish (it may take a long time depending on your cloud content)
Joplin
You can now access your notebooks: https://your_domain/joplin (⚠ don't forget the /joplin ⚠)
Kimai (ARM64)
version: '3.5'
services:

  sqldb:
    image: ubuntu/mysql
    environment:
      - MYSQL_DATABASE=kimai
      - MYSQL_USER=kimaiuser
      - MYSQL_PASSWORD=kimaipassword
      - MYSQL_ROOT_PASSWORD=changemeplease
    command: --default-storage-engine innodb
    restart: unless-stopped
    healthcheck:
      test: mysqladmin -p$$MYSQL_ROOT_PASSWORD ping -h localhost
      interval: 20s
      start_period: 10s
      timeout: 10s
      retries: 3

  kimai:
    image: johannajohnsen/kimai2:apache-latest-prod
    ports:
      - 8001:8001
    environment:
      - ADMINMAIL=admin@kimai.local
      - ADMINPASS=changemeplease
      - DATABASE_URL=mysql://kimaiuser:kimaipassword@sqldb/kimai
      - TRUSTED_HOSTS=nginx,localhost,127.0.0.1 # change "localhost" to your host's address
    restart: unless-stopped
KitchenOwl
KitchenOwl is a smart self-hosted grocery list and recipe manager.
version: "3"
services:
  front:
    image: tombursch/kitchenowl-web:latest
    restart: unless-stopped
    ports:
      - "80:80"
    depends_on:
      - back
  back:
    image: tombursch/kitchenowl:latest
    restart: unless-stopped
    environment:
      - JWT_SECRET_KEY=PLEASE_CHANGE_ME
    volumes:
      - kitchenowl_data:/data

volumes:
  kitchenowl_data:
We recommend running KitchenOwl behind a reverse proxy with HTTPS (e.g. nginx or Traefik). Some example configurations have been contributed.
It is also important that you have HTTP Strict Transport Security enabled and the proper headers applied to your responses or you could be subject to a javascript hijack.
Koel
version: '3.3'

services:
  koel:
    image: hyzual/koel
    depends_on:
      - database
    ports:
      - 7852:80
    environment:
      - DB_CONNECTION=mysql
      - DB_HOST=database
      - DB_USERNAME=koel
      - DB_PASSWORD=01664892ganjah12
      - DB_DATABASE=koel
    volumes:
      - /srv/path/Files/Koel/music:/music
      - /srv/path/Files/Koel/covers:/var/www/html/public/img/covers
      - /srv/path/Files/Koel/search_index:/var/www/html/storage/search-indexes

  database:
    image: mysql/mysql-server:5.7
    volumes:
      - /srv/path/Files/Koel/db:/var/lib/mysql
    environment:
      - MYSQL_ROOT_PASSWORD=xxxxxx
      - MYSQL_DATABASE=koel
      - MYSQL_USER=koel
      - MYSQL_PASSWORD=xxxxxx

volumes:
  db:
    driver: local
  music:
    driver: local
  covers:
    driver: local
  search_index:
    driver: local
Then :
docker exec -it koel_koel_1 bash# Once inside the container, you can run commands:
php artisan koel:init --no-assets
Log in with email admin@koel.dev and password KoelIsCool
Whenever the music in /music changes, you will need to manually scan it before koel is able to play it. Run the following command:
docker exec koel_koel_1 php artisan koel:syncKomga
version: '3.3'
services:
  komga:
    image: gotson/komga
    container_name: komga
    volumes:
      - type: bind
        source: /srv/path/Files/Komga/config
        target: /config
      - type: bind
        source: /srv/path/Files/Komga/data
        target: /data
      - type: bind
        source: /srv/path/Comics/
        target: /comics
      - type: bind
        source: /srv/path/eBooks/
        target: /books
      - type: bind
        source: /srv/path/Magazines/
        target: /magazines
      - type: bind
        source: /etc/timezone
        target: /etc/timezone
        read_only: true
    ports:
      - 9080:25600
    user: "998:100"
    # remove the whole environment section if you don't need it
   # environment:
   #   - <ENV_VAR>=<extra configuration>
    restart: unless-stopped
Permission on /Komga/ should be set to 777 prior to installation.
Kopia
services:
  kopia:
      image: kopia/kopia:latest
      container_name: Kopia
      user: "0:0"
      restart: "unless-stopped"
      privileged: true
      cap_add:
        - SYS_ADMIN
      security_opt:
        - apparmor:unconfined
      devices:
        - /dev/fuse:/dev/fuse:rwm
      command:
        - server
        - start
        - --insecure
        - --htpasswd-file=/app/htpasswd/.htpasswd  ##To generate the htpasswd go to https://hostingcanada.org/htpasswd-generator/ . Use Bcrypt and copy paste the output
        - --address=0.0.0.0:51515
    #    - server
    #    - --disable-csrf-token-checks
    #    - --tls-cert-file=/srv/Files/Kopia/ssl-certs/fullchain.pem
    #    - --tls-key-file=/srv/Files/Kopia/ssl-certs/privkey.pem
    #    - --address=0.0.0.0:51515
        - --server-username=xxxxx #needs to match .htpasswd
        - --server-password=XXXXXX ##needs to match the one used to generate .htpasswd
      ports:
        - 51515:51515
      volumes:
        - /srv/Files/Kopia/shared:/tmp:shared
        - /srv/Files/Kopia/config:/app/config
        - /srv/Files/Kopia/cache:/app/cache
        - /srv/Files/Kopia/logs:/app/logs
        - /srv/Files/Kopia/htpasswd:/app/htpasswd
        - /srv/Files:/data:ro
      environment:
        KOPIA_PASSWORD: XXXXXX
        TZ: Europe/Paris
        USER: xxxxx

### IF you would like to assign hostname and domain name to your server.
#      hostname: "XXX"
#      domainname: "XXX"

### If you want to assign ip to your container with an existing Docker Network.
### Existing networks name is "Docker" in below example. Just change it with your own.
#      networks:
#        Docker:
#          ipv4_address: aaa.bbb.ccc.ddd

#### If you would like to assign DNS Server
#      dns:
#        - 8.8.8.8
#

### Existing Networks should be defined as external.
#networks:
#  Docker:
#    external: true
SFTP :
For known_hosts
cd ~/.ssh/
mv known_hosts known_hosts.bkp
ssh your_username@your_repo_host  #eg admin@192.168.1.104 (login then exit)
ssh-keyscan your_repo_host >> my_kopia_know_hosts
cat my_kopia_know_hosts  #put that in the data knowhost
Snapshot path:
- /srv/Files:/data:ro
Policies:
Default:
10
48
7
4
24
3
no
Good one:
1
1
7
4
12
1
no
Kutt
If necessary, install git
sudo apt install gitClone repo
git clone https://github.com/thedevs-network/kutt.gitcd dans le dossier téléchargé et copier le ficher .env
cp .docker.env .envEdit .env
nano .envIl devrait ressembler à ça :
# App port to run on
PORT=3000

# The name of the site where Kutt is hosted
SITE_NAME=Kutt

# The domain that this website is on
DEFAULT_DOMAIN=cut.domain.com

# Generated link length
LINK_LENGTH=6

# Postgres database credential details
DB_HOST=postgres
DB_PORT=5432
DB_NAME=postgres
DB_USER=
DB_PASSWORD=
DB_SSL=false

# ONLY NEEDED FOR MIGRATION !!1!
# Neo4j database credential details
NEO4J_DB_URI=bolt://localhost
NEO4J_DB_USERNAME=neo4j
NEO4J_DB_PASSWORD=xxxxxxxxx

# Redis host and port
REDIS_HOST=redis
REDIS_PORT=6379
REDIS_PASSWORD=

# Disable registration
DISALLOW_REGISTRATION=false

# Disable anonymous link creation
DISALLOW_ANONYMOUS_LINKS=false

# The daily limit for each user
USER_LIMIT_PER_DAY=50

# Create a cooldown for non-logged in users in minutes
# Set 0 to disable
NON_USER_COOLDOWN=0

# Max number of visits for each link to have detailed stats
DEFAULT_MAX_STATS_PER_LINK=5000

# Use HTTPS for links with custom domain
CUSTOM_DOMAIN_USE_HTTPS=true

# A passphrase to encrypt JWT. Use a long and secure key.
JWT_SECRET=xxxxxxxxxxxxxxxxxxxxxxxxx

# Admin emails so they can access admin actions on settings page
# Comma seperated
ADMIN_EMAILS=t@free.fr

# Invisible reCaptcha secret key
# Create one in https://www.google.com/recaptcha/intro/
RECAPTCHA_SITE_KEY=
RECAPTCHA_SECRET_KEY=

# Google Cloud API to prevent from users from submitting malware URLs.
# Get it from https://developers.google.com/safe-browsing/v4/get-started
GOOGLE_SAFE_BROWSING_KEY=

# Google Analytics tracking ID for universal analytics.
# Example: UA-XXXX-XX
GOOGLE_ANALYTICS=
GOOGLE_ANALYTICS_UNIVERSAL=

# Google Analytics tracking ID for universal analytics
# This one is used for links
# GOOGLE_ANALYTICS_UNIVERSAL=

# Your email host details to use to send verification emails.
# More info on http://nodemailer.com/
# Mail from example "Kutt <support@kutt.it>". Leave empty to use MAIL_USER
MAIL_HOST=ssl0.ovh.net
MAIL_PORT=465
MAIL_SECURE=true
MAIL_USER=contact@s.com
MAIL_FROM=contact@s.com
MAIL_PASSWORD=xxxxxxxx

# The email address that will receive submitted reports.
REPORT_EMAIL=t@free.fr

# Support email to show on the app
CONTACT_EMAIL=contact@s.com
Copy et edit docker-compose.yml
cp docker-compose.yml docker-compose-original.yml nano docker-compose.ymlversion: "3"
services:
kutt:
image: kutt/kutt
depends_on:
- postgres
- redis
command: ["./wait-for-it.sh", "postgres:5432", "--", "npm", "start"]
ports:
- "3000:3000"
env_file:
- .env
environment:
DB_HOST: postgres
DB_NAME: kutt
DB_USER: admin
DB_PASSWORD: xxxxxxxxxxxxxxxx
REDIS_HOST: redis
restart: unless-stopped
redis:
image: redis:6.0-alpine
volumes:
- redis_data:/data
restart: unless-stopped
postgres:
image: postgres:12-alpine
environment:
POSTGRES_USER: admin
POSTGRES_PASSWORD: xxxxxxxxxxxxxxxx
POSTGRES_DB: kutt
volumes:
- postgres_data:/var/lib/postgresql/data
restart: unless-stopped
volumes:
redis_data:
postgres_data:docker-compose up -dLadder
Ladder is a web proxy to help bypass paywalls. This is a selfhosted version of 1ft.io and 12ft.io. It is inspired by 13ft.
version: '3'
services:
  ladder:
    image: ghcr.io/kubero-dev/ladder:latest
    container_name: ladder
    build: .
    #restart: always
    #command: sh -c ./ladder
    environment:
      - PORT=8080
      #- PREFORK=true
      #- X_FORWARDED_FOR=66.249.66.1
      #- USER_AGENT=Mozilla/5.0 (compatible; Googlebot/2.1; +http://www.google.com/bot.html)
      #- USERPASS=foo:bar
      #- LOG_URLS=true
      #- GODEBUG=netdns=go
    ports:
      - "8080:8080"
    deploy:
      resources:
        limits:
          cpus: "0.50"
          memory: 512M
        reservations:
          cpus: "0.25"
          memory: 128M
Lemmy Voyager
version: '3.3'
services:
    wefwef:
        ports:
            - '5314:5314'
        environment:
            - 'CUSTOM_LEMMY_SERVERS=lemmy.ml,pornlemmy.com'
        image: 'ghcr.io/aeharding/voyager:latest'
LemmySchedule
version: "3.7"

services:
  redis:
    image: redis
    hostname: redis
    command: redis-server --save 60 1 --loglevel warning # make Redis dump the contents to disk and restore them on start
    volumes:
      - redis_data:/data
  lemmy_schedule:
    image: ghcr.io/rikudousage/lemmy-schedule:latest
    ports:
      - "8000:80" # replace 8000 with the port you want your app to run on
    environment:
      APP_SECRET: xxxxxxxxxxxxxxxxxxxx # actually create the secret, don't just use this value
      DEFAULT_INSTANCE: lemmy.ml
    volumes:
      - /srv/path/LemmySchedule/volumes/lemmy-schedule-cache:/opt/runtime-cache
      - /srv/path/LemmySchedule/volumes/lemmy-schedule-uploads:/opt/uploaded-files
    depends_on:
      - redis

volumes:
  redis_data:
Libreoffice
---
version: "3.3"
services:
  libreoffice:
    image: ghcr.io/linuxserver/libreoffice
    container_name: libreoffice
    environment:
      - PUID=998
      - PGID=100
      - TZ=Europe/Paris
    volumes:
      - /srv/path/Files/LibreOffice/config:/config
    ports:
      - 3300:3000
    restart: unless-stopped
Librephotos
mkdir librephotos
cd librephotos
touch .env
nano .env
.env
# This file contains all the things you need to change to set up your Libre Photos.
# There are a few items that must be set for it to work such as the location of your photos.
# After the mandatory entries there are some optional ones that you may set.

# Start of mandatory changes.

# Location of your photos.
scanDirectory=./librephotos/pictures

# Internal data of LibrePhotos
data=./librephotos/data

# ------------------------------------------------------------------------------------------------

# Wow, we are at the optional now. Pretty easy so far. You do not have to change any of the below.

# Set this value if you have a custom domain name. This allows uploads and django-admin access. If you do not have a custom domain name, leave this blank.
csrfTrustedOrigins=

#What port should Libre Photos be accessed at (Default 3000)
httpPort=3000

# What branch should we install the latest weekly build or the development branch (dev)
tag=latest

# Number of workers, which take care of the request to the api. This setting can dramatically affect the ram usage.
# A positive integer generally in the 2-4 x $(NUM_CORES) range.
# You’ll want to vary this a bit to find the best for your particular workload.
# Each worker needs 800MB of RAM. Change at your own will. Default is 2.
gunniWorkers=2

# You can set the database name. Did you know Libre Photos was forked from OwnPhotos?
dbName=librephotos

# Here you can change the user name for the database.
dbUser=docker

# The password used by the database.
dbPass=AaAa1234

# Default minimum rating to interpret as favorited. This default value is used when creating a new user.
# Users can change this in their settings (Dashboards > Library).
DEFAULT_FAVORITE_MIN_RATING=4

# Database host. Only change this if you want to use your own existing Postgres server. If using your own server, you can remove the 'db' container from docker-compose.yml. If you're changing the name of the DB's container name (DB_CONT_NAME further down), you need to set this variable to match that name too.
dbHost=db

# Set the names of the docker containers to your own entries. Or don't, I'm not your dad.
# Changing these will require you to `make rename` to rename the services, and start the system with your chosen `docker-compose up -d` invocation again.
# Note that changing the DB_CONT_NAME will also need you to set the `dbHost` variable to the same value.
DB_CONT_NAME=db
BACKEND_CONT_NAME=backend
FRONTEND_CONT_NAME=frontend
PROXY_CONT_NAME=proxy
PGADMIN_CONT_NAME=pgadmin
# ---------------------------------------------------------------------------------------------

# If you are not a developer ignore the following parameters: you will never need them.

# Where shall we store the backend and frontend code files.
codedir=./librephotos/code

# Location for pgAdmin
pgAdminLocation=./librephotos/pgadmin
touch docker-compose.yml
nano docker-compose.yml and don't edit it
docker-compose.yml
# DO NOT EDIT
# The .env file has everything you need to edit.
# Run options:
# 1. Use prebuilt images (preferred method):
#   run cmd: docker-compose up -d
# 2. Build images on your own machine:
#   build cmd: COMPOSE_DOCKER_CLI_BUILD=1 DOCKER_BUILDKIT=1 docker-compose build
#   run cmd: docker-compose up -d

version: "3.8"
services:
  proxy:
    image: reallibrephotos/librephotos-proxy:${tag}
    container_name: proxy
    restart: unless-stopped
    volumes:
      - ${scanDirectory}:/data
      - ${data}/protected_media:/protected_media
    ports:
      - ${httpPort}:80
    depends_on:
      - backend
      - frontend

  db:
    image: postgres:13
    container_name: db
    restart: unless-stopped
    environment:
      - POSTGRES_USER=${dbUser}
      - POSTGRES_PASSWORD=${dbPass}
      - POSTGRES_DB=${dbName}
    volumes:
      - ${data}/db:/var/lib/postgresql/data
    command: postgres -c fsync=off -c synchronous_commit=off -c full_page_writes=off -c random_page_cost=1.0
    healthcheck:
      test: psql -U ${dbUser} -d ${dbName} -c "SELECT 1;"
      interval: 5s
      timeout: 5s
      retries: 5

  frontend:
    image: reallibrephotos/librephotos-frontend:${tag}
    container_name: frontend
    restart: unless-stopped

  backend:
    image: reallibrephotos/librephotos:${tag}
    container_name: backend
    restart: unless-stopped
    volumes:
      - ${scanDirectory}:/data
      - ${data}/protected_media:/protected_media
      - ${data}/logs:/logs
      - ${data}/cache:/root/.cache
    environment:
      - SECRET_KEY=${shhhhKey:-}
      - BACKEND_HOST=backend
      - ADMIN_EMAIL=${adminEmail:-}
      - ADMIN_USERNAME=${userName:-}
      - ADMIN_PASSWORD=${userPass:-}
      - DB_BACKEND=postgresql
      - DB_NAME=${dbName}
      - DB_USER=${dbUser}
      - DB_PASS=${dbPass}
      - DB_HOST=${dbHost}
      - DB_PORT=5432
      - MAPBOX_API_KEY=${mapApiKey:-}
      - WEB_CONCURRENCY=${gunniWorkers:-1}
      - SKIP_PATTERNS=${skipPatterns:-}
      - ALLOW_UPLOAD=${allowUpload:-false}
      - CSRF_TRUSTED_ORIGINS=${csrfTrustedOrigins:-}
      - DEBUG=0
      - HEAVYWEIGHT_PROCESS=${HEAVYWEIGHT_PROCESS:-}
    depends_on:
      db:
        condition: service_healthy
Then docker-compose up -d
LibreX
version: "2.1"
services:
  librex:
    image: librex/librex:latest
    container_name: librex
    network_mode: bridge
    ports:
      - 8080:8080
    environment:
      - PUID=1000
      - PGID=1000
      - VERSION=docker
      - TZ=America/New_York
      - CONFIG_GOOGLE_DOMAIN=com
      - CONFIG_GOOGLE_LANGUAGE_SITE=en
      - CONFIG_GOOGLE_LANGUAGE_RESULTS=en
      - CONFIG_WIKIPEDIA_LANGUAGE=en
    volumes:
      - ./nginx_logs:/var/log/nginx
      - ./php_logs:/var/log/php7
    restart: unless-stopped
Lidarr / LidarrOnSteroids (Lidarr+Deemix)
version: "3.7"

services:
  sonarr:
    container_name: lidarr
    image: ghcr.io/hotio/lidarr
    ports:
      - "8686:8686"
    environment:
      - PUID=998
      - PGID=100
      - UMASK=002
      - TZ=Europe/Paris
    volumes:
      - /srv/dev-disk-by-uuid-7fe66601-5ca0-4c09-bc13-a015025fe53a/Files/Lidarr/config:/config
      - /srv/dev-disk-by-uuid-7fe66601-5ca0-4c09-bc13-a015025fe53a/Music:/music
restart: unless-stoppedversion: '3.4'
services:
lidarr-onsteroids:
image: lidarr-on-steroids
build:
context: .
environment:
- FLAC2CUSTOM_ARGS=-a "-vn -c:a libopus -b:a 64k" -e .opus -r '\.mp3$$'
ports:
- "8686:8686" # Lidarr web UI
- "6595:6595" # Deemix web UI
volumes:
- ./config:/config
- ./config_deemix:/config_deemix
- ./downloads:/downloads
- ./music:/music
restart: unless-stoppedLinkace
1 - Download and extract linkace-docker-simple.zip
2 - Edit the base configuration
You have to change the following settings in the .env file before starting the setup:
- DB_PASSWORD - Please set a secure password here
- REDIS_PASSWORD - Please set a secure password here
3 - chmod 666 .env to be sure it's writable inside docker, for anybody
4 - If you want to bind volumes to a specific location on your drive for data persistence / backups, create the folder db, linkace_logs and backups (if applicable) and grant docker write permission on those folders with chmod +w folder
5 - docker-compose up -d
6 - docker exec -it linkace_app_1 php artisan key:generate to generate the app key
Linkding
To install linkding using Docker Compose, you can use the docker-compose.yml file. Copy the .env.sample file to .env, configure the parameters, and then run:
docker-compose up -d
Linkstack
version: "3.8"

services:

  linkstack:
    hostname: 'linkstack'
    image: 'linkstackorg/linkstack:latest'
    environment:
      TZ: 'Europe/Paris'
      SERVER_ADMIN: 'admin@example.com'
      HTTP_SERVER_NAME: 'example.com'
      HTTPS_SERVER_NAME: 'example.com'
      LOG_LEVEL: 'info'
      PHP_MEMORY_LIMIT: '256M'
      UPLOAD_MAX_FILESIZE: '8M'
    volumes:
      - linkstack_data:/htdocs #don't change
    ports:
      - 8085:80 #og 80:80
      - 4440:443 #og 443:443
    restart: unless-stopped

volumes:
  linkstack_data:
In your reverse proxy, use https scheme and port 4440
Go to https://example.com to finish setup.
Later, go to https://example.com/dashboard to change config.
Linx Server
version: '3.8'
services:
  linx-server:
    container_name: linx-server
    image: andreimarcu/linx-server
    command: -config /data/linx-server.conf
    volumes:
      - /srv/path/Files/LinxServer/files:/data/files
      - /srv/path/Files/LinxServer/meta:/data/meta
      - /srv/path/Files/LinxServer/conf/linx-server.conf:/data/linx-server.conf
    network_mode: bridge
    ports:
      - "8987:8080"  # 8080:8080
    restart: unless-stopped
Delete ./Files/LinxServer/conf/linx-server.conf Folder.
Create linx-server.conf file in linx-server.conf:
bind = 127.0.0.1:8080
sitename = myLinx
siteurl = https://mylinx.example.org/
selifpath = s
maxsize = 4294967296
maxexpiry = 86400
allowhotlink = true
remoteuploads = true
nologs = true
force-random-filename = false
cleanup-every-minutes = 5
Then :
chown -R 65534:65534 ./Files/LinxServer/meta && chown -R 65534:65534 ./Files/LinxServer/filesSetup reverse proxy.
Restart container.
LMS
LMS is a self-hosted music streaming software. See official website.
Usage
In order to run this LMS image, you will have to use at least two volumes:
- Working data (write access rights).
- Music directory to be scanned (read-only access rights), add a volume for each library you want to scan.
Note: make sure to run the docker container using an unprivileged user
Example:
docker run \ --restart=unless-stopped \ --user <user_id:group_id> \ -p <port>:5082 \ -v <path_to_music>:/music:ro \ -v <path_to_persistent_data>:/var/lms:rw \ epoupon/lms
In the LMS administration interface, add /music as a library (you can add as many libraries as necessary).
Custom configuration file
LMS uses a default configuration file, see https://github.com/epoupon/lms/blob/master/conf/lms.conf.
You can specify a custom configuration file using the first argument of the entrypoint executable.
Example 1: Adding a configuration file in the persistent folder
copy lms/conf/lms.conf <path_to_persistent_data>/lms-custom.conf docker run \ --restart=unless-stopped \ --user <user_id:group_id> \ -p <port>:5082 \ -v <path_to_music>:/music:ro \ -v <path_to_persistent_data>:/var/lms:rw \ epoupon/lms /var/lms/lms-custom.conf
Example 2: using a dedicated volume
copy lms/conf/lms.conf <path_to_custom_conf_file>/lms-custom.conf docker run \ --restart=unless-stopped \ --user <user_id:group_id> \ -p <port>:5082 \ -v <path_to_music>:/music:ro \ -v <path_to_persistent_data>:/var/lms:rw \ -v <path_to_custom_conf_file>/lms-custom.conf:/etc/lms-custom.conf:ro \ epoupon/lms /etc/lms-custom.conf
Docker-compose
services:
  lms:
    restart: unless-stopped
    environment:
      - PUID=998
      - PGID=100
    ports:
      - 2805:5082
    volumes:
      - /path/to/Music/:/music:ro
      - /path/to/Files/LMS:/var/lms:rw
    image: epoupon/lms
networks: {}
Logseq
Github | Logseq Docker Web App Guide
A privacy-first, open-source platform for knowledge management and collaboration
docker run -d --rm -p 3051:80 ghcr.io/logseq/logseq-webapp:latestLuna Calendar
https://github.com/Opisek/luna
Image from https://github.com/tiritibambix/gh_actions/
name: luna
services:

  luna-frontend:
    container_name: luna-frontend
    image: tiritibambix/lunafrontend:latest
    ports:
      - "3000:3000"
    volumes:
      - /etc/timezone:/etc/timezone:ro
      - /etc/localtime:/etc/localtime:ro
    environment:
      ORIGIN: http://localhost:3000
      API_URL: http://luna-backend:3000

  luna-backend:
    container_name: luna-backend
    image: tiritibambix/lunabackend:latest
#    ports:
#      - "3001:3000"
    volumes:
      - /srv/dev-disk-by-uuid-7fe66601-5ca0-4c09-bc13-a015025fe53a/Files/Luna/data:/data
      - /etc/timezone:/etc/timezone:ro
      - /etc/localtime:/etc/localtime:ro
    environment:
      DB_HOST: luna-postgres
      DB_PORT: 5432
      DB_USERNAME: luna
      DB_PASSWORD: luna
      DB_DATABASE: luna
    depends_on:
      - luna-postgres

  luna-postgres:
    image: postgres:16-alpine
    container_name: luna-postgres
    ports:
      - "5432:5432"
    volumes:
      - /srv/dev-disk-by-uuid-7fe66601-5ca0-4c09-bc13-a015025fe53a/Files/Luna/postgres:/var/lib/postgresql/data
      - /etc/timezone:/etc/timezone:ro
      - /etc/localtime:/etc/localtime:ro
    environment:
      POSTGRES_USER: luna
      POSTGRES_PASSWORD: luna
      POSTGRES_DB: luna
https://oracle.steph.click/remote.php/dav/calendars/admin/
Authentication Type: Password
Enter Nextcloud login
Lychee 4
#-------------------------------------------
#  Docker Compose
# @RobLandry
# Repo : https://github.com/LycheeOrg/Lychee-Docker
#-------------------------------------------

version: '3'

services:
  lychee_db:
    container_name: lychee_db
    image: mariadb:10
    environment:
      - MYSQL_ROOT_PASSWORD=<ROOT_PASSWORD>
      - MYSQL_DATABASE=lychee
      - MYSQL_USER=lychee
      - MYSQL_PASSWORD=<LYCHEE_PASSWORD>
    expose:
      - 3306
    volumes:
      - mysql:/var/lib/mysql
    networks:
      - lychee
    restart: unless-stopped

  lychee:
    image: lycheeorg/lychee
    container_name: lychee
    ports:
      - 90:80
    volumes:
      - ./lychee/conf:/conf
      - ./lychee/uploads:/uploads
      - ./lychee/sym:/sym
      - ./lychee/logs:/logs
    networks:
      - lychee
    environment:
      #- PUID=998
      #- PGID=100
      # PHP timezone e.g. PHP_TZ=America/New_York
      - PHP_TC=Europe/Paris
      - TIMEZONE=Europe/Paris
      #- APP_NAME=Laravel
      #- APP_ENV=local
      #- APP_FORCE_HTTPS=false
      #- APP_DEBUG=true
      #- APP_URL=http://localhost
      - DB_CONNECTION=mysql
      - DB_HOST=lychee_db
      - DB_PORT=3306
      - DB_DATABASE=lychee
      - DB_USERNAME=lychee
      - DB_PASSWORD=<LYCHEE_PASSWORD>
      #- DB_PASSWORD_FILE=<filename>
      #- DB_OLD_LYCHEE_PREFIX=''
      #- CACHE_DRIVER=file
      #- SESSION_DRIVER=file
      #- SESSION_LIFETIME=120
      #- SECURITY_HEADER_HSTS_ENABLE=false
      #- REDIS_HOST=127.0.0.1
      #- REDIS_PASSWORD=null
      #- REDIS_PASSWORD_FILE=<filename>
      #- REDIS_PORT=6379
      #- MAIL_DRIVER=smtp
      #- MAIL_HOST=smtp.mailtrap.io
      #- MAIL_PORT=2525
      #- MAIL_USERNAME=null
      #- MAIL_PASSWORD=null
      #- MAIL_PASSWORD_FILE=<filename>
      #- MAIL_ENCRYPTION=null
      - STARTUP_DELAY=30
      # - ADMIN_USER=admin
      # - ADMIN_PASSWORD=<ADMIN_PASSWORD>
      # - ADMIN_PASSWORD_FILE=<filename>
    restart: unless-stopped
    depends_on:
      - lychee_db

networks:
  lychee:

volumes:
  mysql:
Change landing background : settings > more > landing_background > uploads/background/pic.jpg
Import from server:
Lychee can import photos from the command line using php artisan lychee:sync /path/to/import. Folders in this path will be converted to albums, and subfolders as subalbums using php artisan lychee:sync /path/to/import --album_id="album ID".
sudo docker exec --user root -it lychee bash
Change Max Filesize
apt-get update
apt-get install nano
cd /etc/php/8.2/clinano php.iniChange "post_max_size = 8M" and "upload_max_filesize = 2M"
apt-get purge nano
apt-get autoclean
Lychee 6
🇬🇧 Lychee 6 Docker Guide (on Debian + Portainer)
1️⃣ Folder structure
Create a clean Docker layout:
mkdir -p /srv/dev-disk-by-uuid-76493abc-7cd4-4b00-927c-8b2bef740dd4/Files/Lychee6/{conf,uploads,sym,logs,tmp,db,cache}
cd /srv/dev-disk-by-uuid-76493abc-7cd4-4b00-927c-8b2bef740dd4/Files/Lychee6
2️⃣ Environment file (stack.env)
PUID=998
PGID=100
TIMEZONE=Europe/Paris
APP_URL=https://lychee.domain.tld
APP_FORCE_HTTPS=true

# Database
DB_DATABASE=lychee
DB_USERNAME=lychee
DB_PASSWORD=lychee_pass
DB_ROOT_PASSWORD=root_lychee_pass

# Redis
CACHE_DRIVER=redis
REDIS_HOST=lychee6_redis
REDIS_PORT=6379
REDIS_PASSWORD= # leave empty
REDIS_USERNAME=default

TRUSTED_PROXIES=YOURREVERSEPROXYSERVERADRESSE #eg 192.168.1.101
3️⃣ Docker Compose file (docker-compose.yml)
version: "3.8"

services:
  lychee6_redis:
    image: redis:alpine
    container_name: lychee6_redis
    hostname: lychee6_redis
    security_opt:
      - no-new-privileges:true
    healthcheck:
      test: ["CMD-SHELL", "redis-cli ping || exit 1"]
    user: "998:100"
    env_file:
      - stack.env
    networks:
      - lychee6_net
    volumes:
      - ./cache:/data:rw
    restart: unless-stopped

  lychee6_db:
    image: mariadb:10
    container_name: lychee6_db
    hostname: lychee6_db
    security_opt:
      - no-new-privileges:true
    env_file:
      - stack.env
    environment:
      - MYSQL_ROOT_PASSWORD=${DB_ROOT_PASSWORD}
      - MYSQL_DATABASE=${DB_DATABASE}
      - MYSQL_USER=${DB_USERNAME}
      - MYSQL_PASSWORD=${DB_PASSWORD}
    volumes:
      - ./db:/var/lib/mysql
    networks:
      - lychee6_net
    restart: unless-stopped

  lychee6_app:
    image: lycheeorg/lychee
    container_name: lychee6_app
    hostname: lychee6_app
    security_opt:
      - no-new-privileges:true
    ports:
      - 7997:80
    volumes:
      - ./conf:/conf
      - ./uploads:/uploads
      - ./sym:/sym
      - ./logs:/logs
      - ./tmp:/lychee-tmp
    env_file:
      - stack.env
    environment:
      - PUID=${PUID}
      - PGID=${PGID}
      - PHP_TZ=${TIMEZONE}
      - TIMEZONE=${TIMEZONE}
      - APP_URL=${APP_URL}
      - DB_CONNECTION=mysql
      - DB_HOST=lychee6_db
      - DB_PORT=3306
      - DB_DATABASE=${DB_DATABASE}
      - DB_USERNAME=${DB_USERNAME}
      - DB_PASSWORD=${DB_PASSWORD}
      - CACHE_DRIVER=redis
      - REDIS_HOST=lychee6_redis
      - REDIS_PORT=6379
      - REDIS_PASSWORD= # leave empty
      - REDIS_USERNAME=default
      - STARTUP_DELAY=30
      - SKIP_PERMISSIONS_CHECKS=false
    depends_on:
      - lychee6_db
      - lychee6_redis
    networks:
      - lychee6_net
    restart: unless-stopped

networks:
  lychee6_net:
    name: lychee6_net
4️⃣ Deployment via Portainer
-
Open Portainer → Stacks → Add Stack
-
Upload the two files (
docker-compose.ymlandstack.env) -
Set stack name to lychee6
-
Deploy.
5️⃣ First run / Admin account
-
Access locally first:
http://your-server-ip:7997
→ Create your admin account here (Lychee rejects domain if SSL not active yet). -
Once the admin is created, switch to your domain:
https://lychee.domain.tld
🇫🇷 Guide Lychee 6 Docker (Debian + Portainer)
1️⃣ Arborescence Docker propre
mkdir -p /srv/dev-disk-by-uuid-76493abc-7cd4-4b00-927c-8b2bef740dd4/Files/Lychee6/{conf,uploads,sym,logs,tmp,db,cache}
cd /srv/dev-disk-by-uuid-76493abc-7cd4-4b00-927c-8b2bef740dd4/Files/Lychee6
2️⃣ Fichier stack.env
PUID=998
PGID=100
TIMEZONE=Europe/Paris
APP_URL=https://lychee.domain.tld
APP_FORCE_HTTPS=true

DB_DATABASE=lychee
DB_USERNAME=lychee
DB_PASSWORD=lychee_pass
DB_ROOT_PASSWORD=root_lychee_pass

CACHE_DRIVER=redis
REDIS_HOST=lychee6_redis
REDIS_PORT=6379
REDIS_PASSWORD= # leave empty
REDIS_USERNAME=default

TRUSTED_PROXIES=YOURREVERSEPROXYSERVERADRESSE #eg 192.168.1.101
3️⃣ Fichier docker-compose.yml
version: "3.8"

services:
  lychee6_redis:
    image: redis:alpine
    container_name: lychee6_redis
    hostname: lychee6_redis
    security_opt:
      - no-new-privileges:true
    healthcheck:
      test: ["CMD-SHELL", "redis-cli ping || exit 1"]
    user: "998:100"
    env_file:
      - stack.env
    networks:
      - lychee6_net
    volumes:
      - ./cache:/data:rw
    restart: unless-stopped

  lychee6_db:
    image: mariadb:10
    container_name: lychee6_db
    hostname: lychee6_db
    security_opt:
      - no-new-privileges:true
    env_file:
      - stack.env
    environment:
      - MYSQL_ROOT_PASSWORD=${DB_ROOT_PASSWORD}
      - MYSQL_DATABASE=${DB_DATABASE}
      - MYSQL_USER=${DB_USERNAME}
      - MYSQL_PASSWORD=${DB_PASSWORD}
    volumes:
      - ./db:/var/lib/mysql
    networks:
      - lychee6_net
    restart: unless-stopped

  lychee6_app:
    image: lycheeorg/lychee
    container_name: lychee6_app
    hostname: lychee6_app
    security_opt:
      - no-new-privileges:true
    ports:
      - 7997:80
    volumes:
      - ./conf:/conf
      - ./uploads:/uploads
      - ./sym:/sym
      - ./logs:/logs
      - ./tmp:/lychee-tmp
    env_file:
      - stack.env
    environment:
      - PUID=${PUID}
      - PGID=${PGID}
      - PHP_TZ=${TIMEZONE}
      - TIMEZONE=${TIMEZONE}
      - APP_URL=${APP_URL}
      - DB_CONNECTION=mysql
      - DB_HOST=lychee6_db
      - DB_PORT=3306
      - DB_DATABASE=${DB_DATABASE}
      - DB_USERNAME=${DB_USERNAME}
      - DB_PASSWORD=${DB_PASSWORD}
      - CACHE_DRIVER=redis
      - REDIS_HOST=lychee6_redis
      - REDIS_PORT=6379
      - REDIS_PASSWORD= # leave empty
      - REDIS_USERNAME=default
      - STARTUP_DELAY=30
      - SKIP_PERMISSIONS_CHECKS=false
    depends_on:
      - lychee6_db
      - lychee6_redis
    networks:
      - lychee6_net
    restart: unless-stopped

networks:
  lychee6_net:
    name: lychee6_net
4️⃣ Déploiement avec Portainer
-
Portainer → Stacks → Add Stack
-
Importer
docker-compose.yml+stack.env -
Nommer la stack : lychee6
-
Déployer.
5️⃣ Création de l’admin
-
Accéder d’abord en local :
http://IP-serveur:7997
→ Créer le compte admin ici. -
Ensuite seulement, se connecter via :
https://lychee.domain.tld
💻Custom CSS
Pour ajouter des icônes cliquables vers Facebook, Instagram et ton site internet dans le footer de Lychee via les champs CSS et JS, voici une solution simple et efficace. Tu peux coller ces codes directement dans les champs correspondants de ta configuration Lychee.
1️⃣ Code CSS (à coller dans le champ CSS)
Ce code stylise les icônes et les positionne en bas de page (footer).
/* Style pour le footer */
.lychee-footer {
    text-align: center;
    padding: 10px;
    background-color: rgba(0, 0, 0, 0.1);
    position: fixed;
    bottom: 0;
    width: 100%;
    z-index: 1000;
}

/* Conteneur des icônes */
.social-icons-container {
    display: flex;
    justify-content: center;
    align-items: center;
    gap: 15px; /* Espacement entre les icônes */
    margin: 0 auto;
    max-width: fit-content;
}

/* Style des icônes */
.social-icon {
    font-size: 24px;
    color: #555;
    transition: color 0.3s;
}

.social-icon:hover {
    opacity: 0.8;
}

/* Couleurs spécifiques pour chaque icône */
.social-icon.facebook { color: #3b5998; }
.social-icon.facebook:hover { color: #2d4373; }

.social-icon.instagram { color: #E1306C; }
.social-icon.instagram:hover { color: #8a3ab9; }

.social-icon.website { color: #4285F4; }
.social-icon.website:hover { color: #3367d6; }
2️⃣ Code JavaScript (à coller dans le champ JS)
Ce code ajoute les icônes au footer et gère les liens cliquables.
// Attendre que la page soit chargée
document.addEventListener('DOMContentLoaded', function() {
    // Créer un conteneur pour les icônes
    const footer = document.querySelector('.lychee-footer') || document.body;
    const socialContainer = document.createElement('div');
    socialContainer.className = 'social-icons-container';
    socialContainer.style.marginTop = '10px';

    // Ajouter les icônes avec leurs liens
    const facebookIcon = createSocialIcon('facebook', 'https://www.facebook.com/TON_PROFIL', 'fab fa-facebook');
    const instagramIcon = createSocialIcon('instagram', 'https://www.instagram.com/TON_PROFIL', 'fab fa-instagram');
    const websiteIcon = createSocialIcon('website', 'https://ton-site-web.com', 'fas fa-globe');

    // Ajouter les icônes au conteneur
    socialContainer.appendChild(facebookIcon);
    socialContainer.appendChild(instagramIcon);
    socialContainer.appendChild(websiteIcon);

    // Ajouter le conteneur au footer
    footer.appendChild(socialContainer);

    // Fonction pour créer une icône
    function createSocialIcon(className, href, iconClass) {
        const link = document.createElement('a');
        link.href = href;
        link.target = '_blank';
        link.rel = 'noopener noreferrer';

        const icon = document.createElement('i');
        icon.className = `social-icon ${className} ${iconClass}`;

        link.appendChild(icon);
        return link;
    }
});
💻 Additional text of the footer
Will work:
<a href="https://photo.stephanebonduel.com" target="_blank"><i class="fa fa-globe" style="font-size: 2em;"></i></a>Wish would work but is too long:
<a href="https://mon-site.com" target="_blank"><i class="fa fa-globe" style="font-size: 2em;"></i></a><a href="https://facebook.com/mon-profil" target="_blank"><i class="fa fa-facebook" style="font-size: 2em;"></i></a><a href="https://instagram.com/mon-profil" target="_blank"><i class="fa fa-instagram" style="font-size: 2em;"></i></a>Manage my damn life
First
cd /path/to/filesPull the repository, or download latest release from Github.
git clone https://github.com/intri-in/manage-my-damn-life-nextjs.gitCopy sample compose file.
cp docker-compose.yml.sample docker-compose.ymlYou can make changes to docker compose file using the Configuration guide as a help. If you're just running locally, no configuration is required.
networks:
  app-tier:
    driver: bridge


services:
  app:
    image: node:18-alpine
    command: sh -c "npm install && npm run build && npm run start"
    ports:
      - 3000:3000
    working_dir: /app
    volumes:
      - /path/to/files/manage-my-damn-life-nextjs/:/app
    depends_on:
      - db
    networks:
      - app-tier
    environment:
      NEXT_PUBLIC_BASE_URL: "http://192.168.1.103:3000/"
      NEXT_PUBLIC_API_URL: "http://192.168.1.103:3000/api/"
      NEXT_PUBLIC_DEBUG_MODE: "true"
      DB_HOST: db # don't change
      DB_USER: "root" # don't change
      DB_PASS: "PaSsWoRd" # change and match
      DB_NAME: db_mmdl # match
      DB_CHARSET: "utf8mb4"
      DB_COLLATE: "utf8mb4_0900_ai_ci"
      AES_PASSWORD : samplepassword
      SMTP_HOST : smtp.host
      SMTP_USERNAME :  test@example.com
      SMTP_PASSWORD :  smtp_password
      SMTP_FROMEMAIL :  test@example.com
      SMTP_PORT :  25
      SMTP_USESECURE :  "false"

      # User Config
      NEXT_PUBLIC_DISABLE_USER_REGISTRATION: "false"

      # After this value, old ssid will be deleted.
      MAX_CONCURRENT_LOGINS_ALLOWED: 5

      # Maxium length of OTP validity, in seconds.
      MAX_OTP_VALIDITY:  1800

      # Maximum length of a login session in seconds.
      MAX_SESSION_LENGTH: 2592000

      # Enforce max length of session.
      ENFORCE_SESSION_TIMEOUT: "true"

      #Max number of recursions for finding subtasks. Included so the recursive function doesn't go haywire.
      #If subtasks are not being rendered properly, try increasing the value.
      NEXT_PUBLIC_SUBTASK_RECURSION_CONTROL_VAR: 100

      # Whether user is running install from a docker image.
      DOCKER_INSTALL: "true"

      ## Test Mode
      NEXT_PUBLIC_TEST_MODE: "false"

  db:
    image: mysql
    command: --default-authentication-plugin=mysql_native_password
    restart: always
    ports:
      - "3306:3306"
    networks:
      - app-tier
    environment:
      MYSQL_DATABASE: db_mmdl # match
      MYSQL_ALLOW_EMPTY_PASSWORD: ok
      MYSQL_ROOT_PASSWORD: PaSsWoRd # change and match
      MYSQL_ROOT_HOST: '%'
DB_USER: root
DB_PASSWORD: [same as MYSQL_ROOT_PASSWORD]
DB_HOST: db
DB_NAME: [same as MYSQL_DATABASE]
docker-compose up -dDocker compose will start two containers : one with MMDL, and one with MySQL. MMDL should be now up and running.
Open your browser and go to http://localhost:3000/install to start the installation process.
MediaCMS
cd /srv/path/Filesgit clone https://github.com/mediacms-io/mediacmscd /srv/path/Files/mediacmsmkdir postgres_data \
&& chmod -R 755 postgres_datanano docker-compose.yamlversion: "3"
services:
redis:
image: "redis:alpine"
restart: always
healthcheck:
test: ["CMD", "redis-cli","ping"]
interval: 30s
timeout: 10s
retries: 3
migrations:
image: mediacms/mediacms:latest
volumes:
- /srv/path/Files/mediacms/deploy:/home/mediacms.io/mediacms/deploy
- /srv/path/Files/mediacms/logs:/home/mediacms.io/mediacms/logs
- /srv/path/Files/mediacms/media_files:/home/mediacms.io/mediacms/media_files
- /srv/path/Files/mediacms/cms/settings.py:/home/mediacms.io/mediacms/cms/settings.py
environment:
ENABLE_UWSGI: 'no'
ENABLE_NGINX: 'no'
ENABLE_CELERY_SHORT: 'no'
ENABLE_CELERY_LONG: 'no'
ENABLE_CELERY_BEAT: 'no'
ADMIN_USER: 'admin'
ADMIN_EMAIL: 'admin@localhost'
ADMIN_PASSWORD: 'complicatedpassword'
restart: on-failure
depends_on:
redis:
condition: service_healthy
web:
image: mediacms/mediacms:latest
deploy:
replicas: 1
ports:
- "8870:80" #whatever:80
volumes:
- /srv/path/Files/mediacms/deploy:/home/mediacms.io/mediacms/deploy
- /srv/path/Files/mediacms/logs:/home/mediacms.io/mediacms/logs
- /srv/path/Files/mediacms/media_files:/home/mediacms.io/mediacms/media_files
- /srv/path/Files/mediacms/cms/settings.py:/home/mediacms.io/mediacms/cms/settings.py
environment:
# ENABLE_UWSGI: 'no' #keep commented
ENABLE_CELERY_BEAT: 'no'
ENABLE_CELERY_SHORT: 'no'
ENABLE_CELERY_LONG: 'no'
ENABLE_MIGRATIONS: 'no'
db:
image: postgres:15.2-alpine
volumes:
- /srv/path/Files/mediacms/postgres_data:/var/lib/postgresql/data/
restart: always
environment:
POSTGRES_USER: mediacms
POSTGRES_PASSWORD: mediacms
POSTGRES_DB: mediacms
TZ: Europe/Paris
healthcheck:
test: ["CMD-SHELL", "pg_isready -d $${POSTGRES_DB} -U $${POSTGRES_USER}"]
interval: 30s
timeout: 10s
retries: 5
celery_beat:
image: mediacms/mediacms:latest
volumes:
- /srv/path/Files/mediacms/deploy:/home/mediacms.io/mediacms/deploy
- /srv/path/Files/mediacms/logs:/home/mediacms.io/mediacms/logs
- /srv/path/Files/mediacms/media_files:/home/mediacms.io/mediacms/media_files
- /srv/path/Files/mediacms/cms/settings.py:/home/mediacms.io/mediacms/cms/settings.py
environment:
ENABLE_UWSGI: 'no'
ENABLE_NGINX: 'no'
ENABLE_CELERY_SHORT: 'no'
ENABLE_CELERY_LONG: 'no'
ENABLE_MIGRATIONS: 'no'
celery_worker:
image: mediacms/mediacms:latest
deploy:
replicas: 1
volumes:
- /srv/path/Files/mediacms/deploy:/home/mediacms.io/mediacms/deploy
- /srv/path/Files/mediacms/logs:/home/mediacms.io/mediacms/logs
- /srv/path/Files/mediacms/media_files:/home/mediacms.io/mediacms/media_files
- /srv/path/Files/mediacms/cms/settings.py:/home/mediacms.io/mediacms/cms/settings.py
environment:
ENABLE_UWSGI: 'no'
ENABLE_NGINX: 'no'
ENABLE_CELERY_BEAT: 'no'
ENABLE_MIGRATIONS: 'no'
depends_on:
- migrationsdocker-compose up -dCSS will probably be missing because reasons, so bash into `web` container
docker exec -it mediacms_web_1 /bin/bashThen
python manage.py collectstaticNo need to reboot
When editing settings.py , just reload celery_worker, celery_beat and web containers
Memos
version: "3.0"
services:
  memos:
    image: neosmemo/memos:latest
    container_name: memos
    volumes:
      - /srv/path/Memos/:/var/opt/memos
    ports:
      - 5230:5230
MeTube
version: "3"
services:
  metube:
    image: alexta69/metube
    container_name: metube
    restart: unless-stopped
    user: "998:100"
    ports:
      - "8081:8081"
    volumes:
      - /srv/path/Files/Metube/downloads:/downloads
Write permission to ./dowloads :
chown 998:100 /srv/path/Files/Metube/downloads/ -RMIND reminders
version: '3.3'
services:
    mind:
        container_name: mind
        volumes:
            - '/srv/Files/MIND/db:/app/db'
        environment:
            - TZ=Europe/Paris
        ports:
            - '8080:8080'
        image: 'mrcas/mind:latest'
        restart: unless-stopped
MinMon
Create /srv/Files/Minmon/minmon.toml. Example config here. More info on config here.
version: "3"

services:
  minmon:
    image: ghcr.io/flo-at/minmon:latest
    volumes:
      - /srv/Files/Minmon/minmon.toml:/etc/minmon.toml:ro
      # The following line is required for the DockerContainerStatus check.
      - /var/run/docker.sock:/var/run/docker.sock
MKVToolNix
version: '3'
services:
  mkvtoolnix:
    image: jlesage/mkvtoolnix
    ports:
      - "5800:5800"
    volumes:
      - "/docker/appdata/mkvtoolnix:/config:rw"
      - "/home/user:/storage:rw"
Moodle
Moodle is a free and open-source learning management system written in PHP and distributed under the GNU General Public License. Moodle is used for blended learning, distance education, flipped classroom and other online learning projects in schools, universities, workplaces and other sectors.
version: '2'
services:
  mariadb:
    image: mariadb
    volumes:
      - /srv/path/Files/Moodle/db:/var/lib/mysql
    environment:
      - MYSQL_ROOT_PASSWORD=pass
      - MYSQL_ROOT_USER=root
      - MYSQL_DATABASE=moodle

  moodle:
    image: bitnami/moodle:latest
    ports:
      - 7080:8080
      - 7443:8443
    environment:
      - MOODLE_DATABASE_HOST=mariadb
      - MOODLE_DATABASE_USER=root
      - MOODLE_DATABASE_PASSWORD=pass
      - MOODLE_DATABASE_NAME=moodle
      - PUID=998
      - PGID=100
    volumes:
      - /srv/path/Files/Moodle/confg:/bitnami/moodle
      - /srv/path/Files/Moodle/data:/bitnami/moodledata
    depends_on:
      - mariadb
    links:
      - mariadb:mariadb
default user: user
default password: bitnami
Morphos
Morphos server aims to provide a self-hosted server to convert files privately.
version: "3.3"
services:
  morphos-server:
    ports:
      - 8080:8080
    volumes:
      - /tmp:/tmp
    image: ghcr.io/danvergara/morphos-server:latest
Movie Roulette
Container Images
| Registry | Architecture | Version | Image Path |
|---|---|---|---|
| Docker Hub | AMD64 | Latest | sahara101/movie-roulette:latest |
| Docker Hub | ARM64/ARMv7 | Latest | sahara101/movie-roulette:arm-latest |
| GHCR | AMD64 | Latest | ghcr.io/sahara101/movie-roulette:latest |
| GHCR | ARM64/ARMv7 | Latest | ghcr.io/sahara101/movie-roulette:arm-latest |
Instead of latest you can also use the version number.
services:
  movie-roulette:
    image: #See above
    container_name: movie-roulette
    ports:
      - "4000:4000"
    volumes:
      - ./movie_roulette_data:/app/data
    restart: unless-stopped
Visit http://your-server:4000 and configure your services.
Musicbrainz Picard
version: "3.3"
services:
  picard:
    container_name: picard
    ports:
      - 5800:5800
    volumes:
      - /path/to/config:/config:rw
      - /path/to/music/:/storage:rw
    image: mikenye/picard
networks: {}
My Spotify
version: "3"

services:
  server:
    image: yooooomi/your_spotify_server
    restart: always
    ports:
      - "8080:8080"
    links:
      - mongo
    depends_on:
      - mongo
    environment:
      - API_ENDPOINT=http://localhost:8080 # This MUST be included as a valid URL in the spotify dashboard (see below)
      - CLIENT_ENDPOINT=http://localhost:3000
      - SPOTIFY_PUBLIC=__your_spotify_client_id__
      - SPOTIFY_SECRET=__your_spotify_secret__
      - CORS=http://localhost:3000,http://localhost:3001 # all if you want to allow every origin
  mongo:
    container_name: mongo
    image: mongo:4.4.8
    volumes:
      - ./your_spotify_db:/data/db

  web:
    image: yooooomi/your_spotify_client
    restart: always
    ports:
      - "3000:3000"
    environment:
      - API_ENDPOINT=http://localhost:8080
Creating the Spotify Application
For YourSpotify to work you need to provide a Spotify application public AND secret to the server environment. To do so, you need to create a Spotify application here.
- Click on Create a client ID.
- Fill out all the informations.
- Copy the public and the secret key into your
docker-composefile under the name ofSPOTIFY_PUBLICandSPOTIFY_SECRETrespectively. - Add an authorized redirect URI corresponding to your server location on the internet adding the suffix /oauth/spotify/callback.
- use the
EDIT SETTINGSbutton on the top right corner of the page. - add your URI under the
Redirect URIssection.
- i.e:
http://localhost:8080/oauth/spotify/callbackorhttp://home.mydomain.com/your_spotify_backend/oauth/spotify/callback
- Do not forget to hit the save button at the bottom of the popup.
- use the
Importing past history
By default, YourSpotify will only retrieve data for the past 24 hours once registered. This is a technical limitation. However, you can import previous data by two ways.
The import process uses cache to limit requests to the Spotify API. By default, the cache size is unlimited, but you can limit is with the MAX_IMPORT_CACHE_SIZE env variable in the server.
Supported import methods
Privacy data
- Request your privacy data at Spotify to have access to your history for the past year here.
- Head to the Settings page and choose the privacy method.
- Input your files starting with
StreamingHistoryX.json. - Start your import.
Full privacy data
Full privacy data can be obtained by emailing privacy@spotify.com and requesting your data since the creation of the account.
- Request your data by email.
- Head to the Settings page and choose the full-privacy method.
- Input your files starting with
endsongX.json. - Start your import.
N8n
version: '3.3'
services:
    n8n:
        container_name: n8n
        ports:
            - '5678:5678'
        volumes:
            - '/srv/Files/n8n:/home/node/.n8n'
        image: n8nio/n8n
        restart: unless-stopped
Nautical-backup
version: '3'
services:
  nautical-backup:
    image: minituff/nautical-backup:2
    container_name: nautical-backup
    volumes:
      - /var/run/docker.sock:/var/run/docker.sock
      - /source:/app/source
      - /destination:/app/destination
    environment: # Optional variables
      - TZ=America/Los_Angeles
      - CRON_SCHEDULE=0 4 * * *
      - SKIP_CONTAINERS=example1,example2,example3
Nautical itself does not have the ability to map network shares. However, it can use a network share for either the source or destination.
Commonly, we run containers on our host machine, then use an NFS share as the backup destination location. This page will give a brief overview of how to do that.
Connect to an NFS Share On Container Host (Linux)
-
Create the NFS destination directories.
# Create mount point (1) mkdir -p /mnt/nfs/docker_backups- The destination directories must exist before a mount can be created
-
Setup NFS mount points:
nano /etc/fstabThis will open a file, and here you can insert your NFS configuration:
# | ------------- Source -------------- | ---- Destination ---- | -------- Options ---------- |
192.168.1.10:/mnt/backups/docker_volumes /mnt/nfs/docker_backups nfs _netdev,auto,rw,async 0 0
Tip:
192.168.1.10is just an example IP address -
Apply and mount the NFS shares
mount -a!!! success "A successful
mount -awill return nothing in the console" -
Verify read and write access
cd /mnt/nfs/docker_backups
touch test.txt && rm test.txt
Add Nautical Backup
The above example created a local directory of /mnt/nfs/docker_backups which is an NFS share pointing to 192.168.1.10:/mnt/backups/docker_volumes.
Here is how we can use this new mount withing Nautical: === "Docker Compose" ```yaml hl_lines="9" ------8<------ "docker-compose-example.yml:0:9" - /mnt/nfs/docker_backups:/app/destination #(3) <-- NFS Share
```

------8<------ "docker-example-tooltips.md"
=== "Docker Run"
bash hl_lines="5" ------8<------ "docker-run-example.sh:0:5" -v /mnt/nfs/docker_backups:/app/destination \ #(2)! ------8<------ "docker-run-example.sh:10:"
------8<------ "docker-example-tooltips.md"
Navidrome
version: "3.3"
services:
  navidrome:
    image: deluan/navidrome:latest
    ports:
      - "4533:4533"
    environment:
      # Optional: put your config options customization here. Examples:
      ND_SCANSCHEDULE: 24h
      ND_LOGLEVEL: info
    volumes:
      - "/srv/path/Files/Navidrome:/data"
      - "/srv/path/Music:/music:ro"
    restart: unless-stopped
NeonLink
First, create an empty bookmarks.sqlite file in the installation folder (i.e. /srv/disk/files/neonlink)
- Replace {80} with any port you like.
- Replace {/path/to/bookmarks.sqlite} with the absolute path to the
bookmarks.sqlitefile you created earlier. - Replace {/path/to/backgroundimages} with the path to folder with background images
Then run the docker-compose.
version: "3.8"

services:
  neonlink:
    image: alexscifier/neonlink
    container_name: neonlink
    volumes:
      - ./bookmarks.sqlite:/app/db/bookmarks.sqlite
      - ./background:/app/public/static/media/background
    restart: unless-stopped
    ports:
      - "80:3333"
Netdata
Find your host's FQDN
hostname --fqdnversion: '3'
services:
netdata:
image: netdata/netdata
container_name: netdata
hostname: FDQN # set to fqdn of host
ports:
- 19999:19999
restart: unless-stopped
cap_add:
- SYS_PTRACE
security_opt:
- apparmor:unconfined
environment:
- PGID= # Giving group access to the Docker socket
volumes:
#Leave everything as is
- netdataconfig:/etc/netdata
- netdatalib:/var/lib/netdata
- netdatacache:/var/cache/netdata
- /etc/passwd:/host/etc/passwd:ro
- /etc/group:/host/etc/group:ro
- /proc:/host/proc:ro
- /sys:/host/sys:ro
- /etc/os-release:/host/etc/os-release:ro
- /var/run/docker.sock:/var/run/docker.sock:ro # Giving group access to the Docker socket
volumes:
netdataconfig:
netdatalib:
netdatacache:New Speedtest Tracker
version: "3.3"
services:
  speedtest-tracker:
    container_name: speedtest-tracker
    restart: unless-stopped
    ports:
      - 8080:80
    environment:
      - PUID=998
      - PGID=100
      - DB_CONNECTION=sqlite
    volumes:
      - /srv/path/Files/Speedtest-Tracker/config:/config
image: lscr.io/linuxserver/speedtest-tracker:latestAs of
v0.11.0 you can add additional users and update the default user's name, email and password.| Username | Password |
|---|---|
|
|
|
Nextcloud
version: '3.8'

volumes:
  nextcloud:
  db:

services:
  db:
    image: mariadb
    restart: unless-stopped
    command: --transaction-isolation=READ-COMMITTED --binlog-format=ROW --innodb-file-per-table=1 --skip-innodb-read-only-compressed
    volumes:
      - /srv/dev-disk-by-uuid-76493abc-7cd4-4b00-927c-8b2bef740dd4/Files/Nextcloud/db:/var/lib/mysql
    environment:
      - MYSQL_ROOT_PASSWORD=XXXXXX
      - MYSQL_PASSWORD=xxxxx
      - MYSQL_DATABASE=nextcloud
      - MYSQL_USER=nextcloud

  app:
    image: nextcloud
    restart: unless-stopped
    depends_on:
      - db
    ports:
      - "8080:80"
    volumes:
      - /srv/dev-disk-by-uuid-76493abc-7cd4-4b00-927c-8b2bef740dd4/Files/Nextcloud/data:/var/www/html
    environment:
      - MYSQL_PASSWORD=xxxxx
      - MYSQL_DATABASE=nextcloud
      - MYSQL_USER=nextcloud
      - MYSQL_HOST=db
      # --- Limites de taille / mémoire ---
      - APACHE_BODY_LIMIT=0          # 0 = illimité côté Apache (sinon mettre une valeur en octets)
      - PHP_UPLOAD_LIMIT=20G         # adapte à ton besoin (ex. 10G, 50G...)
      - PHP_MEMORY_LIMIT=20G          # >= PHP_UPLOAD_LIMIT dans la pratique (au moins > post_max_size)
Host is db mariadb
To find out, docker ps -a and see what matches nextcloud_db_1
ex: 8f867eda8f45 mariadb "docker-entrypoint.s…" 2 minutes ago...
sudo nano /srv/path/NextCloud/config/config.phpedit 'overwrite.cli.url' => 'https://your.domain1.com',
ajout 'overwriteprotocol' => 'https',
Trusted domains:
  array (
    0 => '192.168.x.x:8080',
    1 => 'your.domain1.com', # no https://
    2 => 'your.domain2.com'  # no https://
  ),
Upload large files: https://www.youtube.com/watch?v=2-EbM9MyRBs
Edit Nextcloud/data/.user.ini:
php_value upload_max_filesize 20G
php_value post_max_size 20G
php_value max_input_time 3600
php_value max_execution_time 3600
Edd this to your nginx reverse proxy settings:
fastcgi_connect_timeout 60;
fastcgi_send_timeout 1800;
fastcgi_read_timeout 1800;
Do not acitvate the Cache Assets switch in Nginx Proxy Manager
Update to a newer version
Updating the Nextcloud container is done by pulling the new image, throwing away the old container and starting the new one.
It is only possible to upgrade one major version at a time. For example, if you want to upgrade from version 14 to 16, you will have to upgrade from version 14 to 15, then from 15 to 16.
Since all data is stored in volumes, nothing gets lost. The startup script will check for the version in your volume and the installed docker version. If it finds a mismatch, it automatically starts the upgrade process. Don't forget to add all the volumes to your new container, so it works as expected.
$ docker pull nextcloud
$ docker stop <your_nextcloud_container>
$ docker rm <your_nextcloud_container>
$ docker run <OPTIONS> -d nextcloud
Beware that you have to run the same command with the options that you used to initially start your Nextcloud. That includes volumes, port mapping.
When using docker-compose your compose file takes care of your configuration, so you just have to run:
$ docker-compose pull
$ docker-compose up -d
Locked files / folders ?
Try this :
sudo docker exec -ti --user www-data nextcloud-app-1 /var/www/html/occ files:scan --all

OR

sudo docker exec -ti --user www-data nextcloud-app-1 /var/www/html/occ files:scan username
docker exec --user www-data nextcloud-app-1 php occ maintenance:mode --on
docker exec nextcloud-db-1 mysql --user=root --password=SQLROOTPASSWDOLOL -D nextcloud -e 'delete from oc_file_locks where 1'
docker exec --user www-data nextcloud-app-1 php occ maintenance:mode --offsudo docker exec -ti --user www-data nextcloud-app-1 /var/www/html/occ config:app:set files max_chunk_size --value 0
My last know docker-compose
version: '2'

volumes:
  nextcloud:
  db:

services:
  db:
    image: mariadb:10.5
    restart: unless-stopped
    command: --transaction-isolation=READ-COMMITTED --binlog-format=ROW
    volumes:
      - /srv/dev-disk-by-uuid-7fe66601-5ca0-4c09-bc13-a015025fe53a/Nextcloud/db:/var/lib/mysql
    environment:
      - MYSQL_ROOT_PASSWORD=xxxxxxxxxxxx!
      - MYSQL_PASSWORD=xxxxxxxxxxxx
      - MYSQL_DATABASE=nextcloud
      - MYSQL_USER=nextcloud

  app:
    image: nextcloud
    restart: unless-stopped
    ports:
      - 8080:80
    links:
      - db
    volumes:
      - /srv/dev-disk-by-uuid-7fe66601-5ca0-4c09-bc13-a015025fe53a/Nextcloud/data:/var/www/html
    environment:
      - MYSQL_PASSWORD=xxxxxxxxxxxx
      - MYSQL_DATABASE=nextcloud
      - MYSQL_USER=nextcloud
      - MYSQL_HOST=db
Nextcloud (ARM64)
version: '3.3'
services:
  db:
    image: yobasystems/alpine-mariadb:latest
    command: --transaction-isolation=READ-COMMITTED --binlog-format=ROW --innodb-read-only-compressed=OFF # or --transaction-isolation=READ-COMMITTED --binlog-format=ROW --innodb-file-per-table=1 --skip-innodb-read-only-compressed
    restart: unless-stopped
    volumes:
      - /srv/path/NextCloud/database:/var/lib/mysql
    environment:
      - MYSQL_ROOT_PASSWORD=rootpass
      - MYSQL_PASSWORD=dbpass
      - MYSQL_DATABASE=nextcloud
      - MYSQL_USER=nextcloud
  app:
    image: nextcloud
    ports:
      - 8080:80
    links:
      - db
    volumes:
      - /srv/path/NextCloud/config:/var/www/html
    restart: unless-stopped
Host is db
sudo nano /srv/path/NextCloud/config/config/config.phpedit 'overwrite.cli.url' => 'your.domain1.com',
ajout 'overwriteprotocol' => 'https',
Trusted domains:
  array (
    0 => '192.168.x.x:8080',
    1 => 'your.domain1.com',
    2 => 'your.domain2.com'
  ),
Upload large files: https://www.youtube.com/watch?v=2-EbM9MyRBs
sudo nano /srv/path/NextCloud/config/.user.iniphp_value upload_max_filesize 10G
php_value post_max_size 10G
php_value max_input_time 3600
php_value max_execution_time 3600Add these lines to your nginx config
fastcgi_connect_timeout 60;
fastcgi_send_timeout 1800;
fastcgi_read_timeout 1800;
MANUALLY UPDATE:
https://www.vincent-gou.fr/post/nextcloud_manual_upgrade_after_docker_update/
Connect Nextcloud docker container
[root@nas docker]# docker exec --user www-data -it nextcloud bash #or docker exec --user www-data -it nextcloud-app-1 bashControl Nextcloud version
www-data@e73fd289077c:~/html$ php occ status
Nextcloud or one of the apps require upgrade - only a limited number of commands are available
You may use your browser or the occ upgrade command to do the upgrade
  - installed: true
  - version: 15.0.5.3
  - versionstring: 15.0.5
  - edition:
www-data@e73fd289077c:~/html$
Update Nextcloud
www-data@e73fd289077c:~/html$ php occ upgrade
Nextcloud or one of the apps require upgrade - only a limited number of commands are available
You may use your browser or the occ upgrade command to do the upgrade
Set log level to debug
Updating database schema
Updated database
[...]
Starting code integrity check...
Finished code integrity check
Update successful
Maintenance mode is kept active
Reset log level
Deactivate maintenance mode
www-data@e73fd289077c:~/html$ php occ maintenance:mode --off
Maintenance mode disabled
www-data@e73fd289077c:~/html$ exit
Final setup
Once update is finished, connect Nextcloud and check plugin app updates manually.
Some apps may have been disabled during update process.
You will have to activate them manually.
Enjoy !
How to run occ command to add missing indices
sudo docker exec --user www-data nextcloud-app-1 php occ db:add-missing-indicesFile Operations
php occ files:cleanuptidies up the server’s file cache by deleting all file entries that have no matching entries in the storage table.
Nextcloud All-In-One
version: "3.8"

volumes:
 nextcloud_aio_mastercontainer:
   name: nextcloud_aio_mastercontainer
services:
 nextcloud:
   image: nextcloud/all-in-one:latest
   restart: unless-stopped
   container_name: nextcloud-aio-mastercontainer
   volumes:
     - nextcloud_aio_mastercontainer:/mnt/docker-aio-config
     - /var/run/docker.sock:/var/run/docker.sock:ro
   ports:
     - 8145:8080 # change the port on the left side if it's already in use on your host system.
   environment:
     - NEXTCLOUD_DATADIR=/srv/.../Nextcloud/
     - NEXTCLOUD_UPLOAD_LIMIT=500G #default 10G
     - NEXTCLOUD_MAX_TIME=360000 #default 3600
     - NEXTCLOUD_MEMORY_LIMIT=2048M #default 512
- APACHE_PORT=11000 # change this port number if 11000 is already in use on your host system.*How to change the default location of Nextcloud's Datadir
Go to your registrar and create a CName. Let's say ncaio.domain.ltd.
Create a proxy with this cname pointing to <your host machine IP>:11000
Nginx proxy manager must point to host machine and port 11000
Then go to https://<your host machine IP>:8080 (or the port you changed 8080 to in the compose file). Accept the risk.
Copy the very long password.
On the next page, paste the very long password.
On the next page, type in the domain into the input field that will be used for Nextcloud. Here it is ncaio.domain.ltd
Select or unselect addons and fill in your timezone.
Then "Download and start containers. This will take a while. You can hit the reload button to check out how it's going.
BE PATIENT! The next part will take anywhere from 5 to 25 or 30 minutes.
Now, we wait. In the background, the Nextcloud Master Container is pulling down all of the images for each of the Nextcloud modules that will run.
Once you see the message that all containers are in a 'Running' state, you'll get a button to Open Nextcloud, and you'll be provided a username (usually admin) and a randomly generated, long strong password for your initial login. Make sure to copy that password and use it to login to your Nextcloud install the first time.
Nextclouds config.php file is stored in the nextcloud_aio_nextcloud Docker volume and can be edited by following the config.php documentation.
You can run Nextcloud's usual occ commands by following the occ documentation.
Nextcloud's datadir is getting stored in the /srv/.../Nextcloud/ directory. See the NEXTCLOUD_DATADIR documentation on how to change this.
The Nextcloud container is confied and local external storage in Nextcloud is disabled. See the NEXTCLOUD_MOUNT documentation on how to change this.
Nextcloud has an upload limit of 10G configured (for public link uploads. Bigger uploads are always possible when users are logged in). See the NEXTCLOUD_UPLOAD_LIMIT documentation on how to change this.
For Nextcloud, a memory limit of 512M per PHP process is configured. See the NEXTCLOUD_MEMORY_LIMIT documentation on how to change this.
Nextcloud has a timeout of 3600 seconds configured (important for big file uploads). See the NEXTCLOUD_MAX_TIME documentation on how to change this.
The /dev/dri device which is needed for hardware transcoding is not attached to the Nextcloud container. See the NEXTCLOUD_ENABLE_DRI_DEVICE documentation on how to change this.
For further documentation on AIO, refer to this page. You can use the browser search [CTRL]+[F] to search through the documentation. Additional documentation can be found here.
Lost setup password ?sudo cat /var/lib/docker/volumes/nextcloud_aio_mastercontainer/_data/data/configuration.json | grep password
Between two installs, don't forget to ERASE DOCKER VOLUMES
Commonly used addons:
Cospend
Polls
Camera RAW Previews
App order
Breeze dark
Nginx Proxy Manager
version: '3.3'
services:
  app:
    image: 'jc21/nginx-proxy-manager:latest'
    ports:
      - '80:80'
      - '81:81'
      - '443:443'
    environment:
      DB_MYSQL_HOST: "db"
      DB_MYSQL_PORT: 3306
      DB_MYSQL_USER: "npm"
      DB_MYSQL_PASSWORD: "npm"
      DB_MYSQL_NAME: "npm"
    volumes:
      - /srv/path/Files/NginxProxyManager/data:/data
      - /srv/path/Files/NginxProxyManager/letsencrypt:/etc/letsencrypt
  db:
    image: 'jc21/mariadb-aria:latest'
    environment:
      MYSQL_ROOT_PASSWORD: 'npm'
      MYSQL_DATABASE: 'npm'
      MYSQL_USER: 'npm'
      MYSQL_PASSWORD: 'npm'
    volumes:
      - /srv/path/Files/NginxProxyManager/data/mysql:/var/lib/mysql
Default creditentials:
Email: admin@example.com
Password: changeme
Explications des Concepts
Nginx Proxy Manager - Explications des Concepts
1. Proxy Hosts
Définition: Les "Proxy Hosts" sont des configurations utilisées pour rediriger le trafic entrant basé sur des noms de domaine (ou sous-domaines) vers des serveurs spécifiques sur votre réseau local ou Internet.
Utilité:
- Permet de configurer un reverse proxy pour servir plusieurs applications derrière une même IP publique.
- Simplifie la gestion de plusieurs sites web et applications avec des certificats SSL.
Exemple:
- Vous avez deux services :
- Une application Nextcloud sur
192.168.1.10:8080. - Une interface web de Home Assistant sur
192.168.1.20:8123.
- Une application Nextcloud sur
- Vous configurez des proxy hosts comme suit :
cloud.mondomaine.com-> redirige vershttp://192.168.1.10:8080.home.mondomaine.com-> redirige vershttp://192.168.1.20:8123.
- Ces redirections peuvent être sécurisées avec des certificats SSL via Let's Encrypt.
2. Redirection Hosts
Définition: Les "Redirection Hosts" sont des configurations pour rediriger le trafic d'une URL ou d'un domaine vers un autre.
Utilité:
- Simplifie la redirection de domaines ou sous-domaines.
- Peut être utilisé pour gérer des redirections temporaires ou permanentes.
Exemple:
- Vous souhaitez que tout le trafic vers
oldsite.comsoit redirigé versnewsite.com. - Configuration :
oldsite.com-> redirection vershttps://newsite.com.- Type : Redirection permanente (301).
3. Streams
Définition: Les "Streams" sont utilisés pour gérer les connexions TCP/UDP directes. Contrairement aux proxy hosts, qui fonctionnent sur le protocole HTTP/S, les streams sont conçus pour des services réseau non-HTTP.
Utilité:
- Permet de rediriger des connexions pour des services tels que SSH, MQTT, ou des jeux vidéo utilisant des protocoles TCP/UDP.
Exemple:
- Vous avez un serveur SSH sur votre réseau local (
192.168.1.30:22) et vous voulez permettre l'accès depuis Internet viassh.mondomaine.com. - Configuration :
- Stream TCP :
ssh.mondomaine.com:22->192.168.1.30:22.
- Stream TCP :
4. 404 Hosts
Définition: Les "404 Hosts" servent à intercepter le trafic non désiré ou mal configuré (par exemple, des demandes pour des domaines non gérés par NPM) et à afficher une page 404 ou autre message personnalisé.
Utilité:
- Prévention d'accès indésiré à votre infrastructure.
- Fournir une réponse standardisée pour les domaines inconnus.
Exemple:
- Vous avez configuré plusieurs domaines, mais si quelqu’un essaie d’accéder à
nonexistant.mondomaine.com, une page 404 générique s'affiche pour éviter toute exposition non intentionnelle.
5. Access Lists
Définition: Les "Access Lists" permettent de contrôler qui peut accéder à vos services en fonction des adresses IP ou des règles spécifiques.
Utilité:
- Ajoute une couche de sécurité pour limiter l’accès à certaines ressources.
- Peut être utilisé pour bloquer ou autoriser uniquement certaines IPs ou plages d’IPs.
Exemple:
- Vous configurez une liste d’accès pour l’interface admin de votre application :
- Autorise uniquement les IPs locales (
192.168.1.0/24). - Bloque toutes les autres IPs.
- Autorise uniquement les IPs locales (
- Configuration pour
admin.mondomaine.com:- Access List :
IP locale uniquement. - Appliqué au proxy host correspondant.
- Access List :
Résumé des cas d’utilisation
- Proxy Hosts : Gérer plusieurs applications web sur une seule IP publique.
- Redirection Hosts : Simplifier la migration ou rediriger les visiteurs d’un ancien domaine à un nouveau.
- Streams : Gérer des connexions non-HTTP comme SSH ou MQTT.
- 404 Hosts : Empêcher l’accès à des domaines non configurés.
- Access Lists : Limiter l’accès aux ressources sensibles ou critiques.
Explanation of Concepts
Nginx Proxy Manager - Explanation of Concepts
1. Proxy Hosts
Definition: "Proxy Hosts" are configurations used to redirect incoming traffic based on domain names (or subdomains) to specific servers on your local network or the internet.
Purpose:
- Allows setting up a reverse proxy to serve multiple applications behind a single public IP.
- Simplifies managing multiple websites and applications with SSL certificates.
Example:
- You have two services:
- A Nextcloud application on
192.168.1.10:8080. - A Home Assistant web interface on
192.168.1.20:8123.
- A Nextcloud application on
- You configure proxy hosts as follows:
cloud.mydomain.com-> redirects tohttp://192.168.1.10:8080.home.mydomain.com-> redirects tohttp://192.168.1.20:8123.
- These redirections can be secured with SSL certificates via Let's Encrypt.
2. Redirection Hosts
Definition: "Redirection Hosts" are configurations to redirect traffic from one URL or domain to another.
Purpose:
- Simplifies redirecting domains or subdomains.
- Useful for managing temporary or permanent redirects.
Example:
- You want all traffic to
oldsite.comto be redirected tonewsite.com. - Configuration:
oldsite.com-> redirect tohttps://newsite.com.- Type: Permanent redirect (301).
3. Streams
Definition: "Streams" are used to handle direct TCP/UDP connections. Unlike proxy hosts, which work on HTTP/S protocols, streams are designed for non-HTTP network services.
Purpose:
- Enables redirecting connections for services like SSH, MQTT, or games using TCP/UDP protocols.
Example:
- You have an SSH server on your local network (
192.168.1.30:22) and want to allow access from the internet viassh.mydomain.com. - Configuration:
- Stream TCP:
ssh.mydomain.com:22->192.168.1.30:22.
- Stream TCP:
4. 404 Hosts
Definition: "404 Hosts" are used to intercept unwanted or misconfigured traffic (e.g., requests for domains not handled by NPM) and display a 404 page or other custom message.
Purpose:
- Prevent unauthorized access to your infrastructure.
- Provide a standardized response for unknown domains.
Example:
- You have configured several domains, but if someone tries to access
nonexistent.mydomain.com, a generic 404 page is displayed to avoid accidental exposure.
5. Access Lists
Definition: "Access Lists" are used to control who can access your services based on IP addresses or specific rules.
Purpose:
- Adds a layer of security to restrict access to certain resources.
- Can be used to block or allow specific IPs or IP ranges.
Example:
- You configure an access list for the admin interface of your application:
- Allow only local IPs (
192.168.1.0/24). - Block all other IPs.
- Allow only local IPs (
- Configuration for
admin.mydomain.com:- Access List:
Local IPs only. - Applied to the corresponding proxy host.
- Access List:
Summary of Use Cases
- Proxy Hosts: Manage multiple web applications on a single public IP.
- Redirection Hosts: Simplify migration or redirect visitors from an old domain to a new one.
- Streams: Handle non-HTTP connections like SSH or MQTT.
- 404 Hosts: Prevent access to non-configured domains.
- Access Lists: Restrict access to sensitive or critical resources.
Noisedash
mkdir ./confignano ./config/default.json
{
  "Server": {
    "listeningPort": 1432,
    "sessionFileStorePath": "sessions",
    "sampleUploadPath": "samples",
    "maxSampleSize": 10737418240, // In bytes, 10GB by default
    "sessionSecret": "CHANGE_THIS",
    "logFile": "log/noisedash.log",
    "tls": false, // Keep this as false if using an external web server like nginx
    "tlsKey": "certs/key.pem",
    "tlsCert": "certs/cert.pem"
  }
}
version: "3"
services:
noisedash:
image: kevinthomas0/noisedash:latest
container_name: noisedash
ports:
- "1432:1432"
volumes:
- db:/var/noisedash/db
- samples:/var/noisedash/samples
- ./config:/var/noisedash/config
volumes:
db:
samples:Nomie
First, create <YOUR PATH>/couchdb.ini and paste this:
[HTTPD]
enable_cors = true

[chttpd]
enable_cors = true

[cors]
origins = *
credentials = true
methods = GET, PUT, POST, HEAD, DELETE
headers = accept, authorization, content-type, origin, referer, x-csrf-token
Then deploy:
services:
  nomie6:
    image: ghcr.io/qcasey/nomie6-oss:master
    restart: unless-stopped
    ports:
      - 5555:80

  couchdb:
    image: couchdb:3
    restart: unless-stopped
    ports:
      - 5984:5984
    environment:
      - NODENAME=<YOURNODENAME>
      - COUCHDB_USER=<YOUR USER NAME>
      - COUCHDB_PASSWORD=<YOUR FANCY PASSWORD>
    volumes:
      - <YOUR PATH>:/opt/couchdb/data
      - <YOUR PATH>/couchdb.ini:/opt/couchdb/etc/local.d/docker.ini
Plugins:
https://github.com/open-nomie/plugins
Note-mark
Both the backend and frontend are distributed by as Docker images, making deployment easier.
Below are the image names:
ghcr.io/enchant97/note-mark-backend

ghcr.io/enchant97/note-mark-frontend
The following labels are available:
TIP Image labels follow Semantic Versioning
<major>

<major>.<minor>

<major>.<minor>.<patch>
Deploying both apps can be done using Docker Compose, shown below:
TIP Using a reverse proxy can allow you to have the app on a single domain & port
# file: docker-compose.yml
version: "3"

volumes:
  data:

services:
  backend:
    image: ghcr.io/enchant97/note-mark-backend:0.8.0

    restart: unless-stopped
    volumes:
      - data:/data
    environment:
      # !!! REPLACE These !!!
      JWT_SECRET: "bXktc2VjcmV0"
      CORS_ORIGINS: "*"
    ports:
      - 8001:8000

  frontend:
    image: ghcr.io/enchant97/note-mark-frontend:0.8.0

    restart: unless-stopped
    ports:
      - 8000:8000
My example
version: "3"
volumes:
  data:
services:
  backend:
    image: ghcr.io/enchant97/note-mark-backend:0.8.0
    restart: unless-stopped
    volumes:
      - /srv/Files/NoteMark/data:/data
    environment:
      # !!! REPLACE These !!!
      JWT_SECRET: "btrdhvtbrhd"
      CORS_ORIGINS: "http://192.168.1.103:8001"
      ALLOW_SIGNUP: false
    ports:
      - 8002:8000
  frontend:
    image: ghcr.io/enchant97/note-mark-frontend:0.8.0
    restart: unless-stopped
    ports:
      - 8001:8000
Once running you should be able to visit at http://<your ip>:8000/ and see the UI. Navigate to the login page and change the port to 8001 and ensure the URL ends with /api. These steps would not be required if you ran the app over the same FQDN and port (using a reverse proxy).
TIP A reverse proxy is recommended so a FQDN can be used and tls can be setup to secure the traffic
TIP Take a look at the example deployments
Notesnook sync server (local storage)
Overview
This guide will help you set up a self-hosted instance of Notesnook using Docker Compose.
Components Breakdown
Core Components (Required)
1. Notesnook Server (notes.domain.com:5264)
- Purpose: Main synchronization server
- Accessibility: Must be publicly accessible
- Why: Handles all note synchronization between clients
- Dependencies: Requires MongoDB and Identity Server
2. Identity Server (auth.domain.com:8264)
- Purpose: Authentication and user management
- Accessibility: Must be publicly accessible
- Why:
- Handles user registration and login
- Issues JWT tokens for authentication
- Manages user sessions
- Separate domain for security isolation
- Dependencies: Requires MongoDB
3. SSE Server (events.domain.com:7264)
- Purpose: Real-time updates
- Accessibility: Must be publicly accessible
- Why:
- Provides Server-Sent Events for real-time sync
- Notifies clients when changes occur
- Essential for multi-device synchronization
- Dependencies: Requires Notesnook Server
4. MongoDB (Internal)
- Purpose: Database storage
- Accessibility: Internal only
- Why: Stores user data, notes, and authentication info
- Configuration: Runs as a replica set for reliability
Optional Components
5. Monograph Server (mono.domain.com:6264)
- Purpose: Public note sharing
- Accessibility: Optional, can be disabled
- Why:
- Allows users to share notes publicly
- Can be omitted if you don't need public sharing
- Dependencies: Requires Notesnook Server
6. MinIO (Internal, ports 9009/9090)
- Purpose: S3-compatible storage (only locally in this setup)
- Why:
- Stores file attachments
- Used by Notesnook Server internally
- No need for public access
- Note: Console (9090) can be restricted to localhost
Minimum Required Setup
For a basic working installation:
- Notesnook Server (public)
- Identity Server (public)
- SSE Server (public)
- MongoDB (internal)
- MinIO (internal)
You can omit:
- Monograph Server (if public sharing not needed)
- MinIO Console access (manage via CLI)
Security Considerations
- Only these need public domains:
- notes.domain.com
- auth.domain.com
- events.domain.com
- mono.domain.com (optional)
- Keep internal:
- MongoDB (27017)
- MinIO API (9009)
- MinIO Console (9090)
- JWT tokens ensure secure communication between components
Prerequisites
- Linux server with Docker and Docker Compose installed.
- Domain name with the ability to create subdomains.
- Basic understanding of terminal commands.
- Ports 5264, 6264, 7264, 8264, 9090 and 9009 available. Or you can change them but take good note of your changes.
1. Directory Structure Setup
Create the required directories:
# Create data directories
mkdir -p /srv/Files/Notesnook/db
mkdir -p /srv/Files/Notesnook/s3
mkdir -p /srv/Files/Notesnook/setup
2. Configuration Files
2.1. Environment File
Create the .env file:
cd /srv/Files/Notesnook/setup
nano .env
Add the following content (modify the values accordingly):
# Instance Configuration
INSTANCE_NAME=My Notesnook
DISABLE_SIGNUPS=false
NOTESNOOK_API_SECRET=your_secure_api_secret_here

# SMTP Configuration
SMTP_USERNAME=your_email@domain.com
SMTP_PASSWORD=your_smtp_password
SMTP_HOST=smtp.your-server.com
SMTP_PORT=587

# Public URLs (replace domain.com with your domain)
AUTH_SERVER_PUBLIC_URL=https://auth.domain.com/
NOTESNOOK_APP_PUBLIC_URL=https://notes.domain.com/
MONOGRAPH_PUBLIC_URL=https://mono.domain.com/
ATTACHMENTS_SERVER_PUBLIC_URL=https://files.domain.com/

# MinIO Configuration
MINIO_ROOT_USER=admin
MINIO_ROOT_PASSWORD=your_secure_password_here
2.2. Docker Compose File
Create the docker-compose.yml file:
nano docker-compose.yml
Paste the following content:
x-server-discovery: &server-discovery
  NOTESNOOK_SERVER_PORT: 5264
  NOTESNOOK_SERVER_HOST: notesnook-server
  IDENTITY_SERVER_PORT: 8264
  IDENTITY_SERVER_HOST: identity-server
  SSE_SERVER_PORT: 7264
  SSE_SERVER_HOST: sse-server
  SELF_HOSTED: 1
  IDENTITY_SERVER_URL: ${AUTH_SERVER_PUBLIC_URL}
  NOTESNOOK_APP_HOST: ${NOTESNOOK_APP_PUBLIC_URL}

x-env-files: &env-files
  - .env

services:
  validate:
    image: vandot/alpine-bash
    entrypoint: /bin/bash
    env_file: *env-files
    command:
      - -c
      - |
        required_vars=(
          "INSTANCE_NAME"
          "NOTESNOOK_API_SECRET"
          "DISABLE_SIGNUPS"
          "SMTP_USERNAME"
          "SMTP_PASSWORD"
          "SMTP_HOST"
          "SMTP_PORT"
          "AUTH_SERVER_PUBLIC_URL"
          "NOTESNOOK_APP_PUBLIC_URL"
          "MONOGRAPH_PUBLIC_URL"
          "ATTACHMENTS_SERVER_PUBLIC_URL"
        )
        for var in "$${required_vars[@]}"; do
          if [ -z "$${!var}" ]; then
            echo "Error: Required environment variable $$var is not set."
            exit 1
          fi
        done
        echo "All required environment variables are set."
    restart: "no"

  notesnook-db:
    image: mongo:7.0.12
    hostname: notesnook-db
    volumes:
      - /srv/Files/Notesnook/db:/data/db
      - /srv/Files/Notesnook/db:/data/configdb
    networks:
      - notesnook
    command: --replSet rs0 --bind_ip_all
    depends_on:
      validate:
        condition: service_completed_successfully
    healthcheck:
      test: echo 'db.runCommand("ping").ok' | mongosh mongodb://localhost:27017 --quiet
      interval: 40s
      timeout: 30s
      retries: 3
      start_period: 60s

  initiate-rs0:
    image: mongo:7.0.12
    networks:
      - notesnook
    depends_on:
      - notesnook-db
    entrypoint: /bin/sh
    command:
      - -c
      - |
        mongosh mongodb://notesnook-db:27017 <<EOF
          rs.initiate();
          rs.status();
        EOF

  notesnook-s3:
    image: minio/minio:RELEASE.2024-07-29T22-14-52Z
    ports:
      - 9009:9000
      - 9090:9090
    networks:
      - notesnook
    volumes:
      - /srv/Files/Notesnook/s3:/data/s3
    environment:
      MINIO_BROWSER: "on"
    depends_on:
      validate:
        condition: service_completed_successfully
    env_file: *env-files
    command: server /data/s3 --console-address :9090
    healthcheck:
      test: timeout 5s bash -c ':> /dev/tcp/127.0.0.1/9000' || exit 1
      interval: 40s
      timeout: 30s
      retries: 3
      start_period: 60s

  setup-s3:
    image: minio/mc:RELEASE.2024-07-26T13-08-44Z
    depends_on:
      - notesnook-s3
    networks:
      - notesnook
    entrypoint: /bin/bash
    env_file: *env-files
    command:
      - -c
      - |
        until mc alias set minio http://notesnook-s3:9000/ ${MINIO_ROOT_USER:-minioadmin} ${MINIO_ROOT_PASSWORD:-minioadmin}; do
          sleep 1;
        done;
        mc mb minio/attachments -p

  identity-server:
    image: streetwriters/identity:latest
    ports:
      - 8264:8264
    networks:
      - notesnook
    env_file: *env-files
    depends_on:
      - notesnook-db
    healthcheck:
      test: wget --tries=1 -nv -q  http://localhost:8264/health -O- || exit 1
      interval: 40s
      timeout: 30s
      retries: 3
      start_period: 60s
    environment:
      <<: *server-discovery
      MONGODB_CONNECTION_STRING: mongodb://notesnook-db:27017/identity?replSet=rs0
      MONGODB_DATABASE_NAME: identity

  notesnook-server:
    image: streetwriters/notesnook-sync:latest
    ports:
      - 5264:5264
    networks:
      - notesnook
    env_file: *env-files
    depends_on:
      - notesnook-s3
      - setup-s3
      - identity-server
    healthcheck:
      test: wget --tries=1 -nv -q  http://localhost:5264/health -O- || exit 1
      interval: 40s
      timeout: 30s
      retries: 3
      start_period: 60s
    environment:
      <<: *server-discovery
      MONGODB_CONNECTION_STRING: mongodb://notesnook-db:27017/?replSet=rs0
      MONGODB_DATABASE_NAME: notesnook
      S3_INTERNAL_SERVICE_URL: "http://notesnook-s3:9000/"
      S3_INTERNAL_BUCKET_NAME: "attachments"
      S3_ACCESS_KEY_ID: "${MINIO_ROOT_USER:-minioadmin}"
      S3_ACCESS_KEY: "${MINIO_ROOT_PASSWORD:-minioadmin}"
      S3_SERVICE_URL: "${ATTACHMENTS_SERVER_PUBLIC_URL}"
      S3_REGION: "us-east-1"
      S3_BUCKET_NAME: "attachments"

  sse-server:
    image: streetwriters/sse:latest
    ports:
      - 7264:7264
    env_file: *env-files
    depends_on:
      - identity-server
      - notesnook-server
    networks:
      - notesnook
    healthcheck:
      test: wget --tries=1 -nv -q  http://localhost:7264/health -O- || exit 1
      interval: 40s
      timeout: 30s
      retries: 3
      start_period: 60s
    environment:
      <<: *server-discovery

  monograph-server:
    image: streetwriters/monograph:latest
    ports:
      - 6264:3000
    env_file: *env-files
    depends_on:
      - notesnook-server
    networks:
      - notesnook
    healthcheck:
      test: wget --tries=1 -nv -q  http://localhost:3000/api/health -O- || exit 1
      interval: 40s
      timeout: 30s
      retries: 3
      start_period: 60s
    environment:
      <<: *server-discovery
      API_HOST: http://notesnook-server:5264/
      PUBLIC_URL: ${MONOGRAPH_PUBLIC_URL}

networks:
  notesnook:
3. Docker Images Preparation
Pull all required images to avoid timeout issues:
cd /srv/Files/Notesnook/setup
docker pull mongo:7.0.12
docker pull minio/minio:RELEASE.2024-07-29T22-14-52Z
docker pull streetwriters/identity:latest
docker pull streetwriters/notesnook-sync:latest
docker pull streetwriters/sse:latest
docker pull streetwriters/monograph:latest
docker pull vandot/alpine-bash
4. Deployment
Start the services:
cd /srv/Files/Notesnook/setup
docker compose up -d
5. Service Verification
5.1. Check Container Status
docker compose ps
Expected status:
- Running containers:
notesnook-dbnotesnook-s3identity-servernotesnook-serversse-servermonograph-server
- Completed containers (should show
Exit 0):validateinitiate-rs0setup-s3
5.2. Check Logs
docker compose logs
5.3. Test MinIO Access
Visit: http://your-server:9009/
6. Reverse Proxy Configuration with Nginx and SSL
Enable WebSockets Support for:
notes.domain.com (port 5264) - For real-time synchronization
events.domain.com (port 7264) - For real-time notifications
Enable Cache Assets for: mono.domain.com (port 6264) - For optimizing public notes loading
Step 1: Install Certbot
sudo apt-get update
sudo apt-get install certbot python3-certbot-nginx
Step 2: Obtain SSL Certificates
sudo certbot --nginx -d auth.domain.com -d notes.domain.com -d events.domain.com -d mono.domain.com
Step 3: Modify Nginx Configuration
Use the following example configurations for each subdomain:
# Auth Server - Basic (no cache/websocket needed)
server {
    listen 80;
    server_name auth.domain.com;
    return 301 https://$host$request_uri;
}

server {
    listen 443 ssl;
    server_name auth.domain.com;

    ssl_certificate /etc/letsencrypt/live/auth.domain.com/fullchain.pem;
    ssl_certificate_key /etc/letsencrypt/live/auth.domain.com/privkey.pem;
    include /etc/letsencrypt/options-ssl-nginx.conf;
    ssl_dhparam /etc/letsencrypt/ssl-dhparams.pem;

    location / {
        proxy_pass http://localhost:8264/;
        proxy_set_header Host $host;
        proxy_set_header X-Real-IP $remote_addr;
    }
}

# Notes Server - With WebSocket
server {
    listen 80;
    server_name notes.domain.com;
    return 301 https://$host$request_uri;
}

server {
    listen 443 ssl;
    server_name notes.domain.com;

    ssl_certificate /etc/letsencrypt/live/notes.domain.com/fullchain.pem;
    ssl_certificate_key /etc/letsencrypt/live/notes.domain.com/privkey.pem;
    include /etc/letsencrypt/options-ssl-nginx.conf;
    ssl_dhparam /etc/letsencrypt/ssl-dhparams.pem;

    location / {
        proxy_pass http://localhost:5264/;
        proxy_http_version 1.1;
        proxy_set_header Upgrade $http_upgrade;
        proxy_set_header Connection "upgrade";
        proxy_set_header Host $host;
        proxy_read_timeout 3600;
        proxy_send_timeout 3600;
    }
}

# Events Server - With WebSocket
server {
    listen 80;
    server_name events.domain.com;
    return 301 https://$host$request_uri;
}

server {
    listen 443 ssl;
    server_name events.domain.com;

    ssl_certificate /etc/letsencrypt/live/events.domain.com/fullchain.pem;
    ssl_certificate_key /etc/letsencrypt/live/events.domain.com/privkey.pem;
    include /etc/letsencrypt/options-ssl-nginx.conf;
    ssl_dhparam /etc/letsencrypt/ssl-dhparams.pem;

    location / {
        proxy_pass http://localhost:7264/;
        proxy_http_version 1.1;
        proxy_set_header Upgrade $http_upgrade;
        proxy_set_header Connection "upgrade";
        proxy_set_header Host $host;
        proxy_read_timeout 3600;
        proxy_send_timeout 3600;
    }
}

# Monograph Server - With Cache
server {
    listen 80;
    server_name mono.domain.com;
    return 301 https://$host$request_uri;
}

server {
    listen 443 ssl;
    server_name mono.domain.com;

    ssl_certificate /etc/letsencrypt/live/mono.domain.com/fullchain.pem;
    ssl_certificate_key /etc/letsencrypt/live/mono.domain.com/privkey.pem;
    include /etc/letsencrypt/options-ssl-nginx.conf;
    ssl_dhparam /etc/letsencrypt/ssl-dhparams.pem;

    location / {
        proxy_pass http://localhost:6264/;
        proxy_cache_use_stale error timeout http_500 http_502 http_503 http_504;
        proxy_cache_valid 200 60m;
        add_header X-Cache-Status $upstream_cache_status;
        expires 1h;
        add_header Cache-Control "public, no-transform";
    }
}
7. Useful Commands
Service Management
# View real-time logs
docker compose logs -f

# View logs for specific service
docker compose logs [service-name]

# Restart specific service
docker compose restart [service-name]

# Stop all services
docker compose down

# Update services
docker compose pull
docker compose up -d
8. Maintenance
8.1. Backup
Regularly backup these directories:
/srv/Files/Notesnook/db/(MongoDB data)/srv/Files/Notesnook/s3/(MinIO data)/srv/Files/Notesnook/setup/.env(Configuration)
8.2. Updates
To update all services:
cd /srv/Files/Notesnook/setup
docker compose down
docker compose pull
docker compose up -d
9. Troubleshooting
Common Issues:
Service won't start
- Check logs:
docker compose logs [service-name] - Verify port availability.
- Check directory permissions.
- Verify environment variables.
Database Connection Issues
- Ensure MongoDB replica set is initialized.
- Check MongoDB logs:
docker compose logs notesnook-db.
Storage Issues
- Verify MinIO credentials.
- Check MinIO logs:
docker compose logs notesnook-s3.
Email Not Working
- Verify SMTP settings in
.env. - Check identity-server logs.
Security Notes
- Change default passwords in
.env. - Use strong passwords for MinIO and API secret.
- Keep your
.envfile secure. - Regularly update all services.
- Enable HTTPS on your reverse proxy.
- Consider implementing
fail2ban. - Regularly monitor logs for suspicious activity.
Support
If you encounter issues:
- Check the logs.
- Visit the Notesnook GitHub repository.
- Join the Notesnook Discord for support.
Ntfy
version: "2.3"

services:
  ntfy:
    image: binwiederhier/ntfy
    container_name: ntfy
    command:
      - serve
    environment:
      - TZ=Europe/Paris    # optional: set desired timezone
    user: 998:100 # optional: replace with your own user/group or uid/gid
    volumes:
      - /srv/path/Files/Ntfy/var/cache/ntfy:/var/cache/ntfy
      - /srv/path/Files/Ntfy/etc/ntfy:/etc/ntfy
    ports:
      - 7005:80
    healthcheck: # optional: remember to adapt the host:port to your environment
        test: ["CMD-SHELL", "wget -q --tries=1 http://192.168.1.102:7005/v1/health -O - | grep -Eo '\"healthy\"\\s*:\\s*true' || exit 1"]
        interval: 60s
        timeout: 10s
        retries: 3
        start_period: 40s
    restart: unless-stopped
Obisdian Sync
https://github.com/vrtmrz/obsidian-livesync/blob/main/docs/setup\_own\_server.md#docker-compose
version: "2.1"
services:
  couchdb:
    image: couchdb
    container_name: obsidian-livesync
    user: 1000:1000
    environment:
      - COUCHDB_USER=admin
      - COUCHDB_PASSWORD=password
    volumes:
      - ./data:/opt/couchdb/data
      - ./local.ini:/opt/couchdb/etc/local.ini
    ports:
      - 5984:5984
    restart: unless-stopped
Obsidian
Obsidian is a note-taking app that lets you create, link, and organize your notes on your device, with hundreds of plugins and themes to customize your workflow. You can also publish your notes online, access them offline, and sync them securely with end-to-end encryption.
---
services:
  obsidian:
    image: lscr.io/linuxserver/obsidian:latest
    container_name: obsidian
    security_opt:
      - seccomp:unconfined #optional
    environment:
      - PUID=998
      - PGID=100
      - TZ=Europe/Paris
    volumes:
      - /srv/Files/Obsidian/config:/config
    ports:
      - 3006:3000
      - 3007:3001
    devices:
      - /dev/dri:/dev/dri #optional
    shm_size: "1gb"
    restart: unless-stopped
Odoo
version: '2'
services:
  db:
    image: postgres:10
    environment:
      - POSTGRES_USER=odoo
      - POSTGRES_PASSWORD=odoo
      - POSTGRES_DB=postgres
      - PGDATA=/var/lib/postgresql/data/pgdata
    volumes:
      - /srv/Files/Odoo/db:/var/lib/postgresql/data

  odoo:
    image: odoo:latest
    links:
      - db:db
    depends_on:
      - "db"
    ports:
      - 8069:8069
    volumes:
      - /srv/Files/Odoo/data:/etc/odoo
Ollama + Open WebUI
---
version: "3.6"
services:
    ollama:
        image: ollama/ollama
        restart: unless-stopped
        container_name: ollama
        ports:
            - '11434:11434'
        volumes:
            - '/srv/Files/OllamaGUI/ollama:/root/.ollama'
    open-webui:
        image: 'ghcr.io/open-webui/open-webui:main'
        restart: unless-stopped
        container_name: open-webui
        volumes:
            - '/srv/Files/OllamaGUI/open-webui:/app/backend/data'
        environment:
            - 'OLLAMA_BASE_URL=http://192.168.86.2:11434/' #machine IP
            - 'RAG_EMBEDDING_MODEL_AUTO_UPDATE=True' #if not loading
        ports:
            - '2039:8080'
docker exec -it ollama ollama run <model>Or Portainer, Ollama container > exec console >ollama run <model>
A good one is ollama run mistral:7b-instruct-q4_0
mistral:7b-instruct-q4_0
mixtral:8x7b
llama2
codegemma:7b-code
openchat
OmniPoly: Languagetool, Libretranslate.
Github | Languaguetool | LibreTranslate
This is a frontend app that uses LibreTranslate and LanguageTool as a backend.
version: "3.9"

services:
  libretranslate:
    tty: true
    stdin_open: true
    ports:
      - "5997:5000"
    environment:
      - host=your.libretranslate.instance
    image: libretranslate/libretranslate

  languagetool:
    restart: unless-stopped
    image: elestio/languagetool:latest
    ports:
      - "5998:8010"
    environment:
      - langtool_languageModel=/ngrams
      - Java_Xms=512m
      - Java_Xmx=1g
    volumes:
      - /srv/dev-disk-by-uuid-76493abc-7cd4-4b00-927c-8b2bef740dd4/Files/LibreLanguagetools/ngramsDir:/ngrams

  omnipoly:
    restart: unless-stopped
    image: kweg/omnipoly:latest
    ports:
      - "5999:80"
    environment:
      LANGUAGE_TOOL: http://languagetool:8010
      LIBRETRANSLATE: http://libretranslate:5000
#      OLLAMA: https://your.ollama.instance
#      OLLAMA_MODEL: model_name
      THEME: "dark"
    depends_on:
      - libretranslate
      - languagetool
Onlyoffice
version: '3.3'
services:
documentserver:
ports:
- '6589:80'
volumes:
- '/srv/path/Files/OnlyOffice/logs:/var/log/onlyoffice'
- '/srv/path/Files/OnlyOffice/data:/var/www/onlyoffice/Data'
image: onlyoffice/documentserver
restart: unless-stoppedOur Shopping List
version: '3.3'
services:
app:
image: nanawel/our-shopping-list:latest
restart: unless-stopped
ports:
- '6598:8080'
depends_on:
- mongodb
mongodb:
image: mongo:4
volumes:
- /srv/path/Files/OurShoppingList/dbdata:/data/db
volumes:
dbdata:Ouroboros
version: '3.3'
services:
ouroboros:
container_name: ouroboros
hostname: ouroboros
image: gmt2001/ouroboros #original: pyouroboros/ouroboros not maintained
environment:
- MONITOR=all
- SELF_UPDATE=false
- CLEANUP=false
# - INTERVAL=300
- CRON=0 0 10 ? * SAT
- LOG_LEVEL=info
# - IGNORE=mongo influxdb postgres mariadb
- REPO_USER=xxxxxx #docker.io
- REPO_PASS=xxxxxxx #docker.io
- NOTIFIERS=discord://000000000/XXXXXXXXXXXXX
- TZ=Europe/Paris
restart: unless-stopped
volumes:
- /var/run/docker.sock:/var/run/docker.sockOverseerr / Jellyseerr
version: "3.7"
services:
overseerr:
container_name: overseerr
image: ghcr.io/hotio/overseerr
ports:
- "5055:5055"
environment:
- PUID=1000
- PGID=1000
- UMASK=002
- TZ=Etc/UTC
volumes:
- /<host_folder_config>:/configversion: '3'
services:
jellyseerr:
image: fallenbagel/jellyseerr:latest
container_name: jellyseerr
environment:
- LOG_LEVEL=debug
- TZ=Asia/Tashkent
ports:
- 5055:5055
volumes:
- /path/to/appdata/config:/app/config
restart: unless-stoppedownCloud
version: "3"
volumes:
files:
driver: local
mysql:
driver: local
redis:
driver: local
services:
owncloud:
image: owncloud/server:${OWNCLOUD_VERSION} #eg owncloud/server:latest
container_name: owncloud_server
restart: always
ports:
- ${HTTP_PORT}:8080 # eg 9069:8080
depends_on:
- mariadb
- redis
environment:
- OWNCLOUD_DOMAIN=${OWNCLOUD_DOMAIN} #eg 192.168.1.104:9069
- OWNCLOUD_TRUSTED_DOMAINS=${OWNCLOUD_TRUSTED_DOMAINS} #eg (comma separated): owncloud.yourdomain.tld, cloud.yourdomain.tld
- OWNCLOUD_DB_TYPE=mysql
- OWNCLOUD_DB_NAME=owncloud
- OWNCLOUD_DB_USERNAME=owncloud
- OWNCLOUD_DB_PASSWORD=owncloud #change and match with MYSQL_PASSWORD
- OWNCLOUD_DB_HOST=mariadb
- OWNCLOUD_ADMIN_USERNAME=${ADMIN_USERNAME}
- OWNCLOUD_ADMIN_PASSWORD=${ADMIN_PASSWORD}
- OWNCLOUD_MYSQL_UTF8MB4=true
- OWNCLOUD_REDIS_ENABLED=true
- OWNCLOUD_REDIS_HOST=redis
healthcheck:
test: ["CMD", "/usr/bin/healthcheck"]
interval: 30s
timeout: 10s
retries: 5
volumes:
- files:/mnt/data
mariadb:
image: mariadb:10.11 # minimum required ownCloud version is 10.9
container_name: owncloud_mariadb
restart: always
environment:
- MYSQL_ROOT_PASSWORD=owncloud #change!
- MYSQL_USER=owncloud
- MYSQL_PASSWORD=owncloud # change, must match OWNCLOUD_DB_PASSWORD
- MYSQL_DATABASE=owncloud
- MARIADB_AUTO_UPGRADE=1
command: ["--max-allowed-packet=128M", "--innodb-log-file-size=64M"]
healthcheck:
test: ["CMD", "mysqladmin", "ping", "-u", "root", "--password=owncloud"]
interval: 10s
timeout: 5s
retries: 5
volumes:
- mysql:/var/lib/mysql
redis:
image: redis:6
container_name: owncloud_redis
restart: always
command: ["--databases", "1"]
healthcheck:
test: ["CMD", "redis-cli", "ping"]
interval: 10s
timeout: 5s
retries: 5
volumes:
- redis:/dataConfiguring ownCloud ONLYOFFICE integration app
First, setup onlyoffice server with domain and certs.
In ownCloud, open the ~/settings/admin?sectionid=additional#onlyoffice page with administrative settings for ONLYOFFICE section.
ownCloud Infinity Scale
Start oCIS with docker compose
Create the project
Use the following skeleton as a docker-compose.yml:
mkdir simple-ocis && \
cd simple-ocis && \
touch docker-compose.ymlCopy the following file content into docker-compose.yml and save it.
version: "3.7"
services:
ocis:
image: owncloud/ocis:latest
environment:
# INSECURE: needed if oCIS / Traefik is using self generated certificates
OCIS_INSECURE: "true"
# OCIS_URL: the external domain / ip address of oCIS (with protocol, must always be https)
OCIS_URL: "https://localhost:9200"
# OCIS_LOG_LEVEL: error / info / ... / debug
OCIS_LOG_LEVEL: infoInitialize
Run ocis init to create a config
docker run --rm -it -v $(pwd):/etc/ocis/ owncloud/ocis:latest initYou will get the following output:
Do you want to configure Infinite Scale with certificate checking disabled?
This is not recommended for public instances! [yes | no = default] yes
=========================================
generated OCIS Config
=========================================
configpath : /etc/ocis/ocis.yaml
user : admin
password : t3p4N0jJ47LbhpQ04s9W%u1$d2uE3Y.3
Check your local folder. We just generated a default ocis configuration file with random passwords and secrets.
ls # list the current folder
docker-compose.yml ocis.yaml # ocis.yaml has been generatedRun cat ocis.yaml
token_manager:
jwt_secret: X35rffWpS9BR.=^#LDt&z3ykYOd7h@w*
machine_auth_api_key: -0$4ieu5+t6HD6Ui^0PpKU6B0qxisv.m
system_user_api_key: oVxICwMR9YcKXTau+@pqKZ0EO-OHz8sF
transfer_secret: e%3Sda=WFBuy&ztBUmriAbBR$i2CmaDv
system_user_id: b7d976a1-7300-4db7-82df-13502d6b5e18
admin_user_id: c59a6ae9-5f5e-4eef-b82e-0e5c34f93e52
graph:
spaces:
insecure: false
identity:
ldap:
bind_password: wElKpGjeH0d.E4moXh=.dc@s2CtB0vy%
idp:
ldap:
bind_password: Ft2$2%#=6Mi22@.YPkhh-c6Kj=3xBZAb
idm:
service_user_passwords:
admin_password: t3p4N0jJ47LbhpQ04s9W%u1$d2uE3Y.3
idm_password: wElKpGjeH0d.E4moXh=.dc@s2CtB0vy%
reva_password: pJAdZ2fU!SFKgcdDPRW%ruIiNM6GnN1D
idp_password: Ft2$2%#=6Mi22@.YPkhh-c6Kj=3xBZAb
proxy:
insecure_backends: false
frontend:
archiver:
insecure: false
auth_basic:
auth_providers:
ldap:
bind_password: pJAdZ2fU!SFKgcdDPRW%ruIiNM6GnN1D
auth_bearer:
auth_providers:
oidc:
insecure: false
users:
drivers:
ldap:
bind_password: pJAdZ2fU!SFKgcdDPRW%ruIiNM6GnN1D
groups:
drivers:
ldap:
bind_password: pJAdZ2fU!SFKgcdDPRW%ruIiNM6GnN1D
storage_system:
data_provider_insecure: false
storage_users:
data_provider_insecure: false
ocdav:
insecure: false
thumbnails:
thumbnail:
transfer_secret: z-E%G8MTeFpuT-ez2o8BjfnG1Jl2yLLm
webdav_allow_insecure: false
cs3_allow_insecure: falsePassword initialisation
During the run of./ocis init, the password for theadminuser has been set to a random string.You can override that later by setting
IDM_ADMIN_PASSWORD=secret. The ENV variable setting always overrides the config file.
Mount the config file
Add the config file as a bind mount.
volumes:
# mount the ocis config file inside the container
- "./ocis.yaml:/etc/ocis/ocis.yaml"Apply the changes
The service should be running.
docker compose ps
NAME COMMAND SERVICE STATUS PORTS
simple-ocis-ocis-1 "/usr/bin/ocis server" ocis running 9200/tcpOpen the port 9200 to the outside
Add a port mapping to your docker compose file and run docker compose up -d again. You should now be able to access https://localhost:9200 and log in. You will get a warning from your browser that the connection is not safe because we are using a self-signed certificate. Accept this warning message to continue. Use the user admin and the password which has been initialized before.
Congratulations! You have successfully set up a simple Infinite Scale locally.
docker compose up
You do not need to shut down your service to apply changes from the docker-compose.yml file. Runningdocker compose up -dagain is enough. Docker compose always tries to bring all services to the desired state.docker compose ps
This gives you a status of the services of the project.docker compose exec <service name> <command>
This command is handy to run specific commands inside your service. Trydocker compose exec ocis ocis version.
Persist data, restart and logging
The key to a successful container setup is the persistence of the application data to make the data survive a re-boot. Docker normally uses volumes for this purpose. A volume can either be a “named volume” which are completely managed by docker and have many advantages (see the linked docker documentation), or “bind mounts” which are using the directory structure and OS of the host system. In our example we already use a bind mount for the config file. We will now add a named volume for the oCIS data directory.
This is the way we should configure the ocis service:
volumes:
# mount the ocis config file inside the container
- "./ocis.yaml:/etc/ocis/ocis.yaml"
# short syntax for using a named volume
# in the form <volume name>:<mount path in the container>
# use a named volume for the ocis data directory
- "ocis-data:/var/lib/ocis"
# or the more verbose syntax
#- type: volume
# source: ocis-data # name of the volume
# target: /var/lib/ocis # the mount path inside the containerThe docker-compose.yml needs to declare the named volumes globally, add this at the bottom of the file:
# https://docs.docker.com/compose/compose-file/compose-file-v3/#volumes
# this declares the named volume with all default settings
# you can also see the volume when running `docker volume list`
volumes:
ocis-data:Now let us configure the restart policy and the logging settings for the ocis service:
# https://docs.docker.com/compose/compose-file/compose-file-v3/#restart
restart: always # or on-failure / unless-stopped
# https://docs.docker.com/config/containers/logging/configure/
# https://docs.docker.com/compose/compose-file/compose-file-v3/#logging
# the default log driver does no log rotation
# you can switch to the "local" log driver which does rotation by default
logging:
driver: local
# otherwise you could specify log rotation explicitly
# driver: "json-file" # this is the default driver
# options:
# max-size: "200k" # limit the size of the log file
# max-file: "10" # limit the count of the log filesApply your changes! Just run docker compose up -d again.
Now you have an oCIS which will survive reboots, restart automatically and has log rotation by default.
Access the logs via docker compose logs -f and do some actions in the frontend to see the effect. Create data by uploading files and adding more users. Then run docker compose down to shut oCIS down. Start it again docker compose up -d, log in again and check that your data has survived the reboot.
Pin the oCIS version
Last but not least, it is never a good idea to use the latest docker tag. Pin your container image to a released version.
image: owncloud/ocis:latest@sha256:5ce3d5f9da017d6760934448eb207fbaab9ceaf0171b4122e791e292f7c86c97
# the latest tag is not recommended, because you don't know which version you'll get
# but even if you use `owncloud/ocis:1.16.0` you cannot be sure that you'll get
# the exact same image if you pull it at a later point in time (because docker image tags are not immutable).
# To be 100% that you always get the same image, you can pin the digest (hash) of the
# image. If you do a `docker pull owncloud/ocis:latest`, it also will also show you the digest.
# see also https://docs.docker.com/engine/reference/commandline/images/#list-image-digestsWrapping up
If you have completed this guide, your docker-compose.yml should look like the following example:
version: "3.7"
services:
ocis:
image: owncloud/ocis:latest@sha256:5ce3d5f9da017d6760934448eb207fbaab9ceaf0171b4122e791e292f7c86c97
# the latest tag is not recommended, because you don't know which version you'll get
# but even if you use `owncloud/ocis:1.16.0` you cannot be sure that you'll get
# the exact same image if you pull it at a later point in time (because docker image tags are not immutable).
# To be 100% that you always get the same image, you can pin the digest (hash) of the
# image. If you do a `docker pull owncloud/ocis:latest`, it also will also show you the digest.
# see also https://docs.docker.com/engine/reference/commandline/images/#list-image-digests
environment:
# INSECURE: needed if oCIS / Traefik is using self generated certificates
OCIS_INSECURE: "true"
# OCIS_URL: the external domain / ip address of oCIS (with protocol, must always be https)
OCIS_URL: "https://localhost:9200"
# OCIS_LOG_LEVEL: error / info / ... / debug
OCIS_LOG_LEVEL: info
volumes:
# mount the ocis config file inside the container
- "./ocis.yaml:/etc/ocis/ocis.yaml"
# short syntax for using a named volume
# in the form <volume name>:<mount path in the container>
# use a named volume for the ocis data directory
- "ocis-data:/var/lib/ocis"
# or the more verbose syntax
#- type: volume
# source: ocis-data # name of the volume
# target: /var/lib/ocis # the mount path inside the container
ports:
- 9200:9200
# https://docs.docker.com/compose/compose-file/compose-file-v3/#restart
restart: always # or on-failure / unless-stopped
# https://docs.docker.com/config/containers/logging/configure/
# https://docs.docker.com/compose/compose-file/compose-file-v3/#logging
# the default log driver does no log rotation
# you can switch to the "local" log driver which does rotation by default
logging:
driver: local
# otherwise you could specify log rotation explicitly
# driver: "json-file" # this is the default driver
# options:
# max-size: "200k" # limit the size of the log file
# max-file: "10" # limit the count of the log files
# https://docs.docker.com/compose/compose-file/compose-file-v3/#volumes
# this declares the named volume with all default settings
# you can also see the volume when running `docker volume list`
volumes:
ocis-data:Pairdrop
version: "2"
services:
pairdrop:
image: lscr.io/linuxserver/pairdrop:latest
container_name: pairdrop
restart: unless-stopped
environment:
- PUID=998 # UID to run the application as
- PGID=100 # GID to run the application as
- WS_FALLBACK=false # Set to true to enable websocket fallback if the peer to peer WebRTC connection is not available to the client.
- RATE_LIMIT=false # Set to true to limit clients to 1000 requests per 5 min.
- TZ=Europe/Paris # Time Zone
- DEBUG_MODE=true
ports:
- 3090:3000 # Web UI, originally 3000:3000version: "3"
services:
node:
image: "node:lts-alpine"
user: "node"
working_dir: /home/node/app
volumes:
- ./:/home/node/app
command: ash -c "npm i && npm run start:prod"
restart: unless-stopped
ports:
- "3000:3000"
Paisa
version: "3.3"
services:
paisa:
ports:
- 7500:7500
volumes:
- /srv/Files/Paisa/:/root/Documents/paisa/
image: ananthakumaran/paisa:latestPaperless-ngx
# Docker Compose file for running paperless from the Docker Hub.
# This file contains everything paperless needs to run.
# Paperless supports amd64, arm and arm64 hardware.
#
# All compose files of paperless configure paperless in the following way:
#
# - Paperless is (re)started on system boot, if it was running before shutdown.
# - Docker volumes for storing data are managed by Docker.
# - Folders for importing and exporting files are created in the same directory
# as this file and mounted to the correct folders inside the container.
# - Paperless listens on port 8010.
#
# In addition to that, this Docker Compose file adds the following optional
# configurations:
#
# - Instead of SQLite (default), PostgreSQL is used as the database server.
#
# To install and update paperless with this file, do the following:
#
# - Open portainer Stacks list and click 'Add stack'
# - Paste the contents of this file and assign a name, e.g. 'paperless'
# - Click 'Deploy the stack' and wait for it to be deployed
# - Open the list of containers, select paperless_webserver_1
# - Click 'Console' and then 'Connect' to open the command line inside the container
# - Run 'python3 manage.py createsuperuser' to create a user
# - Exit the console
#
# For more extensive installation and update instructions, refer to the
# documentation.
services:
broker:
image: docker.io/library/redis:7
restart: unless-stopped
volumes:
- /srv/Files/Paperless-ngx/redisdata:/data
db:
image: docker.io/library/postgres:16
restart: unless-stopped
volumes:
- /srv/Files/Paperless-ngx/pgdata:/var/lib/postgresql/data
environment:
POSTGRES_DB: paperless
POSTGRES_USER: ******
POSTGRES_PASSWORD: ******
webserver:
image: ghcr.io/paperless-ngx/paperless-ngx:latest
restart: unless-stopped
depends_on:
- db
- broker
ports:
- "8010:8000"
volumes:
- /srv/Files/Paperless-ngx/data:/usr/src/paperless/data
- /srv/Files/Paperless-ngx/media:/usr/src/paperless/media
- /srv/Files/Paperless-ngx/export:/usr/src/paperless/export
- /srv/Files/Paperless-ngx/consume:/usr/src/paperless/consume
environment:
PAPERLESS_REDIS: redis://broker:6379
PAPERLESS_DBHOST: db
# The UID and GID of the user used to run paperless in the container. Set this
# to your UID and GID on the host so that you have write access to the
# consumption directory.
USERMAP_UID: 998
USERMAP_GID: 100
PAPERLESS_TIME_ZONE: Europe/Paris
PAPERLESS_ADMIN_USER: ******
PAPERLESS_ADMIN_PASSWORD: ******
PAPERLESS_DBUSER: ******
PAPERLESS_DBPASS: ******
# Additional languages to install for text recognition, separated by a
# whitespace. Note that this is
# different from PAPERLESS_OCR_LANGUAGE (default=eng), which defines the
# language used for OCR.
# The container installs English, German, Italian, Spanish and French by
# default.
# See https://packages.debian.org/search?keywords=tesseract-ocr-&searchon=names&suite=buster
# for available languages.
#PAPERLESS_OCR_LANGUAGES: tur ces
# Adjust this key if you plan to make paperless available publicly. It should
# be a very long sequence of random characters. You don't need to remember it.
PAPERLESS_SECRET_KEY: ******
# Use this variable to set a timezone for the Paperless Docker containers. If not specified, defaults to UTC.
#PAPERLESS_TIME_ZONE: America/Los_Angeles
# The default language to use for OCR. Set this to the language most of your
# documents are written in.
PAPERLESS_OCR_LANGUAGE: fra
#volumes:
# data:
# media:
# pgdata:
# redisdata:Photoprism
Link | Link alt docker-compose.yml
version: '3.3'
# Example Docker Compose config file for PhotoPrism (Raspberry Pi / ARM64)
#
# Documentation : https://docs.photoprism.org/getting-started/raspberry-pi/
# Docker Hub URL: https://hub.docker.com/r/photoprism/photoprism-arm64/
#
# Please run behind a reverse proxy like Caddy, Traefik or Nginx if you need HTTPS / SSL support
# e.g. when running PhotoPrism on a public server outside your home network.
#
# -------------------------------------------------------------------
# DOCKER COMPOSE COMMAND REFERENCE
# -------------------------------------------------------------------
# Start | docker-compose up -d
# Stop | docker-compose stop
# Update | docker-compose pull
# Logs | docker-compose logs --tail=25 -f
# Terminal | docker-compose exec photoprism bash
# Help | docker-compose exec photoprism photoprism help
# Config | docker-compose exec photoprism photoprism config
# Reset | docker-compose exec photoprism photoprism reset
# Backup | docker-compose exec photoprism photoprism backup -a -i
# Restore | docker-compose exec photoprism photoprism restore -a -i
# Index | docker-compose exec photoprism photoprism index
# Reindex | docker-compose exec photoprism photoprism index -a
# Import | docker-compose exec photoprism photoprism import
# -------------------------------------------------------------------
# Note: All commands may have to be prefixed with "sudo" when not running as root.
# This will change the home directory "~" to "/root" in your configuration.
services:
photoprism:
# Use photoprism/photoprism-arm64:preview instead for testing preview builds:
image: photoprism/photoprism
container_name: photoprism
# Only enable automatic restarts once your installation is properly
# configured as it otherwise may get stuck in a restart loop:
# https://docs.photoprism.org/getting-started/faq/#why-is-photoprism-getting-stuck-in-a-restart-loop
# restart: unless-stopped
security_opt:
- seccomp:unconfined
- apparmor:unconfined
ports:
- 2342:2342 # [local port]:[container port]
environment:
PHOTOPRISM_ADMIN_PASSWORD: "insecure" # PLEASE CHANGE: Your initial admin password (min 4 characters)
PHOTOPRISM_ORIGINALS_LIMIT: 1000 # File size limit for originals in MB (increase for high-res video)
PHOTOPRISM_HTTP_COMPRESSION: "none" # Improves transfer speed and bandwidth utilization (none or gzip)
PHOTOPRISM_WORKERS: 2 # Limits the number of indexing workers to reduce system load
PHOTOPRISM_DEBUG: "false" # Run in debug mode (shows additional log messages)
PHOTOPRISM_PUBLIC: "false" # No authentication required (disables password protection)
PHOTOPRISM_READONLY: "false" # Don't modify originals directory (reduced functionality)
PHOTOPRISM_EXPERIMENTAL: "false" # Enables experimental features
PHOTOPRISM_DISABLE_WEBDAV: "false" # Disables built-in WebDAV server
PHOTOPRISM_DISABLE_SETTINGS: "false" # Disables Settings in Web UI
PHOTOPRISM_DISABLE_TENSORFLOW: "false" # Disables using TensorFlow for image classification
PHOTOPRISM_DARKTABLE_PRESETS: "true" # Enables Darktable presets and disables concurrent RAW conversion
# PHOTOPRISM_FFMPEG_ENCODER: "h264_v4l2m2m" # FFmpeg AVC encoder for video transcoding (default: libx264)
# PHOTOPRISM_FFMPEG_BUFFERS: "64" # FFmpeg capture buffers (default: 32)
PHOTOPRISM_DETECT_NSFW: "false" # Flag photos as private that MAY be offensive
PHOTOPRISM_UPLOAD_NSFW: "true" # Allow uploads that MAY be offensive
# PHOTOPRISM_DATABASE_DRIVER: "sqlite" # SQLite is an embedded database that doesn't require a server
PHOTOPRISM_DATABASE_DRIVER: "mysql" # Use MariaDB (or MySQL) instead of SQLite for improved performance
PHOTOPRISM_DATABASE_SERVER: "mariadb:3306" # MariaDB database server (hostname:port)
PHOTOPRISM_DATABASE_NAME: "photoprism" # MariaDB database schema name
PHOTOPRISM_DATABASE_USER: "photoprism" # MariaDB database user name
PHOTOPRISM_DATABASE_PASSWORD: "insecure" # MariaDB database user password
PHOTOPRISM_SITE_URL: "http://localhost:2342/" # Public PhotoPrism URL
PHOTOPRISM_SITE_TITLE: "PhotoPrism"
PHOTOPRISM_SITE_CAPTION: "Browse Your Life"
PHOTOPRISM_SITE_DESCRIPTION: ""
PHOTOPRISM_SITE_AUTHOR: ""
# You may optionally set a user / group id using environment variables if your Docker version or NAS does not
# support this natively (see next example):
# UID: 1000
# GID: 1000
# UMASK: 0000
# Uncomment and edit the following line to set a specific user / group id (native):
# user: "1000:1000"
# For hardware AVC transcoding using the h264_v4l2m2m encoder:
# devices:
# - "/dev/video11:/dev/video11"
volumes:
# Your photo and video files ([local path]:[container path]):
- "~/Pictures:/photoprism/originals"
# Multiple folders can be indexed by mounting them as sub-folders of /photoprism/originals:
# - "/mnt/Family:/photoprism/originals/Family" # [folder_1]:/photoprism/originals/[folder_1]
# - "/mnt/Friends:/photoprism/originals/Friends" # [folder_2]:/photoprism/originals/[folder_2]
# Mounting an import folder is optional (see docs):
# - "~/Import:/photoprism/import"
# Permanent storage for settings, index & sidecar files (DON'T REMOVE):
- "./storage:/photoprism/storage"
mariadb:
image: arm64v8/mariadb:10.5
container_name: mariadb
restart: unless-stopped
security_opt:
- seccomp:unconfined
- apparmor:unconfined
command: mysqld --transaction-isolation=READ-COMMITTED --character-set-server=utf8mb4 --collation-server=utf8mb4_unicode_ci --max-connections=512 --innodb-rollback-on-timeout=OFF --innodb-lock-wait-timeout=50
volumes: # Don't remove permanent storage for index database files!
- "./database:/var/lib/mysql"
environment:
MYSQL_ROOT_PASSWORD: please_change
MYSQL_DATABASE: photoprism
MYSQL_USER: photoprism
MYSQL_PASSWORD: insecure
# Uncomment the following lines to upgrade automatically, whenever there is a new Docker image available:
#
# watchtower:
# image: containrrr/watchtower
# container_name: watchtower
# restart: unless-stopped
# environment:
# WATCHTOWER_CLEANUP: "true"
# WATCHTOWER_POLL_INTERVAL: 7200 # Checks for updates every two hours
# volumes:
# - "/var/run/docker.sock:/var/run/docker.sock"
# - "~/.docker/config.json:/config.json" # Optional, for authentication if you have a Docker Hub accountPhotoview
version: "3"
services:
db:
image: mariadb:10.5
restart: always
environment:
- MYSQL_DATABASE=photoview
- MYSQL_USER=photoview
- MYSQL_PASSWORD=photosecret #change
- MYSQL_RANDOM_ROOT_PASSWORD=1
volumes:
- /path/to/Photoview/db_data:/var/lib/mysql
photoview:
image: viktorstrate/photoview:2
restart: always
ports:
- "8031:80" # og: 8000:80
depends_on:
- db
environment:
- PHOTOVIEW_DATABASE_DRIVER=mysql
- PHOTOVIEW_MYSQL_URL=photoview:photosecret@tcp(db)/photoview
- PHOTOVIEW_LISTEN_IP=photoview
- PHOTOVIEW_LISTEN_PORT=80
- PHOTOVIEW_MEDIA_CACHE=/app/cache
# Optional: If you are using Samba/CIFS-Share and experience problems with "directory not found"
# Enable the following Godebug
# - GODEBUG=asyncpreemptoff=1
# Optional: To enable map related features, you need to create a mapbox token.
# A token can be generated for free here https://account.mapbox.com/access-tokens/
# It's a good idea to limit the scope of the token to your own domain, to prevent others from using it.
# - MAPBOX_TOKEN=<YOUR TOKEN HERE>
volumes:
- /path/to/Photoview/api_cache:/app/cache
# Change This: to the directory where your photos are located on your server.
# If the photos are located at `/home/user/photos`, then change this value
# to the following: `/home/user/photos:/photos:ro`.
# You can mount multiple paths, if your photos are spread across multiple directories.
- /path/to/Photoview/photos:/photos:ro
volumes:
db_data:
api_cache:Picoshare
version: '3.3'
services:
picoshare:
environment:
- PORT=3001
- PS_SHARED_SECRET=XXXXXX
- PS_BEHIND_PROXY=true
ports:
- '3001:3001/tcp'
command: -db /data/store.db
volumes:
- '/srv/path/Files/Picoshare/data:/data'
container_name: picoshare
image: mtlynch/picoshare
restart: unless-stoppedIf behind a reverse proxy like nginx proxy manager, add this to the config in the advanced section of your domain with the values of your choice :
client_max_body_size 2G;
proxy_request_buffering off;
proxy_connect_timeout 300;
proxy_send_timeout 300;
proxy_read_timeout 300;-
client_max_body_size 2G;→ allows files up to 2 GB (you can adjust this higher or lower as needed). -
proxy_request_buffering off;→ prevents Nginx from loading the entire file into memory before sending it to the backend. -
The three
*_timeoutdirectives extend the timeouts in case the upload takes a long time.
Pigallery2
version: "3.3"
services:
pigallery2:
ports:
- xxxx:80
environment:
- NODE_ENV=production
volumes:
- ./Pigallery2/config:/app/data/config
- ./Pigallery2/db:/app/data/db
- ./Pigallery2/images:/app/data/images
- ./Pigallery2/temp:/app/data/tmp
image: bpatrik/pigallery2:latest
networks: {}Piglet
version: '3.3'
services:
piglet:
restart: unless-stopped
container_name: piglet
depends_on:
- database
ports:
- '0.0.0.0:80:80' # Piglet
- '0.0.0.0:8080:8080' # API
image: k3nd0x/piglet:latest
environment:
DB_ROOT_PASSWORD: ${MYSQL_ROOT_PASSWORD}
MYSQL_DATABASE: ${MYSQL_DATABASE} # Default 'piglet'
MYSQL_USER: ${MYSQL_USER} # Default 'piglet'
MYSQL_PASSWORD: ${MYSQL_PASSWORD}
MYSQL_HOST: ${MYSQL_HOST}
MAIL_SERVER: ${MAIL_SERVER}
MAIL_USER: ${MAIL_USER}
MAIL_PASSWORD: ${MAIL_PASSWORD}
MAIL_PORT: ${MAIL_PORT}
MAIL_ENCRYPTIONPROTOCOL: ${MAIL_ENCRYPTIONPROTOCOL}
DOMAIN: ${DOMAIN} # Default 'localhost'
SECURE_COOKIE: ${SECURE_COOKIE}
volumes:
- "/etc/timezone:/etc/timezone:ro"
- "/etc/localtime:/etc/localtime:ro"
database:
image: mariadb:11.1.2
container_name: piglet-db
volumes:
- database-data:/var/lib/mysql
environment:
MARIADB_ROOT_PASSWORD: ${MYSQL_ROOT_PASSWORD}
MARIADB_DATABASE: ${MYSQL_DATABASE}
MARIADB_USER: ${MYSQL_USER}
MARIADB_PASSWORD: ${MYSQL_PASSWORD}
volumes:
database-data:### Required env Variables:
MYSQL_PASSWORD=changeme
MYSQL_USER=piglet
MYSQL_DATABASE=piglet
MYSQL_HOST=database # Default Hostname of the docker-compose database container
MYSQL_ROOT_PASSWORD=changeme
### Not required
MAIL_SERVER=''
MAIL_USER=''
MAIL_PASSWORD=''
MAIL_PORT=587
MAIL_ENCRYPTIONPROTOCOL=STARTTLS
DOMAIN=localhost
SECURE_COOKIE=False
Default login Username: admin@localhost Password: admin
Pihole
You first need to free port 53 on the Pi :
sudo nano /etc/systemd/resolved.conf[Resolve]
DNS=1.1.1.1
FallbackDNS=1.0.0.1
#Domains=
#DNSSEC=no
#DNSOverTLS=no
#MulticastDNS=yes
#LLMNR=yes
#Cache=yes
#DNSStubListener=yes
#DNSStubListenerExtra=
#ReadEtcHosts=yes
#ResolveUnicastSingleLabel=no
DNSStubListener=nosudo ln -sf /run/systemd/resolve/resolv.conf /etc/resolv.confsudo reboot nowThen create ./Pihole/etc-pihole/ and ./Pihole/etc-dnsmasq.d/
Now you can Install Pi-hole
---
version: '3.3'
services:
pihole:
container_name: pihole
hostname: piholehostname # the name you want in the GUI.
image: pihole/pihole:latest
ports:
- 53:53/tcp #DNS Port
- 53:53/udp #DNS Port
#- 67:67/udp #DHCP Port
- 83:80/tcp #Dashboard Port
#- 443:443/tcp #Port 443 is to provide a sinkhole for ads that use SSL.
environment:
TZ: Europe/Paris
WEBPASSWORD: xxxxxx
DNS1: "192.168.1.85#5335" # this is my unbound, but you can put any other DNS you want
DNS2: 1.0.0.1
DNSSEC: 'true'
volumes:
- /srv/path/Files/Pihole/etc-pihole/:/etc/pihole/
- /srv/path/Files/Pihole/etc-dnsmasq.d/:/etc/dnsmasq.d/
cap_add:
- NET_ADMIN
restart: alwaysEnter your modem settings and set your DNS to your pihole's host address.
You might want to restart your modem / router.
To undo the changes :
Edit /etc/systemd/resolved.conf
sudo nano /etc/systemd/resolved.confComment out DNS=, FallbackDNS= and DNSStubListener=no
Remove the /etc/resolv.conf symbolic link:
sudo rm /etc/resolv.confReboot.
HOW TO UPDATE
Optional if previously installed with portainer.
Create a docker-compose file with the configuration above.
Starting your pihole is then just a matter of running the following in the directory of your docker-compose.yml...
docker-compose up -dTo update to a newer version, (when a new update/container is available):
docker pull pihole/pihole
docker-compose down
docker-compose up -dBlocklists:
- https://firebog.net
- https://beaconsandwich.co.uk/2020/05/03/shut-your-pi-hole/
- https://oisd.nl
- https://avoidthehack.com/best-pihole-blocklists
- https://github.com/topics/pihole-ads-list
- https://www.github.developerdan.com/hosts/
- https://github.com/topics/pihole-ads-list?o=asc&s=stars
See also : unbound + pihole
Make Pi-hole your primary DHCP Server
This step is optional if you can configure your router to use another device as the DNS server. In my case, my router did not allow me to change the DNS server, therefore I had to take the high road and use Pi-hole as the DHCP server in my network.
What is DHCP?
Dynamic Host Configuration Protocol (DHCP) is the communication protocol that allows every device in a network to have a dynamic local IP address so that the device can be addressed within that local network, and the software that manages this assignment process is called DHCP server. Simply, it is the thing that gives your computer the local 192.168.x.y IP address.
One thing you need to know before you move forward, especially if you don’t know what DHCP is or how it works: there needs to be a single DHCP server in a simple home network, otherwise you’ll set for trouble.
Before you go on
It is important to enable Pi-hole DHCP server and disable your router’s DHCP server subsequently to not to have two DHCP servers running in the same network, which would confuse the connected clients. Therefore, before you move on, make sure to find out how to disable your router’s DHCP server. This will highly depend on your router model, therefore you’ll need to google it.
Enabling Pi-hole DHCP server
Pi-hole comes with a built-in DHCP server that can be used to replace your default DHCP server. To do that, go to Settings > DHCP and check the DHCP Server Enabled checkbox. Be careful about the range and IP address values there:
- Range of IP addresses to hand out: This one is the IP range your devices will get locally. Give this a range between 50–250 as the last part of your IP address to have a safe range. In my case, I limited it to 192.168.0.201 to 192.168.0.251, meaning that any new device that joins my network will get an IP within this range. In my case, I can only connect 50 clients safely, which is enough for my use-case, but you might want to change this for your own setup.
- Router (gateway) IP address: This is the IP address of your router which we have found previously.
- DHCP lease time: This is the time that a single local IP address will be allocated for a given client. It makes sense to give a low value to this limit during your setup so that you can test expired lease scenarios easily. Once you are done, you can increase this value to a week or so, which would be beneficial if you have stationary devices in your home network.
- Enable IPv6 support (SLAAC + RA): This one is for distributing IPv6 addresses in your home network. I want this to be taken care of by Pi-hole as well, so go ahead and check this too.
- Enable DHCP rapid commit (fast address assignment): This is an option to use DHCP rapid commit. It basically allows faster address assignment on trusted networks like your home. In my case, my router didn’t allow me to disable the IPv6 DHCP server, therefore I enabled this feature so that the clients can get an IP address from the Pi instead of my router, allowing using no-ads surfing on all my devices.
Settings example
Once you are done, hit the “Save” button at the bottom of the page and move onto the next step.
Disabling router’s DHCP server
This highly depends on your router configuration, but you should have figured out how to disable your router’s DHCP server at this point anyway. So, go ahead and disable it.
Pinchflat
First:
mkdir -vp .../Pinchflat/{config,downloads} \
&& chown -R nobody /Pinchflat \
&& chmod -R 755 /Pinchflatversion: "3.3"
services:
pinchflat:
environment:
- BASIC_AUTH_USERNAME=user
- BASIC_AUTH_PASSWORD=password
- PUID=998
- PGID=100
ports:
- 8945:8945
volumes:
- .../Pinchflat/config:/config
- .../Pinchflat/downloads:/downloads
image: keglin/pinchflat:latestPinedocs
version: '3.3'
services:
web:
image: rvbg/pinedocs #amd64 : xy2z/pinedocs
ports:
- 3619:80
volumes:
- ./data:/data/pinedocs
restart: unless-stopped
Piped
version: "3"
services:
backend:
image: 1337kavin/piped:latest
restart: unless-stopped
volumes:
- /srv/path/Files/Piped/config.properties:/app/config.properties
depends_on:
- postgres
networks:
- piped
piped:
image: 1337kavin/piped-frontend
restart: unless-stopped
ports:
- 10103:80
networks:
- piped
depends_on:
- backend
postgres:
image: postgres:15-alpine
restart: unless-stopped
volumes:
- "/srv/path/Files/Piped/db:/var/lib/postgresql/data"
environment:
- POSTGRES_DB=piped
- POSTGRES_USER=piped
- POSTGRES_PASSWORD=xxxxxxxxxxxxxxx
networks:
- piped
volumes:
piped:
db:
networks:
piped:https://raw.githubusercontent.com/TeamPiped/Piped-Backend/master/config.properties
Piwigo
version: '3'
services:
piwigo:
image: lscr.io/linuxserver/piwigo:latest
container_name: piwigo
environment:
- PUID=998
- PGID=100
- TZ=Europe/Paris
volumes:
- ./Piwigo/config:/config
- ./Piwigo/gallery:/gallery
ports:
- 7989:80
restart: unless-stopped
piwigodb: #host
image: lscr.io/linuxserver/mariadb:latest
container_name: piwigodb
environment:
- PUID=998
- PGID=100
- TZ==Europe/Paris
- MYSQL_ROOT_PASSWORD=*********
- MYSQL_DATABASE=piwigo #name
- MYSQL_USER=piwigo #user
- MYSQL_PASSWORD=******** #password
volumes:
- ./Piwigo/db:/config
ports:
- 3306:3306
restart: unless-stoppedPlant-it
![]()
Plant-it is a self-hosted gardening companion app.
Useful for keeping track of plant care, receiving notifications about when to water plants, uploading plant images, and more.
Installing Plant-it is pretty straight forward, in order to do so follow these steps:
- Create a folder where you want to place all Plant-it related files.
- Inside that folder, create a file named
docker-compose.ymlwith this content:
name: plant-it
services:
server:
image: msdeluise/plant-it-server:latest
env_file: server.env
depends_on:
- db
- cache
restart: unless-stopped
volumes:
- "./upload-dir:/upload-dir"
ports:
- "8080:8080"
- "3000:3000"
db:
image: mysql:8.0
restart: always
env_file: server.env
volumes:
- "./db:/var/lib/mysql"
cache:
image: redis:7.2.1
restart: always
```
- Inside that folder, create a file named `server.env` with this content:
```ini
#
# DB
#
MYSQL_HOST=db
MYSQL_PORT=3306
MYSQL_USERNAME=root
MYSQL_PSW=root
MYSQL_DATABASE=bootdb
MYSQL_ROOT_PASSWORD=root
#
# JWT
#
JWT_SECRET=putTheSecretHere
JWT_EXP=1
#
# Server config
#
USERS_LIMIT=-1
UPLOAD_DIR=/upload-dir
API_PORT=8080 #don't change
FLORACODEX_KEY=
LOG_LEVEL=DEBUG
ALLOWED_ORIGINS=*
#
# Cache
#
CACHE_TTL=86400
CACHE_HOST=cache
CACHE_PORT=6379
- Run the docker compose file (
docker compose -f docker-compose.yml up -d), then the service will be available atlocalhost:3000, while the REST API will be available atlocalhost:8080/api(localhost:8080/api/swagger-ui/index.htmlfor the documentation of them).
Take a look at the documentation in order to understand the available configurations.
App
You can access the Plant-it service using the web app at http://<server_ip>:3000.
For Android users, the app is also available as an APK, which can be downloaded either from the GitHub releases assets or from F-Droid.
Download
-
GitHub Releases: You can download the latest APK from the GitHub releases page.
-
F-Droid: Alternatively, you can get the app from F-Droid.
Installation
For detailed instructions on how to install and configure the app, please refer to the installation documentation.
Portall
🚢 Portall - Port Management System
Portall provides an intuitive web-interface for generating, tracking, and organizing ports and services across multiple hosts.

🐳 Setup
Docker Run
docker run -p 8080:8080 \
-e SECRET_KEY=your_secret_key \
-e PORT=8080 \
-v ./instance:/app/instance \
Portall
Docker Compose
version: '3'
services:
portall:
image: need4swede/portall:latest
container_name: portall
ports:
- "8080:8080"
environment:
- SECRET_KEY=your_secret_key
volumes:
- ./instance:/app/instance
Prestashop
Voici un tutoriel complet et corrigé pour installer PrestaShop sous Docker avec un domaine personnalisé (myshop.domain.tld), incluant toutes les étapes validées et optimisées pour éviter les erreurs SSL et les .
Tutoriel : Installer PrestaShop sous Docker avec un domaine personnalisé (myshop.domain.tld)
Prérequis
- Un serveur Debian/Ubuntu avec Docker et Portainer installés.
- Un nom de domaine (
myshop.domain.tld) pointant vers l’IP de votre serveur. - .
Étape 1 : Préparer le fichier docker-compose.yml
Collez ce fichier dans Portainer (Stacks > Add stack) :
version: '3.8'
services:
db:
image: mysql:5.7
environment:
MYSQL_ROOT_PASSWORD: XXXXXX
MYSQL_DATABASE: prestashop
MYSQL_USER: prestashop
MYSQL_PASSWORD: XXXXX
volumes:
- db_data:/var/lib/mysql
networks:
- prestashop_network
prestashop:
image: prestashop/prestashop:latest
depends_on:
- db
environment:
DB_SERVER: db
DB_USER: prestashop
DB_PASSWD: XXXXX
DB_NAME: prestashop
PS_DEV_MODE: 0
PS_INSTALL_AUTO: 0 # Désactive l'installation automatique
PS_DOMAIN: myshop.domain.tld # Remplacez par votre domaine
PS_FOLDER_ADMIN: admin10665839 # Séquence numérique à choisir
PS_FOLDER_INSTALL: install10665839 # Séquence numérique doit matcher
ports:
- "8999:80"
volumes:
- prestashop_data:/var/www/html
networks:
- prestashop_network
volumes:
db_data:
prestashop_data:
networks:
prestashop_network:
driver: bridge
Étape 2 : Lancer la stack et installer PrestaShop
- Lancez la stack dans Portainer.
- Attendez 2-3 minutes que les conteneurs soient prêts.
- Accédez à l’installation sur
http://myshop.domain.tld(remplacez par votre domaine). - :
- Sélectionnez la langue.
- Acceptez les conditions générales.
- Remplissez les informations de la boutique (nom, email, mot de passe admin).
- Pour la base de données, utilisez :
- Serveur :
db - Utilisateur :
prestashop - Mot de passe :
prestashop - Base de données :
prestashop
- Serveur :
- Lancez l’installation.
- À la fin, supprimez le dossier
install:- Dans Portainer, accédez au terminal du conteneur
prestashop. - Exécutez :
rm -rf /var/www/html/install
- Dans Portainer, accédez au terminal du conteneur
Étape 3 : (si nécessaire)
Si PrestaShop force le HTTPS et que vous n’avez pas de certificat SSL valide, désactivez-le avec ces commandes SQL :
- Accédez au terminal du conteneur
db(MySQL) via Portainer. - Exécutez les requêtes (remplacez
8f35z_par le préfixe de vos tables, trouvé viaSHOW TABLES;):mysql -u prestashop -pprestashop prestashop -e "UPDATE 8f35z_configuration SET value = '0' WHERE name = 'PS_SSL_ENABLED';" mysql -u prestashop -pprestashop prestashop -e "UPDATE 8f35z_configuration SET value = '0' WHERE name = 'PS_SSL_ENABLED_EVERYWHERE';" - Redémarrez le conteneur PrestaShop dans Portainer.
Étape 4 : Configurer le domaine et l’accès
- Vérifiez que votre domaine (
myshop.domain.tld) pointe bien vers l’IP de votre serveur. - Si vous utilisez un reverse proxy (Nginx, Traefik, Apache) :
- Configurez-le pour rediriger
myshop.domain.tldvers le conteneur PrestaShop (port 80). - Exemple de configuration Nginx :
server { listen 80; server_name myshop.domain.tld; location / { proxy_pass http://[IP_DU_SERVEUR]:80; proxy_set_header Host $host; proxy_set_header X-Real-IP $remote_addr; } }
- Configurez-le pour rediriger
- Si vous voulez activer le HTTPS (recommandé pour la production) :
- Utilisez Let’s Encrypt avec Certbot pour générer un certificat SSL.
- Configurez votre reverse proxy pour utiliser le certificat.
Étape 5 : Accéder à l’admin et au frontoffice
- Admin :
http://myshop.domain.tld/admin[VOTRE_DOSSIER_ADMIN](ex:admin10665839). - Frontoffice :
http://myshop.domain.tld.
Étape 6 : Optimisations (optionnel)
- pour améliorer les performances :
- Dans l’admin PrestaShop, allez dans Paramètres avancés > Performances.
- Activez le cache et choisissez Memcached ou Redis si disponible.
- Sauvegarder régulièrement vos volumes Docker (
db_dataetprestashop_data). - via l’admin ou en recréant les conteneurs avec une image plus récente.
Résumé des commandes utiles
| Action | Commande |
|---|---|
| Vérifier les logs PrestaShop | docker logs [ID_DU_CONTENEUR_PRESTASHOP] |
| Accéder au terminal MySQL | docker exec -it [ID_DU_CONTENEUR_DB] mysql -u prestashop -pprestashop prestashop |
| Vider le cache PrestaShop | rm -rf /var/www/html/var/cache/* (dans le conteneur) |
| Redémarrer les conteneurs | Via Portainer ou docker-compose restart |
Problèmes courants et solutions
| Problème | Solution |
|---|---|
| Erreur SSL ou redirection HTTPS | Désactiver le SSL via SQL (Étape 3). |
| Page blanche ou erreur 500 | Vider le cache et redémarrer le conteneur. |
| Base de données inaccessible | Vérifier les identifiants dans docker-compose.yml et les logs MySQL. |
| Dossier admin introuvable | Vérifier le nom du dossier admin à la fin de l’installation. |
Conclusion
Vous avez maintenant une boutique PrestaShop fonctionnelle, accessible via http://myshop.domain.tld, avec :
- Une installation simple et automatisée via Docker.
- Un domaine personnalisé (
myshop.domain.tld). - Une désactivation du forçage SSL si nécessaire.
- Une interface admin complète pour gérer vos produits.
Prochaines étapes :
- .
- Ajouter des produits et catégories.
- .
C’est la solution la plus efficace pour 90% des cas.
Méthode via Portainer :
- Accédez au terminal du conteneur
prestashop(via Portainer > Containers > prestashop > Console). - Exécutez :
rm -rf /var/www/html/var/cache/* - Redémarrez le conteneur
prestashopdans Portainer.
Prestashop with Bind Mounts = Don't do this
1. Préparation des dossiers avec les bonnes permissions
Notez votre docker PUID:PGID, puis:
mkdir -p /srv/dev-disk-by-uuid-7fe66601-5ca0-4c09-bc13-a015025fe53a/Files/Prestashop/{db,data/admin-dev}
chown -R 998:100 /srv/dev-disk-by-uuid-7fe66601-5ca0-4c09-bc13-a015025fe53a/Files/Prestashop/
chmod -R 775 /srv/dev-disk-by-uuid-7fe66601-5ca0-4c09-bc13-a015025fe53a/Files/Prestashop/1. Fichier docker-compose.yml (à coller dans Portainer)
version: '3.8'
services:
db:
image: mysql:5.7
container_name: prestashop_db
environment:
MYSQL_ROOT_PASSWORD: 01664892ganjah12!
MYSQL_DATABASE: prestashop
MYSQL_USER: prestashop
MYSQL_PASSWORD: 01664892ganjah12
volumes:
- /srv/dev-disk-by-uuid-7fe66601-5ca0-4c09-bc13-a015025fe53a/Files/Prestashop/db:/var/lib/mysql
networks:
- prestashop_network
restart: unless-stopped
prestashop:
image: prestashop/prestashop:latest
container_name: prestashop_web
depends_on:
- db
environment:
DB_SERVER: db
DB_USER: prestashop
DB_PASSWD: 01664892ganjah12
DB_NAME: prestashop
PS_DEV_MODE: 0
PS_INSTALL_AUTO: 0
PS_DOMAIN: emberchains.steph.click
PS_FOLDER_ADMIN: admin10665839
PS_FOLDER_INSTALL: install10665839
ports:
- "8999:80"
volumes:
- /srv/dev-disk-by-uuid-7fe66601-5ca0-4c09-bc13-a015025fe53a/Files/Prestashop/data:/var/www/html
- /srv/dev-disk-by-uuid-7fe66601-5ca0-4c09-bc13-a015025fe53a/Files/Prestashop/admin-dev:/var/www/html/admin-dev
networks:
- prestashop_network
restart: unless-stopped
networks:
prestashop_network:
driver: bridge2. Déploiement et installation
Lancer le stack
- Dans Portainer, collez le
docker-compose.ymlet déployez.
Suivre les logs
- Allez dans Containers >
prestashop_web> Logs pour suivre l’avancement, notamment la fin d'initialisation de la db.
Accéder à l’installation
- URL :
http://[IP_DU_SERVEUR]:8999/install10665839(pas via le domaine, sinon risque de plantage).
3. Créer le dossier manuellement
Sans cette action, docker n'aura pas les permissions pour créer les dossier d'installation.
Cette étape n'est pas nécessaire si vous utilisez des volumes docker.
- Accédez au terminal du conteneur
prestashop_web(via Portainer). - Exécutez :
mkdir -p /var/www/html/admin-dev
chown -R www-data:www-data /var/www/html/admin-dev
4. Configuration de l’installation
Étape "Configuration du système"
- Adresse du serveur de base de données : doit être l'ip interne à docker du conteneur db
- Préfixe des tables :
ps_ - Patience : .
5. Finalisation
Supprimer le dossier install
- Dans le terminal du conteneur
prestashop_web:rm -rf /var/www/html/install10665839
mysql -u prestashop -pXXXXX -h db prestashop -e "UPDATE ps_configuration SET value = '0' WHERE name = 'PS_SSL_ENABLED';"
mysql -u prestashop -pXXXXX -h db prestashop -e "UPDATE ps_configuration SET value = '0' WHERE name = 'PS_SSL_ENABLED_EVERYWHERE';"
Redémarrer le conteneur
- Dans Portainer, redémarrez
prestashop_web.
6. Accès final
- Admin :
http://[IP_DU_SERVEUR]:8999/admin10665839 - Frontoffice :
http://[IP_DU_SERVEUR]:8999
Privatebin
version: '3.3'
services:
privatebin:
restart: unless-stopped
ports:
- '5721:80'
container_name: privatebin
environment:
- PUID=998
- PGID=100
volumes:
- '/srv/dev-disk-by-uuid-efc48120-cd34-4854-a3d5-03a32810e9a4/Privatebin/data:/privatebin/data'
- '/srv/dev-disk-by-uuid-efc48120-cd34-4854-a3d5-03a32810e9a4/Privatebin/cfg:/privatebin/cfg'
image: jgeusebroek/privatebinNeeds https to work
ProjectSend
---
version: "3.3"
services:
projectsend:
image: linuxserver/projectsend
container_name: projectsend-app
environment:
- PUID=998
- PGID=100
- TZ=Europe/Paris
- MAX_UPLOAD=500000
volumes:
- /srv/path/Files/Projectsend/config:/config #Config Volume Goes Here
- /srv/path/Files/Projectsend/data:/data #File Storage Volume Goes Here
- /etc/timezone:/etc/timezone:ro #This is for TimeZone
ports:
- 8010:80
restart: unless-stopped
db:
image: mariadb
container_name: projectsend-db
environment:
MYSQL_ROOT_PASSWORD: xxxxxx
MYSQL_DATABASE: projectsend
MYSQL_USER: projectsend
MYSQL_PASSWORD: xxxxxx
volumes:
- /srv/path/Files/Projectsend/db:/var/lib/mysql #Database Volume Goes Here
- /etc/timezone:/etc/timezone:ro #This is for TimeZone
restart: unless-stoppedhost : db (or database ip→Config : console db : hostname -I)
Database name : projectsend
Username : projectsend
Password : xxxxxx
DON'T FORGET “/” at the end of domain name !!
Email notifications :
email adress : contact@s.com
smtp
username : contact@s.com
password : xxxxxxxx
host : ssl0.ovh.net
port : 465
auth : SSL
Prowlarr
version: "3.3"
services:
prowlarr:
image: lscr.io/linuxserver/prowlarr:develop
container_name: prowlarr
environment:
- PUID=998
- PGID=100
- TZ=Europe/Paris
volumes:
- /srv/path/Files/Prowlarr/config:/config
ports:
- 9696:9696
restart: unless-stoppedqBittorentVPN (hotio) [most UTD notes]
version: "3.7"
services:
qbittorrent:
container_name: qbittorrentvpn
image: ghcr.io/hotio/qbittorrent
ports:
- 8992:8992
- 8118:8118
environment:
- WEBUI_PORTS=8992/tcp,8992/udp
- PUID=998
- PGID=100
- UMASK=002
- TZ=Europe/Paris
- VPN_ENABLED=true
- VPN_LAN_NETWORK=192.168.0.0/24
- VPN_CONF=wg0
# - VPN_ADDITIONAL_PORTS
- VPN_IP_CHECK_DELAY=5
- PRIVOXY_ENABLED=false
volumes:
- /srv/path/Files/QBittorrentVPN/config:/config
- /srv/path/Files/QBittorrentVPN/downloads:/downloads
- /srv/path/Files/QBittorrentVPN/skins:/skins
cap_add:
- NET_ADMIN
sysctls:
- net.ipv4.conf.all.src_valid_mark=1
# - net.ipv6.conf.all.disable_ipv6=0
restart: unless-stoppedDefault credentials are admin and password is in the logs after container launch
make sure /srv/path/Files/QBittorrentVPN/downloads is owned by 998:100 (or whatever puid:pgid you chose)chown -R 998:100 /srv/path/Files/QBittorrentVPN/downloads/
Optionnal : set WebUI\HostHeaderValidation=false in the qBittorrent.conf
If Web UI Stuck on "Unacceptable file type, only regular file is allowed", go to:
"/home/qbittorrent/.config/qBittorrent" and edit the config file: "WebUI\AlternativeUIEnabled=true" to "WebUI\AlternativeUIEnabled=false"
Alternative WebUI :
https://github.com/bill-ahmed/qbit-matUI/releases
https://github.com/WDaan/VueTorrent/releases
https://github.com/jagannatharjun/qbt-theme
MIGHT NOT WORK WITH SOME BROWSERS ! If so, try a different one.
If VPN stops working, check wg0.conf file, change 0.0.0.0/1,128.0.0.0/1 >> 0.0.0.0/0
Install plugins
E.g.: Jackett
cd to ./data/nova3/engines
nano jackett.json
{
"api_key": "YOUR_API_KEY_HERE",
"tracker_first": true,
"url": "http://127.0.0.1:9117"
}nano jackett.py
#VERSION: 3.5
# AUTHORS: Diego de las Heras (ngosang@hotmail.es)
# CONTRIBUTORS: ukharley
# hannsen (github.com/hannsen)
import json
import os
import xml.etree.ElementTree
from urllib.parse import urlencode, unquote
from urllib import request as urllib_request
from http.cookiejar import CookieJar
from novaprinter import prettyPrinter
from helpers import download_file
###############################################################################
# load configuration from file
CONFIG_FILE = 'jackett.json'
CONFIG_PATH = os.path.join(os.path.dirname(os.path.realpath(__file__)), CONFIG_FILE)
CONFIG_DATA = {
'api_key': 'YOUR_API_KEY_HERE', # jackett api
'tracker_first': False, # (False/True) add tracker name to beginning of search result
'url': 'http://127.0.0.1:9117', # jackett url
}
def load_configuration():
global CONFIG_PATH, CONFIG_DATA
try:
# try to load user data from file
with open(CONFIG_PATH) as f:
CONFIG_DATA = json.load(f)
except ValueError:
# if file exists but it's malformed we load add a flag
CONFIG_DATA['malformed'] = True
except Exception:
# if file doesn't exist, we create it
with open(CONFIG_PATH, 'w') as f:
f.write(json.dumps(CONFIG_DATA, indent=4, sort_keys=True))
# do some checks
if any(item not in CONFIG_DATA for item in ['api_key', 'tracker_first', 'url']):
CONFIG_DATA['malformed'] = True
load_configuration()
###############################################################################
class jackett(object):
name = 'Jackett'
url = CONFIG_DATA['url'] if CONFIG_DATA['url'][-1] != '/' else CONFIG_DATA['url'][:-1]
api_key = CONFIG_DATA['api_key']
supported_categories = {
'all': None,
'anime': ['5070'],
'books': ['8000'],
'games': ['1000', '4000'],
'movies': ['2000'],
'music': ['3000'],
'software': ['4000'],
'tv': ['5000'],
}
def download_torrent(self, download_url):
# fix for some indexers with magnet link inside .torrent file
if download_url.startswith('magnet:?'):
print(download_url + " " + download_url)
response = self.get_response(download_url)
if response is not None and response.startswith('magnet:?'):
print(response + " " + download_url)
else:
print(download_file(download_url))
def search(self, what, cat='all'):
what = unquote(what)
category = self.supported_categories[cat.lower()]
# check for malformed configuration
if 'malformed' in CONFIG_DATA:
self.handle_error("malformed configuration file", what)
return
# check api_key
if self.api_key == "YOUR_API_KEY_HERE":
self.handle_error("api key error", what)
return
# prepare jackett url
params = [
('apikey', self.api_key),
('q', what)
]
if category is not None:
params.append(('cat', ','.join(category)))
params = urlencode(params)
jacket_url = self.url + "/api/v2.0/indexers/all/results/torznab/api?%s" % params
response = self.get_response(jacket_url)
if response is None:
self.handle_error("connection error", what)
return
# process search results
response_xml = xml.etree.ElementTree.fromstring(response)
for result in response_xml.find('channel').findall('item'):
res = {}
title = result.find('title')
if title is not None:
title = title.text
else:
continue
tracker = result.find('jackettindexer')
tracker = '' if tracker is None else tracker.text
if CONFIG_DATA['tracker_first']:
res['name'] = '[%s] %s' % (tracker, title)
else:
res['name'] = '%s [%s]' % (title, tracker)
res['link'] = result.find(self.generate_xpath('magneturl'))
if res['link'] is not None:
res['link'] = res['link'].attrib['value']
else:
res['link'] = result.find('link')
if res['link'] is not None:
res['link'] = res['link'].text
else:
continue
res['size'] = result.find('size')
res['size'] = -1 if res['size'] is None else (res['size'].text + ' B')
res['seeds'] = result.find(self.generate_xpath('seeders'))
res['seeds'] = -1 if res['seeds'] is None else int(res['seeds'].attrib['value'])
res['leech'] = result.find(self.generate_xpath('peers'))
res['leech'] = -1 if res['leech'] is None else int(res['leech'].attrib['value'])
if res['seeds'] != -1 and res['leech'] != -1:
res['leech'] -= res['seeds']
res['desc_link'] = result.find('comments')
if res['desc_link'] is not None:
res['desc_link'] = res['desc_link'].text
else:
res['desc_link'] = result.find('guid')
res['desc_link'] = '' if res['desc_link'] is None else res['desc_link'].text
# note: engine_url can't be changed, torrent download stops working
res['engine_url'] = self.url
prettyPrinter(self.escape_pipe(res))
def generate_xpath(self, tag):
return './{http://torznab.com/schemas/2015/feed}attr[@name="%s"]' % tag
# Safety measure until it's fixed in prettyPrinter
def escape_pipe(self, dictionary):
for key in dictionary.keys():
if isinstance(dictionary[key], str):
dictionary[key] = dictionary[key].replace('|', '%7C')
return dictionary
def get_response(self, query):
response = None
try:
# we can't use helpers.retrieve_url because of redirects
# we need the cookie processor to handle redirects
opener = urllib_request.build_opener(urllib_request.HTTPCookieProcessor(CookieJar()))
response = opener.open(query).read().decode('utf-8')
except urllib_request.HTTPError as e:
# if the page returns a magnet redirect, used in download_torrent
if e.code == 302:
response = e.url
except Exception:
pass
return response
def handle_error(self, error_msg, what):
# we need to print the search text to be displayed in qBittorrent when
# 'Torrent names only' is enabled
prettyPrinter({
'seeds': -1,
'size': -1,
'leech': -1,
'engine_url': self.url,
'link': self.url,
'desc_link': 'https://github.com/qbittorrent/search-plugins/wiki/How-to-configure-Jackett-plugin', # noqa
'name': "Jackett: %s! Right-click this row and select 'Open description page' to open help. Configuration file: '%s' Search: '%s'" % (error_msg, CONFIG_PATH, what) # noqa
})
if __name__ == "__main__":
jackett_se = jackett()
jackett_se.search("ubuntu server", 'software')Go to qBittorent, search tab, install plugin, enter path /data/nova3/engines/jackett.py
qBittorentVPN (trigus42)
version: "3.3"
services:
qbittorrentvpn:
image: trigus42/qbittorrentvpn
container_name: qbittorrentvpn
privileged: true
environment:
## Not needed when using Wireguard
# - VPN_USERNAME=myvpnusername
# - VPN_PASSWORD=myvpnpassword
- PUID=998 #optional
- PGID=100 #optional
## This environment variable doesn't exist
# - WEBUI_PORT_ENV=8991 #optional
## This neither
# - INCOMING_PORT_ENV=8999 #optional
- VPN_ENABLED=yes
- LAN_NETWORK=192.168.0.0/24 # Or 192.168.1.0/24 depending on network
- NAME_SERVERS=1.1.1.1,1.0.0.1
ports:
## As you mentioned you need to set WebUI\HostHeaderValidation=false in the qBittorrent.conf but then this is perfectly fine
- 8991:8080
## You probably don't want to be directly connectable (circumventing the VPN)
## If you want to be connectable, you have to use a VPN that allows port forwarding (you don't have to connectable for most things, except if you use private trackers)
## This didn't do much anyway cause you didn't allow the ports in the firewall using ADDITIONAL_PORTS
# - 8999:8999
# - 8999:8999/udp
volumes:
- /srv/path/Files/QBittorentVPN/config:/config
- /srv/path/Files/QBittorentVPN/downloads:/downloads
- /srv/path/Files/QBittorentVPN/skins:/skins
restart: unless-stoppedOptionnal : set WebUI\HostHeaderValidation=false in the qBittorrent.conf
Default creditentials
admin
adminadmin
If Web UI Stuck on "Unacceptable file type, only regular file is allowed", go to:
"/home/qbittorrent/.config/qBittorrent" and edit the config file: "WebUI\AlternativeUIEnabled=true" to "WebUI\AlternativeUIEnabled=false"
Alternative WebUI :
https://github.com/bill-ahmed/qbit-matUI/releases
https://github.com/WDaan/VueTorrent/releases
MIGHT NOT WORK WITH SOME BROWSERS ! If so, try a different one.
| Variable | Function | Example | Default |
|---|---|---|---|
VPN_ENABLED |
Enable VPN (yes/no)? | VPN_ENABLED=yes |
yes |
VPN_TYPE |
WireGuard or OpenVPN (wireguard/openvpn)? | VPN_TYPE=openvpn |
wireguard |
VPN_USERNAME |
If username and password provided, configures all ovpn files automatically | VPN_USERNAME=ad8f64c02a2de |
|
VPN_PASSWORD |
If username and password provided, configures all ovpn files automatically | VPN_PASSWORD=ac98df79ed7fb |
|
LAN_NETWORK |
Comma delimited local Network's with CIDR notation | LAN_NETWORK=192.168.0.0/24,10.10.0.0/24 |
|
SET_FWMARK |
Make web interface reachable for devices in networks not specified in LAN_NETWORK |
yes |
no |
ENABLE_SSL |
Let the container handle SSL (yes/no) | ENABLE_SSL=yes |
no |
NAME_SERVERS |
Comma delimited name servers | NAME_SERVERS=1.1.1.1,1.0.0.1 |
1.1.1.1,1.0.0.1 |
PUID |
UID applied to /config files and /downloads | PUID=99 |
1000 |
PGID |
GID applied to /config files and /downloads | PGID=100 |
1000 |
UMASK |
Set file mode creation mask | UMASK=002 |
002 |
HEALTH_CHECK_HOST |
This is the host or IP that the healthcheck script will use to check an active connection | HEALTH_CHECK_HOST=8.8.8.8 |
1.1.1.1 |
HEALTH_CHECK_INTERVAL |
This is the time in seconds that the container waits to see if the VPN still works | HEALTH_CHECK_INTERVAL=5 |
5 |
INSTALL_PYTHON3 |
Set this to yes to let the container install Python3 |
INSTALL_PYTHON3=yes |
no |
ADDITIONAL_PORTS |
Adding a comma delimited list of ports will allow these ports via the iptables script | ADDITIONAL_PORTS=1234,8112 |
|
DEBUG |
Print information useful for debugging in log | yes |
no |
qBittorrent
---
version: "2.1"
services:
qbittorrent:
image: lscr.io/linuxserver/qbittorrent
container_name: qbittorrent
environment:
- PUID=1000
- PGID=1000
- TZ=Europe/London
- WEBUI_PORT=8080 #8996
volumes:
- /path/to/appdata/config:/config
- /path/to/downloads:/downloads
ports:
- 6881:6881
- 6881:6881/udp
- 8080:8080 #8996:8996
restart: unless-stoppedThe webui is at <your-ip>:8080 and the default username/password is admin/adminadmin.
Change username/password via the webui in the webui section of settings.
WEBUI_PORT variable
Due to issues with CSRF and port mapping, should you require to alter the port for the webui you need to change both sides of the -p 8080 switch AND set the WEBUI_PORT variable to the new port.
For example, to set the port to 8090 you need to set -p 8090:8090 and -e WEBUI_PORT=8090
This should alleviate the "white screen" issue.
If you have no webui , check the file /config/qBittorrent/qBittorrent.conf
edit or add the following lines
WebUI\Address=*
WebUI\ServerDomains=*QBittorrentVPN (binhex)
AirVPN provider
AirVPN users will need to generate a unique OpenVPN configuration file by using the following link https://airvpn.org/generator/
- Please select Linux and then choose the country you want to connect to
- Save the ovpn file to somewhere safe
- Start the qbittorrentvpn docker to create the folder structure
- Stop qbittorrentvpn docker and copy the saved ovpn file to the /config/openvpn/ folder on the host
- Start qbittorrentvpn docker
- Check supervisor.log to make sure you are connected to the tunnel
AirVPN users will also need to create a port forward by using the following link https://airvpn.org/ports/ and clicking Add. This port will need to be specified in the qBittorrent configuration file located at /config/qbittorrent/config/qbittorrent.conf.
AirVPN example
version: "3.3"
services:
arch-qbittorrentvpn:
cap_add:
- NET_ADMIN
ports:
- 6881:6881
- 6881:6881/udp
- 8992:8992
- 8118:8118
container_name: qbittorrentvpn
volumes:
- /srv/.../Files/QBittorrentVPN/data:/data
- /srv/.../Files/QBittorrentVPN/config:/config
- /srv/.../Files/QBittorrentVPN/downloads:/downloads
- /etc/localtime:/etc/localtime:ro
environment:
- VPN_ENABLED=yes
- VPN_PROV=airvpn
- VPN_CLIENT=openvpn
- ENABLE_PRIVOXY=yes
- ENABLE_STARTUP_SCRIPTS=no
- LAN_NETWORK=192.168.1.0/24
- NAME_SERVERS=84.200.69.80,37.235.1.174,1.1.1.1,37.235.1.177,84.200.70.40,1.0.0.1 # Don't change
- VPN_INPUT_PORTS=1234
- VPN_OUTPUT_PORTS=5678
- DEBUG=true
- WEBUI_PORT=8992
- UMASK=000
- PUID=998
- PGID=100
image: binhex/arch-qbittorrentvpn
IMPORTANT
Please note 'VPN_INPUT_PORTS' is NOT to define the incoming port for the VPN, this environment variable is used to define port(s) you want to allow in to the VPN network when network binding multiple containers together, configuring this incorrectly with the VPN provider assigned incoming port COULD result in IP leakage, you have been warned!.
QDirStat
Docker container for QDirStat
This project implements a Docker container for QDirStat.
QDirStat is a graphical application to show where your disk space has gone and to help you to clean it up.
The GUI of the application is accessed through a modern web browser (no installation or configuration needed on the client side) or via any VNC client.
version: '3'
services:
qdirstat:
image: jlesage/qdirstat
ports:
- "5800:5800"
environment:
- USER_ID=998
- GROUP_ID=100
- LANG=fr_FR.UTF-8
- TZ=Europe/Paris
volumes:
- "/path/to/Files/Qdirstat/config:/config:rw"
- "/srv/:/storage:ro" #root folder to be browsed
Radarr
version: "3.7"
services:
radarr:
container_name: radarr
image: ghcr.io/hotio/radarr
ports:
- "7878:7878"
environment:
- PUID=998
- PGID=100
- UMASK=002
- TZ=Europe/Paris
volumes:
- /srv/c/Files/Radarr/config:/config
- /srv/https://hotio.dev/containers/radarr//Video/movies:/movies
- /srv/https://hotio.dev/containers/radarr//Files/QBittorrentVPN/downloads:/downloads
restart: unless-stoppedRadicale
There is no official docker image. This was the most up to date project.
Step 1: Create Configuration Directory
Create a directory to store your Radicale configuration files:
mkdir -p /srv/Files/Radicale/configStep 2: Create Configuration File
Create a file named config inside the config directory:
nano /srv/Files/Radicale/config/configPaste the following configuration into the config file:
# -*- mode: conf -*-
# vim:ft=cfg
# Config file for Radicale - A simple calendar server
#
# Place it into /etc/radicale/config (global)
# or ~/.config/radicale/config (user)
#
# The current values are the default ones
[server]
# CalDAV server hostnames separated by a comma
# IPv4 syntax: address:port
# IPv6 syntax: [address]:port
# Hostname syntax (using "getaddrinfo" to resolve to IPv4/IPv6 adress(es)): hostname:port
# For example: 0.0.0.0:9999, [::]:9999, localhost:9999
#hosts = localhost:5232
hosts = 0.0.0.0:5232
# Max parallel connections
#max_connections = 8
# Max size of request body (bytes)
#max_content_length = 100000000
# Socket timeout (seconds)
#timeout = 30
# SSL flag, enable HTTPS protocol
#ssl = False
# SSL certificate path
#certificate = /etc/ssl/radicale.cert.pem
# SSL private key
#key = /etc/ssl/radicale.key.pem
# CA certificate for validating clients. This can be used to secure
# TCP traffic between Radicale and a reverse proxy
#certificate_authority =
# SSL protocol, secure configuration: ALL -SSLv3 -TLSv1 -TLSv1.1
#protocol = (default)
# SSL ciphersuite, secure configuration: DHE:ECDHE:-NULL:-SHA (see also "man openssl-ciphers")
#ciphersuite = (default)
# script name to strip from URI if called by reverse proxy
#script_name = (default taken from HTTP_X_SCRIPT_NAME or SCRIPT_NAME)
[encoding]
# Encoding for responding requests
#request = utf-8
# Encoding for storing local collections
#stock = utf-8
[auth]
# Authentication method
# Value: none | htpasswd | remote_user | http_x_remote_user | dovecot | ldap | oauth2 | pam | denyall
#type = denyall
type = htpasswd
# Cache logins for until expiration time
#cache_logins = false
# Expiration time for caching successful logins in seconds
#cache_successful_logins_expiry = 15
## Expiration time of caching failed logins in seconds
#cache_failed_logins_expiry = 90
# URI to the LDAP server
#ldap_uri = ldap://localhost
# The base DN where the user accounts have to be searched
#ldap_base = ##BASE_DN##
# The reader DN of the LDAP server
#ldap_reader_dn = CN=ldapreader,CN=Users,##BASE_DN##
# Password of the reader DN
#ldap_secret = ldapreader-secret
# Path of the file containing password of the reader DN
#ldap_secret_file = /run/secrets/ldap_password
# the attribute to read the group memberships from in the user's LDAP entry (default: not set)
#ldap_groups_attribute = memberOf
# The filter to find the DN of the user. This filter must contain a python-style placeholder for the login
#ldap_filter = (&(objectClass=person)(uid={0}))
# the attribute holding the value to be used as username after authentication
#ldap_user_attribute = cn
# Use ssl on the ldap connection
#ldap_use_ssl = False
# The certificate verification mode. NONE, OPTIONAL, default is REQUIRED
#ldap_ssl_verify_mode = REQUIRED
# The path to the CA file in pem format which is used to certificate the server certificate
#ldap_ssl_ca_file =
# Connection type for dovecot authentication (AF_UNIX|AF_INET|AF_INET6)
# Note: credentials are transmitted in cleartext
#dovecot_connection_type = AF_UNIX
# The path to the Dovecot client authentication socket (eg. /run/dovecot/auth-client on Fedora). Radicale must have read / write access to the socket.
#dovecot_socket = /var/run/dovecot/auth-client
# Host of via network exposed dovecot socket
#dovecot_host = localhost
# Port of via network exposed dovecot socket
#dovecot_port = 12345
# IMAP server hostname
# Syntax: address | address:port | [address]:port | imap.server.tld
#imap_host = localhost
# Secure the IMAP connection
# Value: tls | starttls | none
#imap_security = tls
# OAuth2 token endpoint URL
#oauth2_token_endpoint = <URL>
# PAM service
#pam_serivce = radicale
# PAM group user should be member of
#pam_group_membership =
# Htpasswd filename
#htpasswd_filename = /etc/radicale/users
htpasswd_filename = /config/users
# Htpasswd encryption method
# Value: plain | bcrypt | md5 | sha256 | sha512 | autodetect
# bcrypt requires the installation of 'bcrypt' module.
#htpasswd_encryption = autodetect
htpasswd_encryption = bcrypt
# Enable caching of htpasswd file based on size and mtime_ns
#htpasswd_cache = False
# Incorrect authentication delay (seconds)
#delay = 1
# Message displayed in the client when a password is needed
#realm = Radicale - Password Required
# Convert username to lowercase, must be true for case-insensitive auth providers
#lc_username = False
# Strip domain name from username
#strip_domain = False
[rights]
# Rights backend
# Value: authenticated | owner_only | owner_write | from_file
#type = owner_only
# File for rights management from_file
#file = /etc/radicale/rights
# Permit delete of a collection (global)
#permit_delete_collection = True
# Permit overwrite of a collection (global)
#permit_overwrite_collection = True
[storage]
# Storage backend
# Value: multifilesystem | multifilesystem_nolock
#type = multifilesystem
# Folder for storing local collections, created if not present
#filesystem_folder = /var/lib/radicale/collections
filesystem_folder = /data/collections
# Folder for storing cache of local collections, created if not present
# Note: only used in case of use_cache_subfolder_* options are active
# Note: can be used on multi-instance setup to cache files on local node (see below)
#filesystem_cache_folder = (filesystem_folder)
# Use subfolder 'collection-cache' for 'item' cache file structure instead of inside collection folder
# Note: can be used on multi-instance setup to cache 'item' on local node
#use_cache_subfolder_for_item = False
# Use subfolder 'collection-cache' for 'history' cache file structure instead of inside collection folder
# Note: use only on single-instance setup, will break consistency with client in multi-instance setup
#use_cache_subfolder_for_history = False
# Use subfolder 'collection-cache' for 'sync-token' cache file structure instead of inside collection folder
# Note: use only on single-instance setup, will break consistency with client in multi-instance setup
#use_cache_subfolder_for_synctoken = False
# Use last modifiction time (nanoseconds) and size (bytes) for 'item' cache instead of SHA256 (improves speed)
# Note: check used filesystem mtime precision before enabling
# Note: conversion is done on access, bulk conversion can be done offline using storage verification option: radicale --verify-storage
#use_mtime_and_size_for_item_cache = False
# Use configured umask for folder creation (not applicable for OS Windows)
# Useful value: 0077 | 0027 | 0007 | 0022
#folder_umask = (system default, usual 0022)
# Delete sync token that are older (seconds)
#max_sync_token_age = 2592000
# Skip broken item instead of triggering an exception
#skip_broken_item = True
# Command that is run after changes to storage, default is emtpy
# Supported placeholders:
# %(user): logged-in user
# Command will be executed with base directory defined in filesystem_folder
# For "git" check DOCUMENTATION.md for bootstrap instructions
# Example: git add -A && (git diff --cached --quiet || git commit -m "Changes by \"%(user)s\"")
#hook =
# Create predefined user collections
#
# json format:
#
# {
# "def-addressbook": {
# "D:displayname": "Personal Address Book",
# "tag": "VADDRESSBOOK"
# },
# "def-calendar": {
# "C:supported-calendar-component-set": "VEVENT,VJOURNAL,VTODO",
# "D:displayname": "Personal Calendar",
# "tag": "VCALENDAR"
# }
# }
#
#predefined_collections =
[web]
# Web interface backend
# Value: none | internal
#type = internal
[logging]
# Threshold for the logger
# Value: debug | info | warning | error | critical
#level = info
# Don't include passwords in logs
#mask_passwords = True
# Log bad PUT request content
#bad_put_request_content = False
# Log backtrace on level=debug
#backtrace_on_debug = False
# Log request header on level=debug
#request_header_on_debug = False
# Log request content on level=debug
#request_content_on_debug = False
# Log response content on level=debug
#response_content_on_debug = False
# Log rights rule which doesn't match on level=debug
#rights_rule_doesnt_match_on_debug = False
# Log storage cache actions on level=debug
#storage_cache_actions_on_debug = False
[headers]
# Additional HTTP headers
#Access-Control-Allow-Origin = *
[hook]
# Hook types
# Value: none | rabbitmq
#type = none
#rabbitmq_endpoint =
#rabbitmq_topic =
#rabbitmq_queue_type = classic
[reporting]
# When returning a free-busy report, limit the number of returned
# occurences per event to prevent DOS attacks.
#max_freebusy_occurrence = 10000Step 3: Create Users File
Create a file named users inside the config directory:
nano /srv/Files/Radicale/config/usersEach line in the users file should contain a username and a bcrypt-hashed password, separated by a colon (:). Use a tool like Browserling's BCrypt Generator to generate the hashed passwords. The file should look like this:
john:$2a$10$l1Se4qIaRlfOnaC1pGt32uNe/Dr61r4JrZQCNnY.kTx2KgJ70GPSm
sarah:$2a$10$lKEHYHjrZ.QHpWQeB/feWe/0m4ZtckLI.cYkVOITW8/0xoLCp1/WyStep 4: Create and Run Docker Container
Create a docker-compose.yml file with the following content to define your Docker service:
services:
docker-radicale:
container_name: radicale
ports:
- 104.152.49.17:5232:5232
init: true
read_only: true
security_opt:
- no-new-privileges:true
cap_drop:
- ALL
cap_add:
- CHOWN
- SETUID
- SETGID
- KILL
deploy:
resources:
limits:
pids: 50
memory: 256M
healthcheck:
test: curl --fail http://localhost:5232 || exit 1
interval: 30s
retries: "3"
volumes:
- /srv/Files/Radicale/data:/data
- /srv/Files/Radicale/config:/config:ro
image: tomsquest/docker-radicale
networks: {}Run the following command to start the Docker container:
docker-compose up -dThis will start the Radicale server with the specified configuration.
RClone + GUI
version : '3.7'
services:
rclone_rclone:
image: rclone/rclone
container_name: rclone
restart: always
command: rcd --rc-web-gui --rc-addr :5572 --rc-user USER --rc-pass PASSWORD
ports:
- "5572:5572"
volumes:
- /srv/Files/rclone_rclone:/config/rclone
- /srv/Files/rclone_rclone:/logs
environment:
- PHP_TZ=Europe/Paris
- PUID=1000
- PGID=1000Reactive Resume
version: "3.8"
services:
postgres:
image: postgres:alpine
restart: always
ports:
- 5432:5432
volumes:
- pgdata:/var/lib/postgresql/data
healthcheck:
test: ["CMD-SHELL", "pg_isready -U postgres"]
start_period: 15s
interval: 30s
timeout: 30s
retries: 3
environment:
- POSTGRES_DB=postgres
- POSTGRES_USER=postgres
- POSTGRES_PASSWORD=postgres
server:
image: amruthpillai/reactive-resume:server-latest
restart: always
ports:
- 3100:3100
depends_on:
- postgres
environment:
- PUBLIC_URL=http://localhost:3000
- PUBLIC_SERVER_URL=http://localhost:3100
- POSTGRES_DB=postgres
- POSTGRES_USER=postgres
- POSTGRES_PASSWORD=postgres
- SECRET_KEY=change-me-to-something-secure
- POSTGRES_HOST=postgres
- POSTGRES_PORT=5432
- JWT_SECRET=change-me-to-something-secure
- JWT_EXPIRY_TIME=604800
client:
image: amruthpillai/reactive-resume:client-latest
restart: always
ports:
- 3000:3000
depends_on:
- server
environment:
- PUBLIC_URL=http://localhost:3000
- PUBLIC_SERVER_URL=http://localhost:3100
volumes:
pgdata:
Reader
A speedreading tool
version: "3.3"
services:
reader:
ports:
- 5301:8080
image: davidewiest/reader:latest
Reiverr
The easiest and the recommended way to install Reiverr is via Docker. Make sure to update the api keys and base URLs to match your setup.
Radarr & Sonarr API keys can be found under Settings > General in their respective web UIs. Jellyfin API key is located under Administration > Dashboard > Advanced > API Keys in the Jellyfin Web UI.
version: '3.8'
name: reiverr
services:
reiverr:
image: ghcr.io/aleksilassila/reiverr:latest
container_name: reiverr
ports:
- 9494:9494
volumes:
- /path/to/appdata/config:/config
restart: unless-stopped
Rpi-Monitor
sudo docker run --device=/dev/vchiq --volume=/opt/vc:/opt/vc --volume=/boot:/boot --volume=/sys:/dockerhost/sys:ro --volume=/etc:/dockerhost/etc:ro --volume=/proc:/dockerhost/proc:ro --volume=/usr/lib:/dockerhost/usr/lib:ro -p=8888:8888 --name="rpi-monitor" -d michaelmiklis/rpi-monitor:latestou
version: '3.3'
services:
rpi-monitor:
container_name: rpi-monitor
image: michaelmiklis/rpi-monitor:latest
devices:
- /dev/vchiq
volumes:
- '/opt/vc:/opt/vc'
- '/boot:/boot'
- '/sys:/dockerhost/sys:ro'
- '/etc:/dockerhost/etc:ro'
- '/proc:/dockerhost/proc:ro'
- '/usr/lib:/dockerhost/usr/lib:ro'
ports:
- '8888:8888'
restart: unless-stoppedoptions > auto refresh
Scrutiny
version: '3.5'
services:
scrutiny:
container_name: scrutiny
image: ghcr.io/analogj/scrutiny:master-omnibus
cap_add:
- SYS_RAWIO
# - SYS_ADMIN # for NVME drives
ports:
- "8384:8080" # webapp
- "8086:8086" # influxDB admin
volumes:
- /run/udev:/run/udev:ro
- /srv/path/Scrutiny/config:/opt/scrutiny/config
- /srv/path/Scrutiny/influxdb:/opt/scrutiny/influxdb
restart: unless-stopped
devices:
# - "/dev/nvme0"
- "/dev/sda"Seafile
services:
db:
image: mariadb:10.11
restart: always
container_name: seafile-mysql
environment:
- MYSQL_ROOT_PASSWORD=db_dev # Requested, set the root's password of MySQL service.
- MYSQL_LOG_CONSOLE=true
volumes:
- /opt/seafile-mysql/db:/var/lib/mysql # Requested, specifies the path to MySQL data persistent store.
networks:
- seafile-net
memcached:
image: memcached:1.6.18
restart: always
container_name: seafile-memcached
entrypoint: memcached -m 256
networks:
- seafile-net
seafile:
image: seafileltd/seafile-mc:latest
restart: always
container_name: seafile
ports:
- "80:80"
# - "443:443" # If https is enabled, cancel the comment.
volumes:
- /opt/seafile-data:/shared # Requested, specifies the path to Seafile data persistent store.
environment:
- DB_HOST=db
- DB_ROOT_PASSWD=db_dev # Requested, the value should be root's password of MySQL service.
- TIME_ZONE=Etc/UTC # Optional, default is UTC. Should be uncomment and set to your local time zone.
- SEAFILE_ADMIN_EMAIL=me@example.com # Specifies Seafile admin user, default is 'me@example.com'.
- SEAFILE_ADMIN_PASSWORD=asecret # Specifies Seafile admin password, default is 'asecret'.
- SEAFILE_SERVER_LETSENCRYPT=false # Whether to use https or not.
# - SEAFILE_SERVER_HOSTNAME=docs.seafile.com # Specifies your host name if https is enabled.
depends_on:
- db
- memcached
networks:
- seafile-net
networks:
seafile-net:If you have a CSRF verification failed error, try adding your Domain to the corresponding Django setting inside conf/seahub_settings.py:
CSRF_TRUSTED_ORIGINS = ["https://seafile.example.com"]There can be multiple domains coma separated.
Also update "SERVICE_URL" and "FILE_SERVER_ROOT".
In the example above, it is located in /opt/seafile-data/data/seafile/conf/seahub_settings.py
After setup and first login, go to System admin > settings and check or update "SERVICE_URL", "FILE_SERVER_ROOT"
SearXNG
Privacy-respecting, hackable metasearch engine
version: '3.7'
services:
redis:
container_name: searxng-redis
image: "redis:alpine"
restart: unless-stopped
command: redis-server --save "" --appendonly "no"
networks:
- searxng
tmpfs:
- /var/lib/redis
cap_drop:
- ALL
cap_add:
- SETGID
- SETUID
- DAC_OVERRIDE
searxng:
container_name: searxng
image: searxng/searxng:latest
restart: unless-stopped
depends_on:
- redis
networks:
- searxng
ports:
- "8082:8080"
volumes:
- /srv/.../Files/Searxng/:/etc/searxng:rw
environment:
- SEARXNG_BASE_URL=https://your.domain.tld/
cap_drop:
- ALL
cap_add:
- CHOWN
- SETGID
- SETUID
- DAC_OVERRIDE
logging:
driver: "json-file"
options:
max-size: "1m"
max-file: "1"
networks:
searxng:
ipam:
driver: defaultVoici un tuto concis basé sur ta méthode (clone + docker-compose dans Portainer + config minimale via WebUI) :
1. Préparer le repo
git clone https://github.com/searxng/searxng-docker.git
cd searxng-docker
-
Édite
searxng/settings.ymlpour définir tonsecret_keyet supprimer tout tag YAML non reconnu (!goou autres) :
use_default_settings: true
server:
secret_key: "ultrasecretkey"
limiter: false
image_proxy: true
redis:
url: redis://redis:6379/0
2. Préparer Docker Compose
-
Dans Portainer, créer un stack et coller ton
docker-compose.ymladapté :-
Supprimer le service
caddysi tu ne l’utilises pas. -
Binder tes volumes sur
/srv/dev-disk-by-uuid-53d16a81-1979-44a2-9f39-fd2dff88856a/Files/Searxng/:
-
services:
redis:
container_name: redis
image: docker.io/valkey/valkey:8-alpine
command: valkey-server --save 30 1 --loglevel warning
restart: unless-stopped
volumes:
- /srv/dev-disk-by-uuid-53d16a81-1979-44a2-9f39-fd2dff88856a/Files/Searxng/redis:/data
searxng:
container_name: searxng
image: docker.io/searxng/searxng:latest
restart: unless-stopped
ports:
- "127.0.0.1:8080:8080"
volumes:
- /srv/dev-disk-by-uuid-53d16a81-1979-44a2-9f39-fd2dff88856a/Files/Searxng/searxng:/etc/searxng
- /srv/dev-disk-by-uuid-53d16a81-1979-44a2-9f39-fd2dff88856a/Files/Searxng/cache:/var/cache/searxng
3. Lancer le stack
-
Dans Portainer : Deploy the stack.
-
Vérifier les logs :
docker logs -f searxng
-
Corriger les éventuels warnings YAML ou Redis si besoin.
4. Configurer via WebUI
-
Accéder à
http://localhost:8080(ou ton host). -
Dans
Settings → Engines, activer/désactiver les moteurs. -
Sauvegarder.
-
Tu peux ignorer Google si tu veux éviter les blocages 403.
5. Notes
-
Les moteurs comme Google peuvent être bloqués → mieux vaut utiliser Google API ou les désactiver.
-
Toutes les données persistent dans les volumes bindés → tu peux recréer le conteneur sans perdre la config.
-
Pour mises à jour :
docker pull searxng/searxng:latest+ relancer le stack.
Serge-chat
Serge is a chat interface crafted with llama.cpp for running GGUF models. No API keys, entirely self-hosted!
services:
serge:
image: ghcr.io/serge-chat/serge:latest
container_name: serge
restart: unless-stopped
ports:
- 8008:8008
volumes:
- /srv/Files/Serge/weights:/usr/src/app/weights
- /srv/Files/Serge/datadb:/data/db/
#uncomment if you want to use docker volumes:
#volumes:
# weights:
# datadb:Servas
Docker
Servas is available as an official Docker image.
Docker is also the preferred way to use Servas.
Docker Compose file
Initial steps:
- Create
.envfile in the directory where thedocker-compose.yamlis located. - Copy the content of the example env file into the
.envfile. - Change the
APP_URL. - Use a strong password for the
DB_PASSWORDsetting. - Start the containers with
docker-compose up -d. - Generate the application key:
docker exec -it servas php artisan key:generate --force- Restart the containers with
docker-compose restart. - Open your browser and create a user account at https://your-servas-instance/register.
APP_NAME=Servas
APP_ENV=production
APP_KEY=
APP_DEBUG=false
APP_URL=https://your-servas-instance #or http://192.168.x.x:whateverport
SERVAS_ENABLE_REGISTRATION=true
# MySQL
DB_CONNECTION=mysql
DB_HOST=db
DB_PORT=3306
DB_DATABASE=servas_db
DB_USERNAME=servas_db_user
DB_PASSWORD=password
# SQLite
#DB_CONNECTION=sqlite
#DB_DATABASE=/var/www/html/database/sqlite/servas.db
#DB_FOREIGN_KEYS=trueversion: "3"
services:
db:
image: mariadb:10.7.3
restart: unless-stopped
command: mysqld --character-set-server=utf8mb4 --collation-server=utf8mb4_bin
environment:
- MARIADB_ROOT_PASSWORD=${DB_PASSWORD}
- MARIADB_USER=${DB_USERNAME}
- MARIADB_PASSWORD=${DB_PASSWORD}
- MARIADB_DATABASE=${DB_DATABASE}
volumes:
- /srv/path/Files/servas-db-data:/var/lib/mysql
servas:
image: beromir/servas
container_name: servas
restart: unless-stopped
depends_on:
- db
ports:
- "1245:80" #whatever port:80
volumes:
- /srv/path/Files//.env:/var/www/html/.env
volumes:
servas-db-data:Shlink
version: "3"
services:
shlink:
image: shlinkio/shlink:stable
restart: unless-stopped
container_name: shlink-backend
environment:
- TZ="Europe/Paris"
- DEFAULT_DOMAIN=sub.domain.ldt #no http/https. no trailing slash
- IS_HTTPS_ENABLED=true
- GEOLITE_LICENSE_KEY=xxxxxxxxx #we'll need to get this key from maxmind.com
- DB_DRIVER=maria
- DB_USER=shlink
- DB_NAME=shlink
- DB_PASSWORD=xxxxxx #change this
- DB_HOST=database
depends_on:
- database
ports:
- 8987:8080
database:
image: mariadb:10.8
restart: unless-stopped
container_name: shlink-database
environment:
- MARIADB_ROOT_PASSWORD=xxxxxxx #change this
- MARIADB_DATABASE=shlink
- MARIADB_USER=shlink
- MARIADB_PASSWORD=xxxxxx #change this
volumes:
- /srv/path/Files/Shlink/db:/var/lib/mysql
shlink-web-client:
image: shlinkio/shlink-web-client
restart: unless-stopped
container_name: shlink-gui
depends_on:
- shlink
ports:
- 8986:8080Once everything is up and running, you're going to run the following command to generate an API key for the web interface:
docker exec shlink-backend shlink api-key:generate
Store the api-key for the next step.
Now go to: http://192.168.x.xxx:8086
You'll be asked to connect a server. Give the server a name, enter the URL of the shlink-backend as well as the API key.
*
If you use the video tutorial, please, acknowledge this.
Shotshare
An Imgur replacement
cd /homegit clone https://github.com/mdshack/shotsharecd /srv/dev-disk-by-uuid-7fe66601-5ca0-4c09-bc13-a015025fe53a/Files/sudo mkdir Shotsharecd /srv/dev-disk-by-uuid-7fe66601-5ca0-4c09-bc13-a015025fe53a/Files/Shotsharesudo mkdir shotshare\_datasudo touch .env database.sqlitecp -r /home/shotshare/storage/\* /srv/dev-disk-by-uuid-7fe66601-5ca0-4c09-bc13-a015025fe53a/Files/Shotshare/shotshare\_datachown 82:82 -R /srv/dev-disk-by-uuid-7fe66601-5ca0-4c09-bc13-a015025fe53a/Files/Shotshare/
version: "3.3"
services:
shotshare:
ports:
- 2000:80 # 2000 or whatever
environment:
- HOST=:80
- ALLOW_REGISTRATION=false
volumes:
- /srv/dev-disk-by-uuid-7fe66601-5ca0-4c09-bc13-a015025fe53a/Files/Shotshare/shotshare_data:/app/storage
- /srv/dev-disk-by-uuid-7fe66601-5ca0-4c09-bc13-a015025fe53a/Files/Shotshare/database.sqlite:/app/database/database.sqlite
- /srv/dev-disk-by-uuid-7fe66601-5ca0-4c09-bc13-a015025fe53a/Files/Shotshare/.env:/app/.env
restart: unless-stopped
container_name: shotshare
image: mdshack/shotshare:latest
networks: {}Silverbullet
silverbullet:
container_name: silverbullet
image: zefhemel/silverbullet
volumes:
- /media/docker/silverbullet/space:/space
ports:
- 3000:3000
restart: unless-stopped
environment:
- PUID=1000
- PGID=1000
- TZ=Europe/Zurich
- SB_USER=${USERNAME}:${PASSWORD}
SiYuan
version: "3.9"
services:
main:
image: b3log/siyuan
command: ['--workspace=/siyuan/workspace/', '--accessAuthCode=xxxxx'] # accessAuthCode=password
user: '1000:1000' # do not change
ports:
- 6806:6806
volumes:
- /srv/Files/Siyuan/workspace:/siyuan/workspace
restart: unless-stopped
environment:
- TZ=Europe/Paris
Slink
Yet another Imgur replacement.
slink:
image: anirdev/slink:latest
container_name: slink
environment:
# Your application hostname
- ORIGIN=https://your-domain.com
# Require user approval before they can upload images
- USER_APPROVAL_REQUIRED=true
# User password requirements
- USER_PASSWORD_MIN_LENGTH=8
- USER_PASSWORD_REQUIREMENTS=15 # bitmask of requirements
# Maximum image size allowed to be uploaded (no more than 50M)
- IMAGE_MAX_SIZE=15M
# Storage provider to use.
# Available options are local and smb
- STORAGE_PROVIDER=local
volumes:
# Persist the database
- ./slink/var/data:/app/var/data
# Persist the uploaded images
- ./slink/images:/app/slink/images
ports:
# Expose the application on port 3000
- "3000:3000"As of May 2024, you can't run it locally only because it needs a cert to login. So you need to set up a domain name with ssl cert.
Smokeping
---
version: "2.1"
services:
smokeping:
image: lscr.io/linuxserver/smokeping:latest
container_name: smokeping
environment:
- PUID=998
- PGID=100
- TZ=Europe/Paris
volumes:
- /srv/path/Files/Smokeping/config:/config
- /srv/path/Files/Smokeping/data:/data
ports:
- 800:80 #og 80:80
restart: unless-stopped
Solidinvoice
version: '3.7'
services:
solidinvoice:
image: solidinvoice/solidinvoice
ports:
- "8000:80"
volumes:
- /srv/Files/Solidinvoice/data:/var/www/html/var/data
- /srv/Files/Solidinvoice/logs:/var/www/html/var/logs
- /srv/Files/Solidinvoice/uploads:/var/www/html/web/uploads
restart: unless-stopped
depends_on:
- db
db:
image: mysql:5.7
environment:
MYSQL_ROOT_PASSWORD: example1
MYSQL_DATABASE: solidinvoice
MYSQL_USER: solidinvoice
MYSQL_PASSWORD: example2
volumes:
- /srv/Files/Solidinvoice/db_data:/var/lib/mysql
restart: unless-stoppedSonarr
version: "3.7"
services:
sonarr:
container_name: sonarr
image: ghcr.io/hotio/sonarr
ports:
- "8989:8989"
environment:
- PUID=998
- PGID=100
- UMASK=002
- TZ=Europe/Paris
volumes:
- /srv/path/Files/Sonarr/config:/config
- /srv/path/Video/tvshows:/tvshows
- /srv/path/Files/QBittorrentVPN/downloads:/downloads
restart: unless-stoppedSoulseek
version: '3.3'
services:
soulseek:
container_name: soulseek
restart: unless-stopped
volumes:
- '/srv/path/Files/Soulseek/data:/data/.SoulseekQt'
- '/srv/path/Files/Soulseek/downloads:/data/Soulseek Downloads'
- '/srv/path/Files/Soulseek/logs:/data/Soulseek Chat Logs'
- '/srv/path/Music:/data/Music'
- '/srv/path/movies/:/data/Videos'
- '/srv/path/tvshows/:/data/TVShows'
- '/srv/path/Files/Soulseek/ProfilePic:/data/Profile Pic'
environment:
- PGID=998
- PUID=100
- UMASK=0022
- TZ=Europe/Paris
ports:
- 6080:6080
image: realies/soulseek:latestDark Themes:

-----------------------------------------------------------------------


Speedtest Tracker
version: '3.3'
services:
speedtest:
container_name: speedtest-tracker
image: henrywhitaker3/speedtest-tracker:dev-arm
ports:
- 8765:80
volumes:
- /srv/path/Files/SpeedtestTracker/config:/config
environment:
- TZ=Europe/Paris
- PGID=100
- PUID=998
- OOKLA_EULA_GDPR=true
logging:
driver: "json-file"
options:
max-file: "10"
max-size: "200k"
restart: unless-stoppedIf you get an "Invalid Date" error, replace speedtest with what you have called your container, run `docker exec -it speedtest-tracker php /config/www/artisan speedtest-tracker:eula` and then try and restart the container.
Stash
# APPNICENAME=Stash
# APPDESCRIPTION=An organizer for your porn, written in Go
version: '3.4'
services:
stash:
image: stashapp/stash:latest
container_name: stash
restart: unless-stopped
## the container's port must be the same with the STASH_PORT in the environment section
ports:
- "9999:9999"
## If you intend to use stash's DLNA functionality uncomment the below network mode and comment out the above ports section
# network_mode: host
logging:
driver: "json-file"
options:
max-file: "10"
max-size: "2m"
environment:
- STASH_STASH=/data/
- STASH_GENERATED=/generated/
- STASH_METADATA=/metadata/
- STASH_CACHE=/cache/
## Adjust below to change default port (9999)
- STASH_PORT=9999
volumes:
- /etc/localtime:/etc/localtime:ro
## Adjust below paths (the left part) to your liking.
## E.g. you can change ./config:/root/.stash to ./stash:/root/.stash
## Keep configs, scrapers, and plugins here.
- /srv/path/Files/Stash/config:/root/.stash
## Point this at your collection.
- /srv/path/Files/Jellyfin/perso:/data
## This is where your stash's metadata lives
- /srv/path/Files/Stash/metadata:/metadata
## Any other cache content.
- /srv/path/Files/Stash/cache:/cache
## Where to store generated content (screenshots,previews,transcodes,sprites)
- /srv/path/Files/Stash/generated:/generatedStirling-PDF
Stirling-PDF is a robust, locally hosted web-based PDF manipulation tool using Docker. It enables you to carry out various operations on PDF files, including splitting, merging, converting, reorganizing, adding images, rotating, compressing, and more. This locally hosted web application has evolved to encompass a comprehensive set of features, addressing all your PDF requirements.
Stirling-PDF does not initiate any outbound calls for record-keeping or tracking purposes.
All files and PDFs exist either exclusively on the client side, reside in server memory only during task execution, or temporarily reside in a file solely for the execution of the task. Any file downloaded by the user will have been deleted from the server by that point.
version: '3.3'
services:
stirling-pdf:
image: stirlingtools/stirling-pdf:latest
ports:
- '7979:8080'
volumes:
- /srv/Files/Stirling-PDF/trainingData:/usr/share/tessdata #Required for extra OCR languages
- /srv/Files/Stirling-PDF/extraConfigs:/configs
- /srv/Files/Stirling-PDF/customFiles:/customFiles/
- /srv/Files/Stirling-PDF/logs:/logs
environment:
- DOCKER_ENABLE_SECURITY=false
- INSTALL_BOOK_AND_ADVANCED_HTML_OPS=false
- LANGS=fr_FR
restart: unless-stoppedSuiteCRM
Installation
# Copyright VMware, Inc.
# SPDX-License-Identifier: APACHE-2.0
version: '2'
services:
mariadb:
image: docker.io/bitnami/mariadb:11.3
environment:
# ALLOW_EMPTY_PASSWORD is recommended only for development.
- ALLOW_EMPTY_PASSWORD=yes
- MARIADB_USER=bn_suitecrm
- MARIADB_DATABASE=bitnami_suitecrm
- MARIADB_PASSWORD=changeme #change
volumes:
- '/srv/Files/SuiteCRM/db:/bitnami/mariadb'
suitecrm:
image: docker.io/bitnami/suitecrm:latest
ports:
- '4580:8080' #80:8080
- '4443:8443' #443:8443
environment:
- SUITECRM_DATABASE_HOST=mariadb
- SUITECRM_DATABASE_PORT_NUMBER=3306
- SUITECRM_DATABASE_USER=bn_suitecrm
- SUITECRM_DATABASE_NAME=bitnami_suitecrm
- SUITECRM_DATABASE_PASSWORD=changeme #change
# ALLOW_EMPTY_PASSWORD is recommended only for development.
- ALLOW_EMPTY_PASSWORD=no
- SUITECRM_USERNAME=changeme #change
- SUITECRM_PASSWORD=changeme #change
volumes:
- '/srv/Files/SuiteCRM/data:/bitnami/suitecrm'
depends_on:
- mariadb
You'll get mkdir: cannot create directory '/bitnami/mariadb/data': Permission denied
You'll have to chmod 777 -R /srv/Files/SuiteCRMthen redeploy stack
Adding Language
-
Login as English
-
Go to 'Admin / Module Loader'

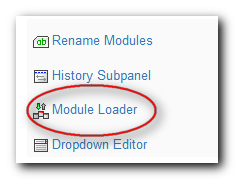
-
Upload and install the new Language pack (zip file)

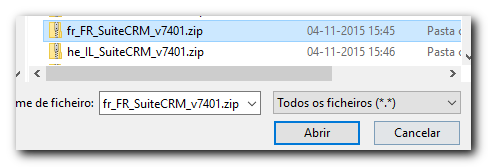
-
Click Upload to send the file to the server
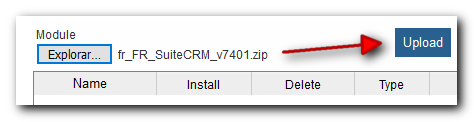
-
Click Install and confirm to apply the changes
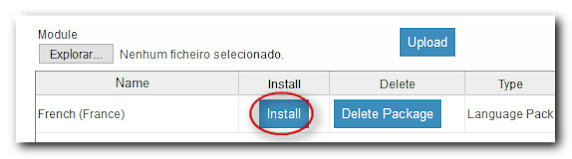
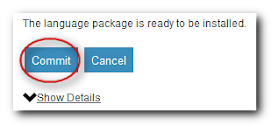
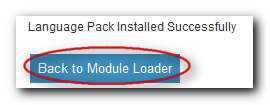
-
Go to 'Admin / Repair / Quick Repair and Rebuild
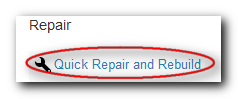
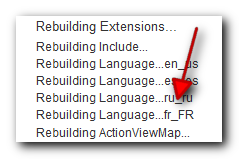
-
Logout
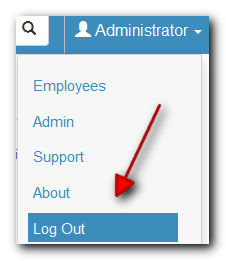
-
Login for your new language
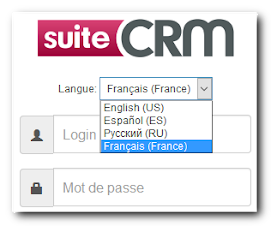
Tailscale (in a container, host wide)
version: "3.3"
services:
tailscale:
container_name: tailscale
hostname: yourhostname
network_mode: "host" # mandatory if you want it system wide
image: tailscale/tailscale:stable
volumes:
- ./Tailscale:/var/lib # State data will be stored in this directory
- /dev/net/tun:/dev/net/tun # Required for tailscale to work
cap_add: # Required for tailscale to work
- net_admin
- sys_module
command: tailscaled
privileged: true
restart: unless-stoppedThen to login, shell into the container, or enter the container's console in Portainer, and type
tailscale upYou'll get a link. Follow the link to add the machine to your Tailscale account.
Teddit
Docker-compose method (production)
Create /srv/path/Teddit/config.js
Paste this, editing the subs you want to follow:
To find this, /bin/bash into the teddit container, and cat config.js while running the stack without the -volumes variable.
const config = {
domain: process.env.DOMAIN || '127.0.0.1', // Or for example 'teddit.net'
use_reddit_oauth: process.env.USE_REDDIT_OAUTH === 'true' || false, // If false, teddit uses Reddit's public API. If true, you need to have your own Reddit app ID (enter the app ID to the "reddit_app_id" config key).
cert_dir: process.env.CERT_DIR || '', // For example '/home/teddit/letsencrypt/live/teddit.net', if you are using https. No trailing slash.
theme: process.env.THEME || 'auto', // One of: 'dark', 'sepia', 'auto', ''. Auto theme uses browser's theme detection (Dark or White theme). White theme is set by the empty the option ('').
clean_homepage: !('CLEAN_HOMEPAGE' in process.env) || process.env.CLEAN_HOMEPAGE === 'true', // Allows the clean homepage to be used (similar to invidious), instead of the usual reddit-like frontpage
flairs_enabled: !('FLAIRS_ENABLED' in process.env) || process.env.FLAIRS_ENABLED === 'true', // Enables the rendering of user and link flairs on teddit
highlight_controversial: !('HIGHLIGHT_CONTROVERSIAL' in process.env) || process.env.HIGHLIGHT_CONTROVERSIAL === 'true', // Enables controversial comments to be indicated by a typographical dagger (†)
api_enabled: !('API_ENABLED' in process.env) || process.env.API_ENABLED === 'true', // Teddit API feature. Might increase loads significantly on your instance.
api_force_https: process.env.API_FORCE_HTTPS === 'true' || false, // Force HTTPS to Teddit API permalinks (see #285).
video_enabled: !('VIDEO_ENABLED' in process.env) || process.env.VIDEO_ENABLED === 'true',
redis_enabled: !('REDIS_ENABLED' in process.env) || process.env.REDIS_ENABLED === 'true', // If disabled, does not cache Reddit API calls
redis_db: process.env.REDIS_DB,
redis_host: process.env.REDIS_HOST || '127.0.0.1',
redis_password: process.env.REDIS_PASSWORD,
redis_port: process.env.REDIS_PORT || 6379,
ssl_port: process.env.SSL_PORT || 8088,
nonssl_port: process.env.NONSSL_PORT || 8080,
listen_address: process.env.LISTEN_ADDRESS || '0.0.0.0', // '0.0.0.0' will accept connections only from IPv4 addresses. If you want to also accept IPv6 addresses use '::'.
https_enabled: process.env.HTTPS_ENABLED === 'true' || false,
redirect_http_to_https: process.env.REDIRECT_HTTP_TO_HTTPS === 'true' || false,
redirect_www: process.env.REDIRECT_WWW === 'true' || false,
use_compression: !('USE_COMPRESSION' in process.env) || process.env.USE_COMPRESSION === 'true',
use_view_cache: process.env.USE_VIEW_CACHE === 'true' || false,
use_helmet: process.env.USE_HELMET === 'true' || false, // Recommended to be true when using https
use_helmet_hsts: process.env.USE_HELMET_HSTS === 'true' || false, // Recommended to be true when using https
trust_proxy: process.env.TRUST_PROXY === 'true' || false, // Enable trust_proxy if you are using reverse proxy like nginx
trust_proxy_address: process.env.TRUST_PROXY_ADDRESS || '127.0.0.1',
http_proxy: process.env.HTTP_PROXY,
nsfw_enabled: !('NSFW_ENABLED' in process.env) || process.env.NSFW_ENABLED === 'true', // Enable NSFW (over 18) content. If false, a warning is shown to the user before opening any NSFW post. When the NFSW content is disabled, NSFW posts are hidden from subreddits and from user page feeds. Note: Users can set this to true or false from their preferences.
videos_muted: !('VIDEOS_MUTED' in process.env) || process.env.VIDEOS_MUTED === 'true', // Automatically mute all videos in posts
post_comments_sort: process.env.POST_COMMENTS_SORT || 'confidence', // "confidence" is the default sorting in Reddit. Must be one of: confidence, top, new, controversial, old, random, qa, live.
reddit_app_id: process.env.REDDIT_APP_ID || 'ABfYqdDc9qPh1w', // If "use_reddit_oauth" config key is set to true, you have to obtain your Reddit app ID. For testing purposes it's okay to use this project's default app ID. Create your Reddit app here: https://old.reddit.com/prefs/apps/. Make sure to create an "installed app" type of app.
domain_replacements: process.env.DOMAIN_REPLACEMENTS
? (JSON.parse(process.env.DOMAIN_REPLACEMENTS).map(([p, r]) => [new RegExp(p, 'gm'), r]))
: [], // Replacements for domains in outgoing links. Tuples with regular expressions to match, and replacement values. This is in addition to user-level configuration of privacyDomains.
cache_control: !('CACHE_CONTROL' in process.env) || process.env.CACHE_CONTROL === 'true', // If true, teddit will automatically remove all cached static files. By default this is set to true.
cache_control_interval: process.env.CACHE_CONTROL_INTERVAL || 24, // How often the cache directory for static files is emptied (in hours). Requires cache_control to be true. Default is every 24 hours.
show_upvoted_percentage: !('SHOW_UPVOTED_PERCENTAGE' in process.env) || process.env.SHOW_UPVOTED_PERCENTAGE === 'true',
show_upvotes: !('SHOW_UPVOTES' in process.env) || process.env.SHOW_UPVOTES === 'true', // If true, teddit will show number of upvotes in posts and points in comments.
post_media_max_heights: {
/**
* Sets the max-height value for images and videos in posts.
* Default is 'medium'.
*/
'extra-small': 300,
'small': 415,
'medium': 600,
'large': 850,
'extra-large': 1200
},
setexs: {
/**
* Redis cache expiration values (in seconds).
* When the cache expires, new content is fetched from Reddit's API (when
* the given URL is revisited).
*/
frontpage: 600,
subreddit: 600,
posts: 600,
user: 600,
searches: 600,
sidebar: 60 * 60 * 24 * 7, // 7 days
shorts: 60 * 60 * 24 * 31,
wikis: 60 * 60 * 24 * 7,
subreddits_explore: {
front: 60 * 60 * 24 * 1,
new_page: 60
},
},
rate_limiting: {
enabled: false,
initial_limit: 100, // This is the amount of page loads one IP address can make in one minute without getting limited.
limit_after_limited: 30 // When an IP is limited, this is the amount of page loads the IP can make in one minute.
},
valid_media_domains: process.env.VALID_MEDIA_DOMAINS
? JSON.parse(process.env.VALID_MEDIA_DOMAINS)
: ['preview.redd.it', 'external-preview.redd.it', 'i.redd.it', 'v.redd.it', 'a.thumbs.redditmedia.com', 'b.thumbs.redditmedia.com', 'emoji.redditmedia.com', 'styles.redditmedia.com', 'www.redditstatic.com', 'thumbs.gfycat.com', 'i.ytimg.com', 'i.imgur.com'],
valid_embed_video_domains: ['gfycat.com', 'youtube.com'],
reddit_api_error_text: `Seems like your instance is either blocked (e.g. due to API rate limiting), reddit is currently down, or your API key is expired and not renewd properly. This can also happen for other reasons.`,
/**
* Here you can configure the suggested subreddits which are visible in the
* cleaned homepage, and in the top bar.
* You should keep at least 'All', and 'Saved'.
*
* If you set your configs with an environment variables for example with
* docker-compose.yml, your suggested_subreddits config could be something
* like this (note the quotes):
* - SUGGESTED_SUBREDDITS=["Popular", "All", "Saved", "selfhosted", "linux", "datahoarder", "Monero"]
* or
* - 'SUGGESTED_SUBREDDITS=["Popular", "All", "Saved", "selfhosted", "linux", "datahoarder", "Monero"]'
*/
suggested_subreddits: process.env.SUGGESTED_SUBREDDITS
? JSON.parse(process.env.SUGGESTED_SUBREDDITS)
:
['Popular', 'All', 'Saved', 'AskReddit', 'pics', 'news',
'worldnews', 'funny', 'tifu', 'videos', 'gaming', 'aww',
'todayilearned', 'gifs', 'Art', 'explainlikeimfive',
'movies', 'Jokes', 'TwoXChromosomes',
'mildlyinteresting', 'LifeProTips', 'askscience',
'IAmA', 'dataisbeautiful', 'books', 'science',
'Showerthoughts', 'gadgets', 'Futurology',
'nottheonion', 'history', 'sports', 'OldSchoolCool',
'GetMotivated', 'DIY', 'photoshopbattles', 'nosleep',
'Music', 'space', 'food', 'UpliftingNews', 'EarthPorn',
'Documentaries', 'InternetIsBeautiful',
'WritingPrompts', 'creepy', 'philosophy',
'announcements', 'listentothis', 'blog'],
};
module.exports = config;Docker-compose:
version: "3.8"
services:
teddit:
container_name: teddit
image: teddit/teddit:latest
environment:
# - DOMAIN=teddit.net
# - USE_HELMET=true
# - USE_HELMET_HSTS=true
# - TRUST_PROXY=true
- REDIS_HOST=teddit-redis
ports:
- "8056:8080" #original 8080:8080
networks:
- teddit_net
healthcheck:
test: ["CMD", "wget" ,"--no-verbose", "--tries=1", "--spider", "http://localhost:8080/about"]
interval: 1m
timeout: 3s
depends_on:
- teddit-redis
volumes:
- /srv/path/Teddit/config.js:/teddit/config.js
teddit-redis:
container_name: teddit-redis
image: redis:6.2.5-alpine
command: redis-server
environment:
- REDIS_REPLICATION_MODE=master
networks:
- teddit_net
networks:
teddit_net:
Note: This compose is made for a true "production" setup, and is made to be used to have teddit behind a reverse proxy, if you don't want that and prefer to directly access teddit via its port:
- Change
ports: - "127.0.0.1:8080:8080"toports: - "8080:8080" - Remove
DOMAIN=teddit.net,USE_HELMET=true,USE_HELMET_HSTS=true,TRUST_PROXY=true
Thumbor
Crop, resize, transform and much more, all on-demand and AI Powered
Running with Docker
Unfortunately Thumbor doesn't have an official Docker image it looks like, but there are some trusted unofficial images, in particular, the minimalcompact/thumbor image.
version: '3'
services:
thumbor:
image: ghcr.io/minimalcompact/thumbor
environment:
# VIRTUAL_HOST is picked up by nginx-proxy. Here it's set for localhost
# but you usually need to point it to your domain, e.g. thumbor.example.com
- VIRTUAL_HOST=localhost
# THUMBOR_NUM_PROCESSES control how many processes run inside the container
# Normally this is set in connection with the number of CPU cores
# Note however that you can also use the docker-compose scale option to dynamically
# scale your thumbor instances
- THUMBOR_NUM_PROCESSES=4
# this would allow CORS from any origin (you can restrict to specific origins if you want)
- CORS_ALLOW_ORIGIN=*
# returns a webp image if browser Accept headers match
- AUTO_WEBP=True
# nginx-proxy does caching automatically, so no need to store the result storage cache
# (this greatly speeds up and saves on CPU)
- RESULT_STORAGE=thumbor.result_storages.no_storage
- RESULT_STORAGE_STORES_UNSAFE=True
- STORAGE=thumbor.storages.file_storage
restart: always
networks:
- app
nginx-proxy:
image: ghcr.io/minimalcompact/thumbor-nginx-proxy-cache
environment:
# setting the DEFAULT_HOST to the same as the VIRTUAL_HOST above.
# Makes sure it works irrespective of the host name
# Normally this won't be necessary, but it helps for testing.
- DEFAULT_HOST=localhost
# optional: control cache memory size (default 500m), cache size (default 10g) and inactive (default 300m)
# see https://nginx.org/en/docs/http/ngx_http_proxy_module.html#proxy_cache_path
- PROXY_CACHE_SIZE=10g
- PROXY_CACHE_MEMORY_SIZE=500m
- PROXY_CACHE_INACTIVE=300m
volumes:
# this is essential for nginx-proxy to detect docker containers, scaling etc
# see https://github.com/nginx-proxy/nginx-proxy
- /var/run/docker.sock:/tmp/docker.sock:ro
# mapping cache folder, to persist it independently of the container
- ./cache:/var/cache/nginx
ports:
- "80:80"
- "443:443"
restart: always
networks:
- app
volumes:
cache:
driver: local
networks:
app:
driver: bridgeTitra
version: "3.7"
services:
titra:
image: kromit/titra
container_name: titra
depends_on:
- mongodb
environment:
- ROOT_URL=http://192.168.x.x:3265
- MONGO_URL=mongodb://mongodb/titra?directConnection=true
- PORT=3265
ports:
- "3265:3265"
restart: unless-stopped
mongodb:
image: mongo:5.0
container_name: mongodb
restart: unless-stopped
volumes:
- /srv/path/Files/Titra/mongodb:/data/dbTraggo
version: "3.7"
services:
traggo:
image: traggo/server:latest
ports:
- 3030:3030
environment:
TRAGGO_DEFAULT_USER_NAME: "admin"
TRAGGO_DEFAULT_USER_PASS: "mynewpassword"
volumes:
- ./traggodata:/opt/traggo/data
Transmission-OpenVPN
---
version: "3.3"
services:
transmission-openvpn:
image: haugene/transmission-openvpn:latest
container_name: transmission-openvpn
restart: always
cap_add:
- NET_ADMIN # This runs the container with raised privileges
devices:
- /dev/net/tun # This creates a tunnel for Transmission
volumes:
- /srv/path/Files/TransmissionOpenVPN/dowloads:/data # Change this to your Torrent path
environment:
- OPENVPN_PROVIDER=vpnunlimited # Or other compatible OpenVPN provider
- OPENVPN_CONFIG=fr # Or other region that supports port forwarding. Check with your VPN provider
- OPENVPN_USERNAME=xxxxxx # VPN provider username
- OPENVPN_PASSWORD=xxxxxx # VPN provider password
- LOCAL_NETWORK=192.168.0.0/24 # If your server's IP address is 192.168.1.x, then use this. If your server's IP address is 192.168.0.x, then change to 192.168.0.0/24
- OPENVPN_OPTS=--inactive 3600 --ping 10 --ping-exit 60 # Leave this as is
- PUID=998 #Change to your PUID
- PGID=100 #Change to your PGID
ports:
- 9091:9091 #GUI Port
- 9889:8888 #Transmission Port
dns:
- 1.1.1.1 #Use whatever DNS provider you want. Google is 8.8.8.8
- 1.0.0.1 #Use whatever DNS provider you want. Google is 8.8.4.4Trilium
version: '3.3'
services:
trilium:
ports:
- '8080:8080'
volumes:
- '/srv/path/Files/Trilium/trilium-data:/home/node/trilium-data'
image: 'zadam/trilium:latest'chmod 777 /srv/path/Files/Trilium/trilium-data
Since this effectively allows reading/writing this directory to any user on the system, it's recommended to do this on only single-user systems. This directory will be used (mounted) below.
Enhance Mobile View experience:
Mobile view plugin: https://github.com/BeatLink/trilium-scripts/tree/main/Mobile%20View (Thanks dude)
Create a new note.
Create 7 sudnotes and follow instructions:
https://github.com/BeatLink/trilium-scripts/blob/main/Mobile%20View/SetNoteView.js
https://github.com/BeatLink/trilium-scripts/blob/main/Mobile%20View/SetRightPanelView.js
https://github.com/BeatLink/trilium-scripts/blob/main/Mobile%20View/SetSidebarView.js
https://github.com/BeatLink/trilium-scripts/blob/main/Mobile%20View/ToggleMobileView.js
https://github.com/BeatLink/trilium-scripts/blob/main/Mobile%20View/SetupButtons.js
https://github.com/BeatLink/trilium-scripts/blob/main/Mobile%20View/SetHTMLMeta.js
https://github.com/BeatLink/trilium-scripts/blob/main/Mobile%20View/MobileView.css
Note: "<path-to-....js>" is the "Note Id" under "Note Info"

More plugins:
Awesome Trilium: https://github.com/Nriver/awesome-trilium#-table-of-contents
Firefox extension: https://github.com/zadam/trilium-web-clipper/releases
Tube Archivist
version: '3.3'
services:
tubearchivist:
container_name: tubearchivist
restart: unless-stopped
image: bbilly1/tubearchivist
ports:
- 8624:8000 #OG : 8000:8000
volumes:
- /srv/path/to/videos:/youtube
- /srv/path/Files/TubeArchivist/cache:/cache
environment:
- ES_URL=http://archivist-es:9200 # needs protocol e.g. http and port
- REDIS_HOST=archivist-redis # don't add protocol
- HOST_UID=998
- HOST_GID=100
- TA_HOST=192.168.1.xxx # set your host name, OG: tubearchivist.local / If reverse proxy, need to put "TA_HOST=192.168.1.xxx sub.domain.ldt"
- TA_USERNAME=xxxxx # your initial TA credentials
- TA_PASSWORD=XXXXXX # your initial TA credentials
- ELASTIC_PASSWORD=XXXXXX # set password for Elasticsearch
- TZ=Europe/Paris # set your time zone
depends_on:
- archivist-es
- archivist-redis
archivist-redis:
image: redislabs/rejson # for arm64 use bbilly1/rejson
container_name: archivist-redis
restart: unless-stopped
expose:
- "6379"
volumes:
- /srv/path/Files/TubeArchivist/redis:/data
depends_on:
- archivist-es
archivist-es:
image: bbilly1/tubearchivist-es # only for amd64, or use official es 8.5.1
container_name: archivist-es
restart: unless-stopped
environment:
- "ELASTIC_PASSWORD=XXXXXX" # matching Elasticsearch password
- "ES_JAVA_OPTS=-Xms512m -Xmx512m"
- "xpack.security.enabled=true"
- "discovery.type=single-node"
- "path.repo=/usr/share/elasticsearch/data/snapshot"
ulimits:
memlock:
soft: -1
hard: -1
volumes:
- /srv/path/Files/TubeArchivist/es:/usr/share/elasticsearch/data # check for permission error when using bind mount, see readme
expose:
- "9200"
volumes:
media:
cache:
redis:
es:Tubesync
version: '3.7'
services:
tubesync:
image: ghcr.io/meeb/tubesync:latest
container_name: tubesync
restart: unless-stopped
ports:
- 4848:4848
volumes:
- /srv/path/Files/Tubesync/config:/config
- /srv/path/Files/Tubesync/downloads:/downloads
environment:
- TZ=Europe/Paris
- PUID=998
- PGID=100Twenty
mkdir -vp /srv/Files/Twenty/{data,db} \
&& touch /srv/Files/Twenty/.env \
&& touch /srv/Files/Twenty/docker-compose.yml \
&& chmod -R 777 /srv/Files/Twenty/Edit .env
TAG=latest
POSTGRES_ADMIN_PASSWORD=STRONGPASSWORD
PG_DATABASE_HOST=db:5432
SERVER_URL=http://localhost:3000 #EDIT THIS to reflect web server adress and port you want to use, eg http://192.168.1.103:9171
# Uncoment if you are serving your front on another server than the API (eg. bucket)
# FRONT_BASE_URL=http://localhost:3000
# Use openssl rand -base64 32 for each secret
ACCESS_TOKEN_SECRET=
LOGIN_TOKEN_SECRET=
REFRESH_TOKEN_SECRET=
FILE_TOKEN_SECRET=
SIGN_IN_PREFILLED=true
STORAGE_TYPE=local
# STORAGE_S3_REGION=eu-west3
# STORAGE_S3_NAME=my-bucket
# STORAGE_S3_ENDPOINT=Edit docker-compose.yml. In this example, persistent bound volumes are used
version: "3.9"
name: twenty
services:
server:
image: twentycrm/twenty:${TAG}
volumes:
- /srv/Files/Twenty/data:/app/${STORAGE_LOCAL_PATH:-.local-storage}
ports:
- "3000:3000" #has to match your .env, eg 9171:3000
environment:
PORT: 3000 #don't change
PG_DATABASE_URL: postgres://twenty:twenty@${PG_DATABASE_HOST}/default
SERVER_URL: ${SERVER_URL}
FRONT_BASE_URL: ${FRONT_BASE_URL:-$SERVER_URL}
ENABLE_DB_MIGRATIONS: "true"
SIGN_IN_PREFILLED: ${SIGN_IN_PREFILLED}
STORAGE_TYPE: ${STORAGE_TYPE}
STORAGE_S3_REGION: ${STORAGE_S3_REGION}
STORAGE_S3_NAME: ${STORAGE_S3_NAME}
STORAGE_S3_ENDPOINT: ${STORAGE_S3_ENDPOINT}
ACCESS_TOKEN_SECRET: ${ACCESS_TOKEN_SECRET}
LOGIN_TOKEN_SECRET: ${LOGIN_TOKEN_SECRET}
REFRESH_TOKEN_SECRET: ${REFRESH_TOKEN_SECRET}
FILE_TOKEN_SECRET: ${FILE_TOKEN_SECRET}
depends_on:
db:
condition: service_healthy
healthcheck:
test: curl --fail http://localhost:3000/healthz #don't change
interval: 5s
timeout: 5s
retries: 10
restart: always
db:
image: twentycrm/twenty-postgres:${TAG}
volumes:
- /srv/Files/Twenty/db:/bitnami/postgresql
environment:
POSTGRES_PASSWORD: ${POSTGRES_ADMIN_PASSWORD}
healthcheck:
test: pg_isready -U twenty -d default
interval: 5s
timeout: 5s
retries: 10
restart: always
#volumes:
# db-data:
# server-local-data:
Ubooquity
version: "2.1"
services:
ubooquity:
image: lscr.io/linuxserver/ubooquity:latest
container_name: ubooquity
environment:
- PUID=998
- PGID=100
- TZ=Europe/Paris
# - MAXMEM=1024 #If no value is set it will default to 512MB.
volumes:
- /srv/path/Files/Ubooquity/config:/config
- /srv/path/Files/Ubooquity/files:/files
- /srv/path/eBooks/:/books
- /srv/path/Comics/:/comics
- /srv/path/Magazines/:/magazines
ports:
- 2202:2202
- 2203:2203
restart: unless-stoppedAccess the admin page at http://<your-ip>:2203/ubooquity/admin and set a password.
Then you can access the webui at http://<your-ip>:2202/ubooquity/
For OPDS readers, Enable OPDS feed in advanced settings, and use:http://ip:2202/ubooquity/opds-bookshttp://ip:2202/ubooquity/opds-comics
Umami
Umami is a simple, fast, privacy-focused alternative to Google Analytics.
---
version: '3'
services:
umami:
image: ghcr.io/umami-software/umami:postgresql-latest
ports:
- "3580:3000" #og 3000:3000
environment:
DATABASE_URL: postgresql://umami:umami@db:5432/umami
DATABASE_TYPE: postgresql
APP_SECRET: RANDOMCHARACTERS #CHANGE
depends_on:
db:
condition: service_healthy
restart: always
healthcheck:
test: ["CMD-SHELL", "curl http://localhost:3000/api/heartbeat"]
interval: 5s
timeout: 5s
retries: 5
db:
image: postgres:15-alpine
environment:
POSTGRES_DB: umami
POSTGRES_USER: umami
POSTGRES_PASSWORD: umami #DON'T CHANGE
volumes:
- /srv/parth/Files/Umami/db-data:/var/lib/postgresql/data
restart: always
healthcheck:
test: ["CMD-SHELL", "pg_isready -U $${POSTGRES_USER} -d $${POSTGRES_DB}"]
interval: 5s
timeout: 5s
retries: 5
#volumes:
# umami-db-data:Default login is admin and default password is umami.
Unbound
version: "3.3"
services:
unbound:
container_name: unbound
ports:
- 5335:53/tcp
- 5335:53/udp
image: klutchell/unbound
restart: always
networks: {}Unpackerr
Github | Docker compose docs | Config generator
Unpackerr runs as a daemon on your download host or seedbox. It checks for completed downloads and extracts them so Lidarr, Radarr, Readarr, and Sonarr may import them. If your problem is rar files getting stuck in your activity queue, then this is your solution.
Not a starr app user, and just need to extract files? We do that too. This application can run standalone and extract files found in a "watch" folder. In other words, you can configure this application to watch your download folder, and it will happily extract everything you download.
services:
unpackerr:
image: golift/unpackerr
container_name: unpackerr
volumes:
- /srv/path/Files/QBittorrentVPN/downloads:/downloads
restart: always
user: "998:100"
environment:
- TZ=Europe/Paris
- UN_DEBUG=true
- UN_LOG_FILE=/downloads/unpackerr.log # don't change. Or see notes about log files bellow
- UN_INTERVAL=10m
- UN_START_DELAY=1m
- UN_RETRY_DELAY=5m
- UN_MAX_RETRIES=3
- UN_PARALLEL=1
# Sonarr Config
- UN_SONARR_0_URL=http://
- UN_SONARR_0_API_KEY=
- UN_SONARR_0_PROTOCOLS=torrent
# Radarr Config
- UN_RADARR_0_URL=http://
- UN_RADARR_0_API_KEY
- UN_RADARR_0_PROTOCOLS=torrentLog File
Set a log file. You'll need it to figure out what Unpackerr did. Put it in your download location. Example:
environment:
- UN_LOG_FILE=/downloads/unpackerr.logReplace /downloads/unpackerr.log with /data/unpackerr.log if you mounted /data in volumes:. Or whatever download path you mounted; just put it there for ease of finding it.
For example: you can mount /logs in volumes like this:
First, create /srv/path/Unpackerr, /srv/path/Unpackerr/Logs and /srv/path/Unpackerr/Logs/unpackerr.log
Thensudo chown -R 998:100 /srv/path/Filessudo chmod -R 755 /srv/path/Files
volumes:
- /srv/path/Files/QBittorrentVPN/downloads:/downloads
- /srv/path/Files/Unpackerr/Logs:/logs And set
- UN_LOG_FILE=/logs/unpackerr.logUpSnap
version: "3"
services:
upsnap:
container_name: upsnap
image: ghcr.io/seriousm4x/upsnap:4
network_mode: host
restart: unless-stopped
volumes:
- /srv/path/Files/Upsnap/data:/app/pb_data
environment:
- TZ=Europe/Paris # Set container timezone for cron schedules
- UPSNAP_INTERVAL=@every 10s # Sets the interval in which the devices are pinged
- UPSNAP_SCAN_RANGE=192.168.1.0/24 # Scan range is used for device discovery on local network
Uptime-Kuma
version: '3.3'
services:
uptime-kuma:
restart: always
ports:
- '3001:3001'
volumes:
- '/srv/path/Uptime-Kuma:/app/data'
container_name: uptime-kuma
image: 'louislam/uptime-kuma:1'
UrBackup
version: '3.3'
services:
urbackup:
image: uroni/urbackup-server:latest
container_name: urbackup
restart: unless-stopped
environment:
- PUID=1000 # Enter the UID of the user who should own the files here
- PGID=100 # Enter the GID of the user who should own the files here
- TZ=Europe/Berlin # Enter your timezone
volumes:
- /srv/path/Files/UrBackup/db:/var/urbackup
- /srv/path/Files/UrBackup/backups:/backups
# Uncomment the next line if you want to bind-mount the www-folder
#- /path/to/wwwfolder:/usr/share/urbackup
network_mode: "host"
# Activate the following two lines for BTRFS support
#cap_add:
# - SYS_ADMIN Viewtube
version: "3"
services:
viewtube:
container_name: viewtube
restart: unless-stopped
image: mauriceo/viewtube:0.9
depends_on:
- viewtube-mongodb
- viewtube-redis
networks:
- viewtube
volumes:
- /etc/localtime:/etc/localtime:ro
- ./data:/data
environment:
- VIEWTUBE_URL=https://viewtube.io/
- VIEWTUBE_DATABASE_HOST=viewtube-mongodb
- VIEWTUBE_REDIS_HOST=viewtube-redis
- VIEWTUBE_DATA_DIRECTORY=/data
ports:
- 8066:8066
viewtube-mongodb:
container_name: viewtube-mongodb
image: mongo:4.4
networks:
- viewtube
restart: unless-stopped
volumes:
- ./data/db:/data/db
viewtube-redis:
container_name: viewtube-redis
image: redis:6
networks:
- viewtube
restart: unless-stopped
volumes:
- ./data/redis:/data
networks:
viewtube:Vikunja (with mail notifications)
version: '3.3'
services:
db:
image: mariadb:10
command: --character-set-server=utf8mb4 --collation-server=utf8mb4_unicode_ci
environment:
MYSQL_ROOT_PASSWORD: xxxxxxx
MYSQL_USER: vikunja
MYSQL_PASSWORD: xxxxxxx
MYSQL_DATABASE: vikunja
volumes:
- ./Vikunja/Vikunjadb:/var/lib/mysql
restart: unless-stopped
vikunja:
image: vikunja/vikunja
environment:
VIKUNJA_DATABASE_HOST: db
VIKUNJA_DATABASE_PASSWORD: xxxxxxx
VIKUNJA_DATABASE_TYPE: mysql
VIKUNJA_DATABASE_USER: vikunja
VIKUNJA_DATABASE_DATABASE: vikunja
VIKUNJA_SERVICE_PUBLICURL: https://your.vikunja.com
VIKUNJA_SERVICE_ENABLEEMAILREMINDERS: 1
VIKUNJA_MAILER_ENABLED: 1
VIKUNJA_MAILER_FORCESSL: 1
VIKUNJA_MAILER_HOST: ssl0.ovh.net
VIKUNJA_MAILER_PORT: 465 #587 or 465 or 25
VIKUNJA_MAILER_USERNAME:
VIKUNJA_MAILER_FROMEMAIL:
VIKUNJA_MAILER_PASSWORD: xxxxxxx
VIKUNJA_SERVICE_TIMEZONE: Europe/Paris
VIKUNJA_SERVICE_ENABLEREGISTRATION: false
ports:
- 3456:3456
volumes:
- ./Vikunja/files:/app/vikunja/files
depends_on:
- db
restart: unless-stopped- Write permission to ./fileschown 1000:1000 path/to/files -R
- Vikunja CLI : https://vikunja.io/docs/cli/#dump
Enter api exec console in portainer /bin/ash and type ./vikunja <command>
Example CLI :
User list:./vikunja user list
Reset password./vikunja user reset-password 1 --direct --password wowsuperpassword
(where 1 is user ID and wowsuperpassword is the new password)
Create user:./vikunja user create -u name -p password -e email@address.tld
Wallos
Subscription tracker
version: '3.0'
services:
wallos:
container_name: wallos
image: bellamy/wallos:latest
ports:
- "8282:80/tcp"
environment:
TZ: 'America/Toronto'
# Volumes store your data between container upgrades
volumes:
- './db:/var/www/html/db'
- './logos:/var/www/html/images/uploads/logos'
restart: unless-stopped
Watch your LAN
version: '3.3'
services:
watchyourlan:
container_name: watchyourlan
environment:
- IFACE=enp1s0 eth0
- TZ=Europe/Paris
network_mode: host
volumes:
- '/srv/path/Files/Watchyourlan:/data'
image: aceberg/watchyourlan
Watchtower
version: "3.3"
services:
watchtower:
image: containrrr/watchtower
container_name: watchtower
volumes:
- /var/run/docker.sock:/var/run/docker.sock
environment:
- TZ=Europe/Paris
- WATCHTOWER_MONITOR_ONLY=true
- WATCHTOWER_SCHEDULE=0 0 10 ? * SAT
- WATCHTOWER_CLEANUP=true
- WATCHTOWER_NOTIFICATIONS_HOSTNAME=yourhostname
# - WATCHTOWER_NOTIFICATIONS=email
# - WATCHTOWER_NOTIFICATION_EMAIL_FROM=contact@s.com
# - WATCHTOWER_NOTIFICATION_EMAIL_TO=t@free.fr
# - WATCHTOWER_NOTIFICATION_EMAIL_SERVER=ssl0.ovh.net
# - WATCHTOWER_NOTIFICATION_EMAIL_SERVER_PASSWORD=xxxxxxxx
# - WATCHTOWER_NOTIFICATION_EMAIL_SUBJECTTAG=RPi4
# - WATCHTOWER_NOTIFICATION_EMAIL_SERVER_USER=contact@s.com
# - WATCHTOWER_NOTIFICATION_EMAIL_SERVER_PORT=587
- WATCHTOWER_NOTIFICATIONS=shoutrrr
- WATCHTOWER_NOTIFICATION_URL=discord://web_hooooooooook/
restart: unless-stoppedCheck once :
docker run --rm -v /var/run/docker.sock:/var/run/docker.sock containrrr/watchtower --run-onceDiscord notif: https://containrrr.dev/shoutrrr/v0.5/services/discord/
Image name problem : https://github.com/containrrr/watchtower/issues/1050#issuecomment-968309913
Websurfx
Created the folder for Websurfx. In this example: /srv/Files/Websurfx/, in which you need to create two new empty files named allowlist.txt and blocklist.txt. Finally, create a new config file config.lua with this configuration:
config.lua
-- ### General ###
logging = true -- an option to enable or disable logs.
debug = false -- an option to enable or disable debug mode.
threads = 8 -- the amount of threads that the app will use to run (the value should be greater than 0).
-- ### Server ###
port = "8080" -- port on which server should be launched
binding_ip = "0.0.0.0" --ip address of the machine running websurfx. DO NOT CHANGE
production_use = false -- whether to use production mode or not (in other words this option should be used if it is to be used to host it on the server to provide a service to a large number of users (more than one))
-- if production_use is set to true
-- There will be a random delay before sending the request to the search engines, this is to prevent DDoSing the upstream search engines from a large number of simultaneous requests.
request_timeout = 30 -- timeout for the search requests sent to the upstream search engines to be fetched (value in seconds).
rate_limiter = {
number_of_requests = 20, -- The number of request that are allowed within a provided time limit.
time_limit = 3, -- The time limit in which the quantity of requests that should be accepted.
}
-- ### Search ###
-- Filter results based on different levels. The levels provided are:
-- {{
-- 0 - None
-- 1 - Low
-- 2 - Moderate
-- 3 - High
-- 4 - Aggressive
-- }}
safe_search = 2
-- ### Website ###
-- The different colorschemes provided are:
-- {{
-- catppuccin-mocha
-- dark-chocolate
-- dracula
-- gruvbox-dark
-- monokai
-- nord
-- oceanic-next
-- one-dark
-- solarized-dark
-- solarized-light
-- tokyo-night
-- tomorrow-night
-- }}
colorscheme = "catppuccin-mocha" -- the colorscheme name which should be used for the website theme
theme = "simple" -- the theme name which should be used for the website
-- ### Caching ###
redis_url = "redis://redis:6379" -- redis connection url address on which the client should connect on.
-- ### Search Engines ###
upstream_search_engines = {
DuckDuckGo = true,
Searx = false,
} -- select the upstream search engines from which the results should be fetched.Then:
---
version: '3.9'
services:
app:
image: neonmmd/websurfx:redis
ports:
- 8080:8080
depends_on:
- redis
links:
- redis
volumes:
- /srv/Files/Websurfx:/etc/xdg/websurfx/
redis:
image: redis:latest
WeddingShare
services:
wedding-share:
container_name: WeddingShare
image: cirx08/wedding_share:latest
ports:
- '2145:5000/tcp'
environment:
TITLE: 'WeddingShare'
ACCOUNT_OWNER_USERNAME: 'admin'
ACCOUNT_OWNER_PASSWORD: 'ComplicatedPassword'
ACCOUNT_OWNER_LOG_PASSWORD : 'false'
LANGUAGES_DEFAULT: 'fr-FR'
GALLERY_DOWNLOAD: 'false'
DATABASE_TYPE: 'sqlite'
ENCRYPTION_KEY: 'LongComplicatedKey'
ENCRYPTION_SALT: 'AnotherLongComplicatedKey'
volumes:
- /srv/dev-disk-by-uuid-7fe66601-5ca0-4c09-bc13-a015025fe53a/Files/WeddingShare/config:/app/config
- /srv/dev-disk-by-uuid-7fe66601-5ca0-4c09-bc13-a015025fe53a/Files/WeddingShare/thumbnails:/app/wwwroot/thumbnails
- /srv/dev-disk-by-uuid-7fe66601-5ca0-4c09-bc13-a015025fe53a/Files/WeddingShare/uploads:/app/wwwroot/uploads
- /srv/dev-disk-by-uuid-7fe66601-5ca0-4c09-bc13-a015025fe53a/Files/WeddingShare/custom-resources:/app/wwwroot/custom_resources
network_mode: bridge
hostname: wedding-share
restart: alwaysWhat's up Docker
version: '3'
services:
whatsupdocker:
image: ghcr.io/fmartinou/whats-up-docker
container_name: wud
volumes:
- /var/run/docker.sock:/var/run/docker.sock
ports:
- 3000:3000Whoogle
---
version: "3.3"
services:
whoogle:
image: benbusby/whoogle-search:latest
container_name: whoogle
ports:
- 5000:5000
restart: unless-stoppedWireguard Easy
version: "3.3"
services:
wg-easy:
environment:
# ⚠️ Required:
# Change this to your host's public address
- WG_HOST=public IP
# Optional:
- PASSWORD_HASH= #see instructions bellow
- WG_PORT=51820
# - WG_DEFAULT_ADDRESS=10.8.0.x
- WG_DEFAULT_DNS=1.1.1.1, 1.0.0.1
# - WG_ALLOWED_IPS=192.168.15.0/24, 10.0.1.0/24
image: ghcr.io/wg-easy/wg-easy
container_name: wg-easy
volumes:
- /srv/path/Files/WG-Easy:/etc/wireguard
ports:
- "51820:51820/udp"
- "51821:51821/tcp"
restart: unless-stopped
cap_add:
- NET_ADMIN
- SYS_MODULE
sysctls:
- net.ipv4.ip_forward=1
- net.ipv4.conf.all.src_valid_mark=1To generate password hash:
docker run -it ghcr.io/wg-easy/wg-easy wgpw YOUR_PASSWORD
Open port 51820 on router
Wordpress
version: '3.3'
services:
wordpress:
image: wordpress
restart: always
ports:
- 8282:80 # or whatever:80
environment:
WORDPRESS_DB_HOST: db
WORDPRESS_DB_USER: user
WORDPRESS_DB_PASSWORD: password
WORDPRESS_DB_NAME: db
volumes:
- /srv/path/to/Wordpress/wp:/var/www/html
links:
- db:db
db:
image: mysql:5.7
restart: always
environment:
MYSQL_DATABASE: db
MYSQL_USER: user
MYSQL_PASSWORD: password
MYSQL_RANDOM_ROOT_PASSWORD: '1'
volumes:
- /srv/path/to/Wordpress/db:/var/lib/mysql
volumes:
wordpress:
db:How to Increase Media File Maximum Upload Size in WordPress
Create or Edit php.ini File
This is a default file used to configure any application which runs on PHP. This file contains parameters required for file timeout, upload size, and resource limits. Access your WordPress root directory using SSH or FTP and look for a php.ini file. In some cases, this file is not visible; the other option would be to create a new file instead.
Open any text editor and create a new file on your desktop. Copy the following code and save it as php.ini.
upload_max_filesize = 64M
post_max_size = 128M
memory_limit = 264M
max_execution_time = 180
Workout-tracker
version: "3.8"
services:
workout-tracker:
image: ghcr.io/jovandeginste/workout-tracker:master
restart: unless-stopped
ports:
# Host Port:Container Port
- 8080:8080
volumes:
- ./data:/data
environment:
- WT_JWT_ENCRYPTION_KEY=my-secret-key #32A default admin user is created with password admin
XBackbone
---
version: "3.3"
services:
xbackbone:
image: lscr.io/linuxserver/xbackbone
container_name: xbackbone
environment:
- PUID=998
- PGID=100
- TZ=Europe/Paris
volumes:
- /srv/path/Files/XBackbone:/config
ports:
- 99:80
- 4434:443
restart: unless-stopped"If you want to change the PHP max upload size you can override the php.ini file by adding options in /config/php/php-local.ini"
Add lines:
upload_max_filesize = 100G
post_max_size = 100G
For reverse proxying, remember to change the base_url in /config/www/xbackbone/config.php to your domain if you initially set up the application with a local url.
'base_url' => 'https://my.domain.com',
Xyphyn/photon for Lemmy
version: '3.3'
services:
xyphyn:
ports:
- '8080:3000'
environment:
- PUBLIC_INSTANCE_URL=lemmy.ml
image: 'ghcr.io/xyphyn/photon:latest'
Yacy
Won't work as a stack, need to run in CLi.
Don't change --v
Check the image you want to use.
docker run -d --name yacy_search_server -p 8090:8090 -p 8443:8443 -v yacy_search_server_data:/opt/yacy_search_server/DATA --restart unless-stopped --log-opt max-size=200m --log-opt max-file=2 yacy/yacy_search_server:armv7-latestCréer un mot de passe admin
Méthode A — (recommandée) Exécuter le script passwd.sh dans le conteneur
-
Ouvre un shell dans le conteneur :
docker exec -it yacy_search_server bash
(si bash n’existe pas, remplacer bash par sh)
-
Lance le script pour définir le mot de passe (remplace
NouveauMotDePassepar ton mot de passe) :
cd /opt/yacy_search_server
./bin/passwd.sh NouveauMotDePasse
-
Sortir et redémarrer le conteneur :
exit
docker restart yacy_search_server
-
Teste l’accès : ouvre
http://localhost:7090/ConfigAccounts_p.htmlet connecte-toi avec :
-
Nom d’utilisateur :
admin -
Mot de passe :
NouveauMotDePasse
Méthode B — Exécuter passwd.sh depuis l’hôte sans entrer dans le conteneur
(Utile si tu préfères une commande unique)
docker run --rm -v yacy_search_server_data:/opt/yacy_search_server/DATA yacy/yacy_search_server:aarch64-latest /opt/yacy_search_server/bin/passwd.sh NouveauMotDePasse
Si le volume a des problèmes de permissions et que le conteneur ne peut pas écrire dans
/opt/.../DATA, ajoute--user 0pour exécuter en root (temporaire) :
docker run --rm --user 0 -v yacy_search_server_data:/opt/yacy_search_server/DATA yacy/yacy_search_server:aarch64-latest /opt/yacy_search_server/bin/passwd.sh NouveauMotDePasse
Après ça, redémarre ton conteneur habituel :
docker restart yacy_search_server
Méthode C — Vérifier / éditer directement le fichier de config (avancé)
Le script écrit dans DATA/SETTINGS/yacy.conf une valeur adminAccountBase64MD5. Si tu veux vérifier ce qui est actuellement configuré :
-
Voir le contenu du fichier (depuis l’hôte) :
docker exec -it yacy_search_server cat /opt/yacy_search_server/DATA/SETTINGS/yacy.conf | grep adminAccountBase64MD5 -n
-
Si tu veux supprimer l’entrée (pour forcer YaCy à se retrouver sans admin — risqué : tu seras en mode non-protégé), fais une sauvegarde puis édite/supprime la ligne. Par exemple (dans le conteneur) :
docker exec -it yacy_search_server bash
cd /opt/yacy_search_server/DATA/SETTINGS
cp yacy.conf yacy.conf.bak
# puis édite avec vi/nano si présent, ou utilise sed pour supprimer la ligne (attention)
Je ne recommande pas d’éditer manuellement si tu n’es pas à l’aise — préfère passwd.sh.
Si passwd.sh échoue à cause de permissions
Si tu obtiens des erreurs Permission denied lors de l’exécution du script, fais d’abord une vérification rapide des permissions du volume :
# lister quelques fichiers avec UID/GID numériques
docker run --rm -v yacy_search_server_data:/data alpine ls -ln /data/DATA/SETTINGS || docker run --rm -v yacy_search_server_data:/data alpine ls -ln /data/SETTINGS
Si on voit des fichiers appartenant à un UID différent et que YaCy ne peut pas écrire, corrige la propriété :
docker run --rm -v yacy_search_server_data:/data busybox chown -R 1000:1000 /data
(puis relance la Méthode B ou redémarre ton conteneur)
Vérifications / logs après modification
Après avoir défini le mot de passe et redémarré :
docker restart yacy_search_server
docker logs -f yacy_search_server
Cherche dans les logs des messages de démarrage réussis et l’absence de 401 pour la page d’administration.
Récapitulatif rapide — commandes à copier-coller (méthode B, la plus simple)
# 1) définir le mot de passe depuis l'hôte (variante normale)
docker run --rm -v yacy_search_server_data:/opt/yacy_search_server/DATA yacy/yacy_search_server:aarch64-latest /opt/yacy_search_server/bin/passwd.sh MonNouveauMdP
# si échec pour permissions, réessayez en root
docker run --rm --user 0 -v yacy_search_server_data:/opt/yacy_search_server/DATA yacy/yacy_search_server:aarch64-latest /opt/yacy_search_server/bin/passwd.sh MonNouveauMdP
# 2) redémarrer votre container principal
docker restart yacy_search_server
# 3) suivre les logs pour vérifier
docker logs -f yacy_search_server
Yourls
version: '3.1'
services:
yourls:
image: yourls
restart: unless-stopped
ports:
- 8080:80
environment:
YOURLS_DB_PASS: example
YOURLS_SITE: https://example.com
YOURLS_USER: example_username
YOURLS_PASS: example_password
volumes:
- /srv/path/Files/Yourls/:/var/www/html/user
- /srv/path/Files/Yourls/plugins:/var/www/html/user/plugins
mysql:
image: mysql
restart: always
environment:
MYSQL_ROOT_PASSWORD: example
MYSQL_DATABASE: yourlsCool stuff around yourls : https://github.com/YOURLS/awesome-yourls
Youtransfer
version: '3.3'
services:
youtransfer:
volumes:
- '/srv/path/Files/Youtransfer/uploads:/opt/youtransfer/uploads'
- '/srv/path/Files/Youtransfer/config:/opt/youtransfer/config'
ports:
- '89:5000'
image: 'remie/youtransfer:stable'
restart: unless-stoppedYouTubeDL-Material
version: "2"
services:
ytdl_material:
environment:
ALLOW_CONFIG_MUTATIONS: 'true'
ytdl_mongodb_connection_string: 'mongodb://ytdl-mongo-db:27017'
ytdl_use_local_db: 'false'
write_ytdl_config: 'true'
restart: unless-stopped
depends_on:
- ytdl-mongo-db
volumes:
- /srv/path/Files/YTDL/appdata:/app/appdata
- /srv/path/Files/YTDL/audio:/app/audio
- /srv/path/Files/YTDL/video:/app/video
- /srv/path/Files/YTDL/subscriptions:/app/subscriptions
- /srv/path/Files/YTDL/users:/app/users
ports:
- "8998:17442"
image: tzahi12345/youtubedl-material:latest
ytdl-mongo-db:
image: mongo
ports:
- "27017:27017"
logging:
driver: "none"
container_name: ytdl-mongo-db
restart: unless-stopped
volumes:
- /srv/path/Files/YTDL/db/:/data/dbUpgrade yt-dlp to nightly
- Open your container's shell by running
docker exec -it <container id> /bin/sh - A slash should appear in your console. Now cd into where
yt-dlpis stored:cd /app/node_modules/youtube-dl/bin - Run
./youtube-dl --update-to nightly. The executable is calledyoutube-dl, but it's still yt-dlp. We do this for legacy reasons - You can confirm it's up to date by running
./youtube-dl --version
YTPTube
YTPTube is a web-based GUI for yt-dlp, designed to make downloading videos from video platforms easier and user-friendly. It supports downloading playlists, channels, live streams and includes features like scheduling downloads, sending notifications, and built-in video player.
mkdir -p /srv/dev-disk-by-uuid-7fe66601-5ca0-4c09-bc13-a015025fe53a/Files/YTPTube/{config,downloads}
chown -R 998:100 /srv/dev-disk-by-uuid-7fe66601-5ca0-4c09-bc13-a015025fe53a/Files/YTPTube/
chmod -R 775 /srv/dev-disk-by-uuid-7fe66601-5ca0-4c09-bc13-a015025fe53a/Files/YTPTube/services:
ytptube:
user: "${UID:-1000}:${UID:-1000}" # change this to your user id and group id, for example: "1000:1000"
image: ghcr.io/arabcoders/ytptube:latest
container_name: ytptube
restart: unless-stopped
ports:
- "8081:8081"
environment:
- YTP_REMOVE_FILES=true
volumes:
- ./config:/config:rw
- ./downloads:/downloads:rw
tmpfs:
- /tmpHow to fix “No video formats found” on YouTube (yt-dlp / ytptube)
Variables:
example:
environment:
- YTP_REMOVE_FILES=trueWhisper-WebUI
Building the image yourself
-
Install and launch Docker-Desktop.
-
Git clone the repository
git clone https://github.com/jhj0517/Whisper-WebUI.git- Build the image ( Image is about 7GB~ )
docker compose build - Run the container
docker compose up -d- Connect to the WebUI with your browser at
http://localhost:7860
If needed, update the docker-compose.yaml to match your environment.
How to Update Whisper-WebUI (Self-Hosted with Docker)
1. Navigate to the Whisper-WebUI Directory
Open a terminal and go to the directory where you cloned the repository:
cd /srv/dev-disk-by-uuid-76493abc-7cd4-4b00-927c-8b2bef740dd4/Files/Whisper-WebUI/(This is where the .git/ folder is located.)
2. Stop the Running Container
Stop the current container to avoid conflicts:
docker compose down3. Update the Repository
Pull the latest changes from the Git repository:
git pull origin main(Replace main with the correct branch if needed.)
4. Rebuild the Docker Image
Rebuild the image to include the updates:
docker compose build
(This may take a while and use ~7GB of space.)
5. Restart the Container
Start the container again with the updated image:
docker compose up -d6. Verify the Update
Open your browser and go to: http://localhost:7860
Key Notes
docker-compose.yaml: If you customized this file (e.g., for bind mounts or ports), your changes will persist. Double-check compatibility with the new version.- Persistent Data: If you use bind mounts for models or audio files, they won’t be affected by the update.
- Troubleshooting: If the build fails, check the logs for dependency or version conflicts.